Topic Updated: April 01, 2025
Users Grid Features
The Users grid consists of all features needed for locating and working with both agent and non-agent users. These features include:
Search filters and fields
Selecting users
Grid menu
Task icons
Using Filters on the Users Grid
Filters allow for the display of only specific users based on the selected filter options. The Users grid contains the following filter options:
User Type – Used to select the type of users to display on the users list. This filter allows for the selection of the following types of users:
- All – Displays all available agent and non-agent users. (This is the default filter option.)
- Agent – Displays only agent users.
- Supervisor – Displays only supervisor users.
- Non Contact Center – Displays only users that are not associated with the contact center.

Status – Displays users based on the selected active status. The following active status filters are available:
- All – Displays all users, both active and inactive. (This is the default filter option.)
- Active – Displays only active users.
- Inactive – Displays only inactive users.

If your organization uses two or more platforms within Webex CCE Administration Portal, a Platforms selection drop-down menu displays. The All option is selected by default and will display users associated with all available platforms. Select a specific platform if you need to view only users associated with that platform.

Using Search Fields on the Users Grid
Enter text into any column's search field to find a specific result within that column. Narrow search results even further by entering text into the search field of other columns. For additional details about using search, see Grid Column Headers.

Changing Column Sorting on the Users Grid
Change the sorting of grid columns by either ascending, descending, or no sorting. To learn more about using column sorting, see Grid Column Headers.

Selecting Users
By selecting specific users, you gain the ability to export their data (refer to the Export and View Grid Data section for more details) or simultaneously apply settings or modifications to multiple users. To learn more about selecting or deselecting users, see Select / Deselect Grid Data andGrid Column Headers.
NOTE:
If enabled for your organization, the following features are available on the Users grid menu when a user or users are selected:
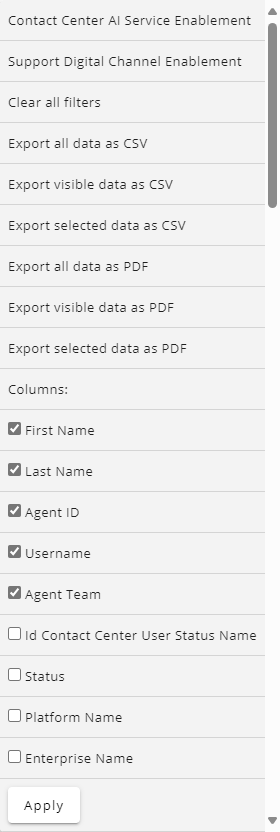
- Contact Center AI Service Enablement
- Support Digital Channel Enablement
Using the Grid Menu for Users
The grid menu provides the following additional controls and features below:
- Add New Agent – Opens the Create Agent dialog allowing you to create a new agent. (See Create a New Agent for more information.)
- Add New Supervisor – Opens the Create Supervisor dialog allowing you to create a new supervisor. (See Create a New Supervisor for more information.)
- Add New Non-Contact User – Opens the Create Non-Contact User dialog allowing you to create a new non-contact center user. (See Create New Non-Contact Center Userfor more information.)
- Contact Center AI Service Enablement – Opens the Contact Center AI Services Enablement dialog allowing you to enable or disable AI services for selected agents and supervisors.
- Support Digital Channel Enablement – Opens the Support Digital Channel Enablement dialog allowing you to enable or disable Support Digital Channel for the selected agent and supervisors.
The Contact Center AI Service Enablement and Support Digital Channel Enablement options do not display unless you have agents and/or supervisors selected on the Users grid.
- Clear all sorting – Clears all sorting used on the Users grid.
- Clear all filters – Clears all filters used on the Users grid.
- Export Data – Export Users grid data in CSV and PDF file formats.
For additional information about exporting grid data, see Export and View Grid Data
- Columns - All options below this section allows for showing or hiding the specified column on the Users grid.
- First Name – Show or hide the First Name column.
- Last Name – Show or hide the Last Name column.
- Agent ID – Show or hide the Agent ID column.
- Username – Show or hide the Username column.
- Agent Team – Show or hide the Agent Team column.
- Id Contact Center User Status Name – Show or hide the Id Contact Center User Status column.
- Status – Show or hide the Status column.
- Platform Name – Displays the platform associated with the users.
- Enterprise Name – Displays the Enterprise Name assigned to the users.
- Buttons – Show or hide the column containing the task icons.
For additional information about showing or hiding columns, seeExport and View Grid Data.
Using the Task Icons on the Users Grid
Task icons perform a variety of actions for each user listed on the Users grid. See the task icon descriptions below:
 Edit User – Opens the Edit User dialog box for editing user information and details. (See Edit Agent or Non-Agent User Information for more information.)
 +/- Skills – Opens the Agent to Skills page for assigning or removing skills for an agent. (See Assign or Unassign Skills for an Agent from the Users Grid for more information.)
 Reset Password – Opens the Reset Password dialog box for resetting the user's password. This task icons does not display if Federation is enabled. (See Reset User Password for more information.)
 Clone User – Opens the Clone User dialog box for creating a new user. (See Clone a New Non-Agent User or Clone a New Agent User for more information.)
 Manage Supervisor Teams – Opens the Manage Teams for Supervisor dialog for assigning the supervisor to agent teams and setting as the primary supervisor. (See Manage Supervisor Agent Team Assignments for more information.)
 Edit Access Groups – Opens the Edit Groups for User dialog box for assigning or removing groups for a user. (See Edit User Access Groups for more information.)
 Activate User – Icon only displays for deactivated users. Click this icon to activate the user. This task icon does not display if Federation is enabled. (See Activate or Deactivate a User for more information.)
 Deactivate User – Icon only displays for active users. Click this icon to deactivate the user. This task icon does not display if Federation is enabled. (See Activate or Deactivate a User for more information.)
 Access Summary – Opens the Access Summary dialog box for a quick view of group and collection assignments. (See View Access Summary for a User for more information.)
 Unlock User Session – Opens the Unlock User Sessions dialog allowing you to unlock a user's Portal session. (See Unlock a User Session for more information.)
 Force Agent Logout – Allows Portal Administrators and supervisors to force an agent to log out of their computer telephony interface (CTI). (See Force an Agent to Log Out of CTI for more information.)
 Delete User – Used to delete users or agents that are no longer needed. (See Delete a User for more information.)
 Audit User – Opens the User Audit dialog box for viewing historical changes for the user. (See Audit a User for more information.)
If Federation is enabled, the Reset Password and Activate/Deactivate Users icons are not displayed on the Users grid.
See Also
Copyright © 2025 Cisco. All rights reserved.
![]()
![]()
![]()