Topic Updated: April 01, 2025
Bulk Request Page Features
The Bulk Request page includes several features to help you work with bulk tasks such as:
- Loading users
- Importing agents and supervisors from ICM
- Deleting users
- Peripheral gateway (PG) migration
- Directory number routing
User Load Tab
The User Load tab provides features for loading users into Humanify Portal in bulk.
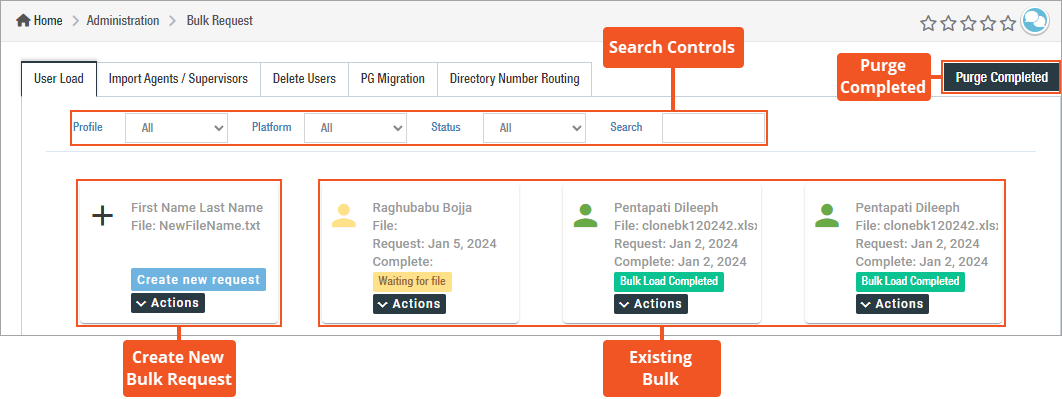
Search Controls – Consists of multiple drop-down menu filters which allow you to filter the bulk requests. These filters can be combined to further narrow the bulk requests displayed on the page. The following filters are available:
- Profile – Filter the bulk requests displayed on the page by the profile they are associated with. (The default setting for this filter is All)

- Platform – If your organization uses multiple platforms, you can use this filter to have the page only display those bulk requests associated with the selected platform. (The default setting for this filter is All)

- Status – Filters the bulk requests displayed on the page by their current status. (The default setting for this filter is All)
- All – Displays bulk loads of all statuses.
- Upload Failed – Displays only bulk requests that failed during upload.
- Bulk Load in Progress – Displays only bulk requests which are currently in progress of loading.
- Bulk Load Completed – Displays only bulk requests that have completed.
- Waiting for Input File to be Uploaded – Displays only bulk requests that are waiting for a user to add the input file for uploading.
- Bulk Load Failed – Displays only bulk requests that have failed to upload the input file.
- Upload in Progress – Displays only bulk requests that are currently in the process of uploading.
- Ready for Processing – Displays only bulk requests that are in queue for processing.

- Search – Enter text in this field to filter the bulk requests by the following:
- Name of the user that created the request
- ID number
- File name

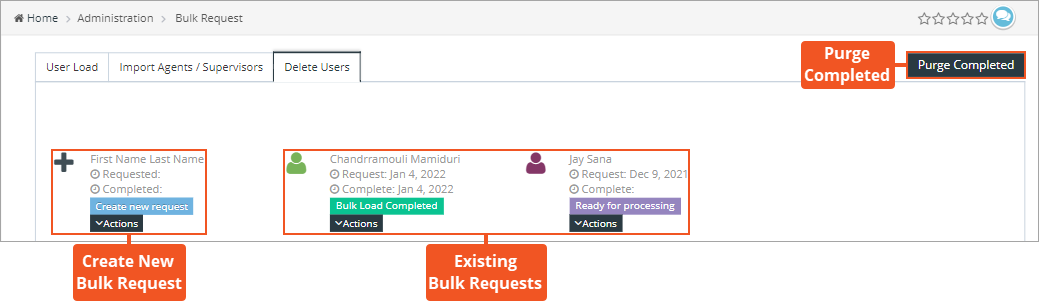
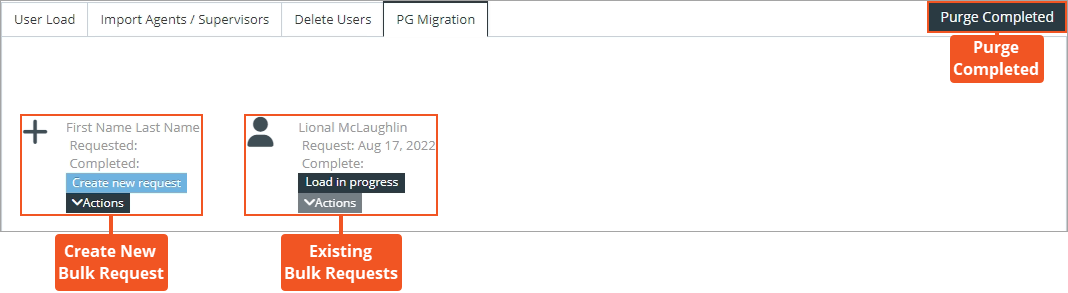
- Purge Completed – Clicking this button allows you purge (clear) all completed bulk load jobs. See Purge Completed Bulk Requests for additional help with this feature.
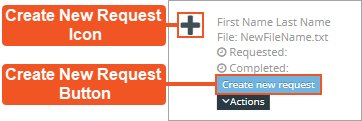
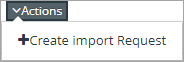
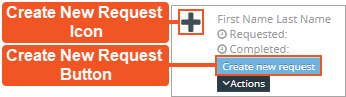
- Create New Bulk Request – Create a new bulk request by performing one of the three methods shown below. For assistance with creating a new bulk request, see Create a New Bulk User Load Request.
- Click on the Create New Request Icon to open the Create Bulk Request dialog.
- Click on the Create New Request Button to open the Create Bulk Request dialog.
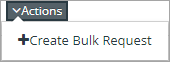
- Click on the Actions button and select the Create Bulk Request option to open the Create Bulk Request dialog.
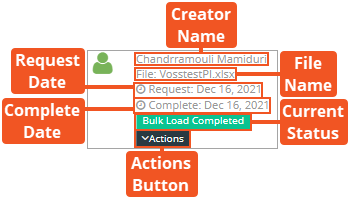
- Existing Bulk Requests – The remainder of the Bulk Request page lists all existing bulk requests organized from newest at the top of the page and older requests at the bottom. Each bulk request includes the following:
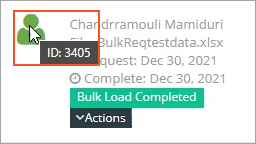
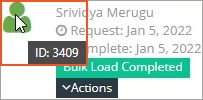
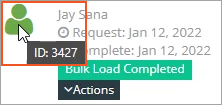
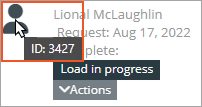
- Bulk Request ID – Placing the mouse pointer over the icon for the bulk request displays the ID number associated with it.
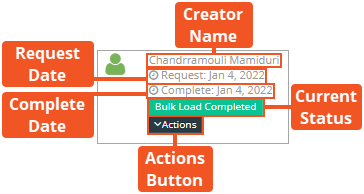
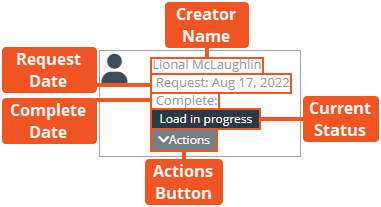
- Creator Name – Displays the first and last name of the original creator.
- File Name – Displays the name of the file selected for upload.
- Request Date – Displays the date on which the bulk request originated.
- Complete Date – Displays the date on which the bulk request completed.
- Current Status – Displays the current status of the file upload. The status can be as follows:
- Upload Failed – Bulk request failed during upload.
- Bulk Load in Progress – Bulk request is currently in progress of loading.
- Bulk Load Completed – Bulk request has completed.
- Waiting for Input File to be Uploaded – Bulk request is waiting for a user to add the input file for uploading.
- Bulk Load Failed – Bulk request has failed to load.
- Upload in Progress – Bulk request currently in the process of uploading.
- Ready for Processing – Bulk request in queue for processing.
- Actions Button – Drop-down menu that displays actions you can take based on the current status of the bulk request.
Import Agents / Supervisors Tab
Features for importing agents and supervisors into Humanify Portal in bulk are found within the Import Agents / Supervisors tab.

- Purge Completed – Clicking this button allows you purge (clear) all completed bulk import jobs. See Purge Completed Bulk Requests for additional help with this feature.
- Create New Bulk Request – Create a new bulk import request by performing one of the three methods shown below. For assistance with creating a new bulk import request, see Create a New Bulk Agent and Supervisor Import Request.
- Click on the Create New Request Icon to open the Create Import Agents Request dialog.
- Click on the Create New Request Button to open the Create Import Agents Request dialog.

- Click on the Actions button and select the Create Import Request option to open the Create Import Agents Request dialog.
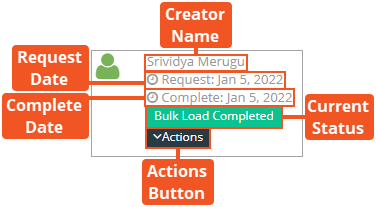
- Existing Bulk Requests – The remainder of the Bulk Request page lists all existing bulk import requests organized from newest at the top of the page and older requests at the bottom. Each bulk import request includes the following:
- Bulk Request ID – Placing the mouse pointer over the icon for the bulk request displays the ID number associated with it.
- Creator Name – Displays the first and last name of the original creator.
- Request Date – Displays the date on which the bulk import request originated.
- Complete Date – Displays the date on which the bulk import request completed.
- Current Status – Displays the current status of the file upload. The status can be as follows:
- Ready for Processing – Bulk request import in queue for processing.
- Load in Progress – Bulk request import is currently in progress of loading.
- Bulk Load Completed – Bulk request import has completed.
- Actions Button – Drop-down menu that displays actions you can take based on the current status of the bulk request.
Delete Users Tab
Deleting users in bulk is the primary feature found within the Delete Users tab.
- Purge Completed – Clicking this button allows you purge (clear) all completed bulk load jobs. See Purge Completed Bulk Requests for additional help with this feature.
- Create New Bulk Request – Create a new bulk delete request by performing one of the three methods shown below. For assistance with creating a new bulk delete request, see Create a New Bulk Delete Users Request.
- Click on the Create New Request Icon to open the Create Bulk Delete Request dialog.
- Click on the Create New Request Button to open the Create Bulk Delete Request dialog.
- Click on the Actions button and select the Create Bulk Request option to open the Create Bulk Delete Request dialog.
- Existing Bulk Requests – The remainder of the Bulk Request page lists all existing bulk requests organized from newest at the top of the page and older requests at the bottom. Each bulk request includes the following:
- Bulk Request ID – Placing the mouse pointer over the icon for the bulk request displays the ID number associated with it.
- Creator Name – Displays the first and last name of the original creator.
- Request Date – Displays the date on which the bulk delete request originated.
- Complete Date – Displays the date on which the bulk delete request completed.
- Current Status – Displays the current status of the load. The status can be as follows:
- Ready for Processing – Bulk request delete in queue for processing.
- Load in Progress – Bulk request delete is currently in progress of loading.
- Bulk Load Completed – Bulk request delete has completed.
- Actions Button – Drop-down menu that displays actions you can take based on the current status of the bulk request.
PG Migration Tab
This tab contains a feature that allows you the ability to easily migrate peripheral gateway (PG) objects into Humanify Portal. Objects include the following:
- Agents
- Skill groups and assignments
- Agent teams
- Attribute assignments
- Purge Completed – Clicking this button allows you purge (clear) all completed bulk load jobs. See Purge Completed Bulk Requests for additional help with this feature.
- Create New Bulk Request – Create a new bulk PG migration request by performing one of the three methods shown below. For assistance with creating a new bulk PG migration request, see Create a New PG Migration Request.
- Click on the Create New Request Icon to open the PG Migration Request dialog.
- Click on the Create New Request Button to open the PG Migration Request dialog.

- Click on the Actions button and select the Create Bulk Request option to open the PG Migration Request dialog.
- Existing Bulk Requests – The remainder of the Bulk Request page lists all existing bulk requests organized from newest at the top of the page and older requests at the bottom. Each bulk request includes the following:
- Bulk Request ID – Placing the mouse pointer over the icon for the bulk request displays the ID number associated with it.
- Creator Name – Displays the first and last name of the original creator.
- Request Date – Displays the date on which the bulk PG migration request originated.
- Complete Date – Displays the date on which the bulk PG migration request completed.
- Current Status – Displays the current status of the load. The status can be as follows:
- Ready for Processing – Bulk request PG migration in queue for processing.
- Load in Progress – Bulk request PG migration is currently in progress of loading.
- Bulk Load Completed – Bulk request PG migration has completed.
- Actions Button – Drop-down menu that displays actions you can take based on the current status of the bulk request.
Directory Number Routing Tab
Access this tab to quickly add multiple directory number routes for your organization to use.
- Purge Completed – Clicking this button allows you purge (clear) all completed bulk load jobs. See Purge Completed Bulk Requests for additional help with this feature.
- Create New Bulk Request – Create a new bulk directory number route request by performing one of the three methods shown below. For assistance with creating a new bulk directory number route request, see Create a New Directory Number Route Bulk Request.
- Click on the Create New Request Icon to open the Create Bulk Request dialog.
- Click on the Create New Request Button to open the Create Bulk Request dialog.
- Click on the Actions button and select the Create Bulk Request option to open the Create Bulk Request dialog.
- Existing Bulk Requests – The remainder of the Bulk Request page lists all existing bulk requests organized from newest at the top of the page and older requests at the bottom. Each bulk request includes the following:
- Bulk Request ID – Placing the mouse pointer over the icon for the bulk request displays the ID number associated with it.
- Creator Name – Displays the first and last name of the original creator.
- Request Date – Displays the date on which the bulk directory number route request originated.
- Complete Date – Displays the date on which the bulk directory number route request completed.
- Current Status – Displays the current status of the load. The status can be as follows:
- Ready for Processing – Bulk request directory number route in queue for processing.
- Load in Progress – Bulk request directory number route is currently in progress of loading.
- Bulk Load Completed – Bulk request directory number route has completed.
- Actions Button – Drop-down menu that displays actions you can take based on the current status of the bulk request.
See Also
Please let us know how we can improve this topic by clicking the link below:
© TTEC Digital 2025
![]()
![]()
![]()