Topic Updated: April 01, 2025
Create a New Bulk User Load Request
You can create a new bulk request in the Bulk Request page (see the following screen capture). If you are not currently viewing the Bulk Request page, for information on displaying the Bulk Request page, Bulk Request.

To create a new bulk request, perform the following steps:
The Bulk Request template is located in the upper left corner of the Bulk Request page.
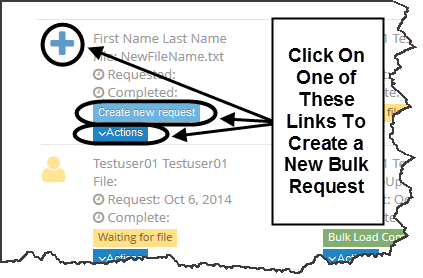
In the Bulk Request page, click on one of the following links:
 - You can click on the Create icon to create a new bulk request.
 - You can click on the Create new request icon to create a new bulk request.
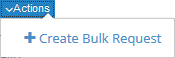 - You can click on the Actions drop down menu to display the Create Bulk Request menu item. Click on the Create Bulk Request menu item to create a new bulk request.
When you click on one of the above choices, the Create Bulk Request pop-up window opens, in which you can define a new bulk request.
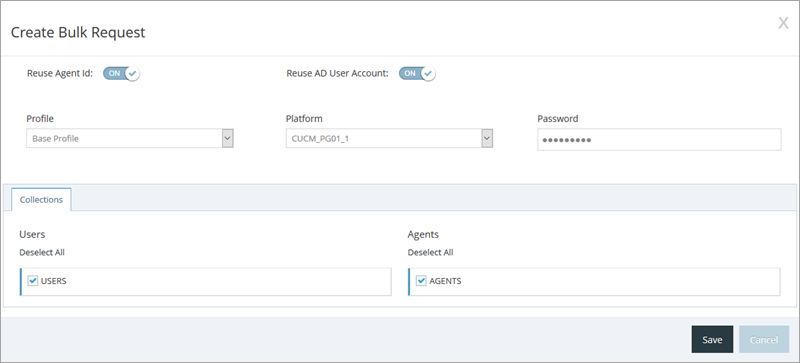
In the Create Bulk Request pop-up window, provide the following information:
Reuse Agent Id - Set to OFF by default. Toggle option ON to allow re-use of older agent IDs for new agents. This prevents any potential "agent ID is already in use" type errors.
- Reuse AD User Account - Set to OFF by default. Toggle option ON to allow the re-use of user accounts already existing in Active Directory. This prevents any potential errors if user accounts already exist in Active Directory.
- Profile - Click anywhere in the box to open the drop-down menu and select a profile to assign the users to.
Platform - Click anywhere in the box to open the drop-down menu and select the platform to associate the users/agents with.
- Password - Enter a password to be assigned to all users/agents included in the bulk request.
Collections - Optional. Select Users or Agents groups that need to be associated with the bulk request. By default, all groups are selected. You can click on the Deselect All command to deselect all groups or you can click on individual groups to deselect those groups by removing the check mark from the check box. In addition, particularly if there are a large number of groups listed, you can deselect all groups and then click on individual groups to select only those groups. Finally, if you have deselected all groups using the Deselect All command and then changed your mind, you can click on the Select All command to cause all groups to be selected.


NOTE: When using the Re-use Agent ID option please note the following:
|
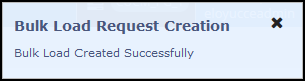
After providing all information in the Create Bulk Request pop-up window, click on the Save button to create the new bulk request. A confirmation message is displayed with the "Bulk Load Created Successfully" message to confirm that the bulk request has been created successfully.
Note: If, after defining the new bulk request and before clicking on the Save button, you change your mind about creating the new bulk request, you can click on the Cancel button to close the Create Bulk Request pop-up window immediately without saving the new bulk request.
When the bulk request has been successfully defined, a new request is created in the topmost position in the Bulk Request home page beside the Bulk Request template.


For information both about the upload file and how to upload the upload file, Upload and Process a Bulk Request File.
Please let us know how we can improve this topic by clicking the link below:
© TTEC Digital 2025
![]()
![]()
![]()