Topic Updated: April 01, 2025
Creating a Contact Flow Application
This section explains the process for creating a new contact flow application.
Application Prerequisites
Before creating a new contact flow application, the following is recommended:
- Use Audio Manager to add any audio files for use in the contact flow application.
- Use Routing Controls to establish any routing control variables for use in the contact flow application.
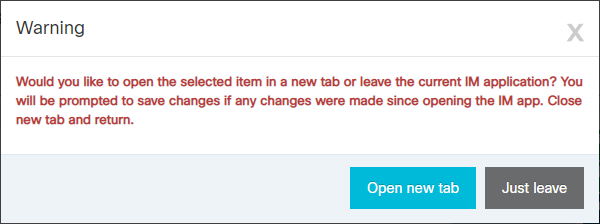
NOTE:
For better productivity when using Interaction Manager Designer, a dialog box displays providing the option to open other Humanify Portal tools in a new browser window displays. This allows users to quickly work between tools, such as Audio Manager or Routing Controls, without leaving Interaction Manager Designer.
Adding a New Application
To create a new application, click the Add Application (+) button in the Application and Queues panel.

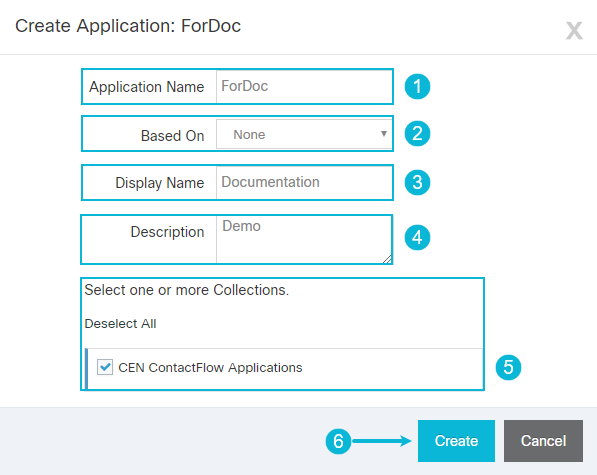
Creating an Application
On the Create Application dialog:
- Enter a name for the application into the Application Name field.
Use the Based On drop-down menu to select another contact flow application that is similar to the new one. This option copies the selected applications nodes and removes any existing Internal DN or External TFN nodes.
- Enter a name to display on the Applications and Queues panel in the Display Name field.
- Describe the use or purpose of the application in the Description field.
- Select a Collection or Collections to assign to this application.
- Click the Create button when finished.
Editing the New Application
After creating the new application, refer to the topic Edit a Contact Flow Application to learn more about building and editing a contact flow application.
See Also
Copyright © 2025 Cisco. All rights reserved.
![]()
![]()
![]()