Edit User Contact Center Information
Contact center users(agents or supervisors) have additional information based on their role with the contact center. If their role or information needs changed or updated within Humanify Portal, you can do so by editing their contact center information. The Users tool allows you to make changes to this information when needed.
Accessing a User's Contact Center Information
Locate the agent or supervisor needing their contact center information updated and do the following:
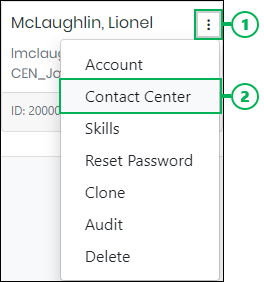
- Access the Actions menu for the user by clicking the Actions button.
- Select the Contact Center option to access the Contact Center interface.

NOTE:
The Contact Center option is only available for contact center users (agents or supervisors).
Editing Contact Center Information
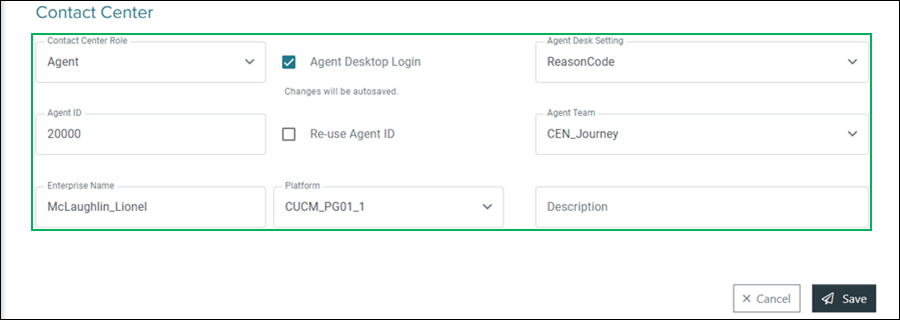
The Contact Center interface allows you to change or update an agent or supervisor's information in relation to the contact center. Make any necessary changes to the information.

Contact Center Role – Drop-down menu for changing the role.
Agent Desktop Login – If this option is enabled, the user can sign into Agent Desktop.
Agent Desk Setting – Drop-down menu for changing the agent's desk settings.
Agent ID – Field for changing an agent's agent ID.
Re-use Agent ID – If this option is enabled, the agent ID from another agent can be entered for this user. Doing this removes the agent ID from the agent that it was originally assigned to, and they are no longer an agent user.
Agent Team – Drop-down menu for changing a user's team assignment.
Enterprise Name – Field for changing the name assigned to the agent within the Cisco Configuration Manager.
NOTE:
This field supports the use of the underscore (_) and period (.) special characters, but they cannot be the first character used.
Platform – Drop-down menu for changing the platform the agent or supervisor is assigned to.
NOTE:
The Platform option only displays for organizations that use multiple platforms.
Description – Field for changing the description of the agent used within the Cisco Configuration Manager.
Saving Changes
Save any changes by clicking Save, or click Cancel to cancel the operation.

NOTE:
If canceling the operation, a Confirm Navigation panel displays. Click Leave Page to confirm canceling. To close the panel and return to the previous task, click Stay on Page.
