Topic Updated: April 01, 2025
Configure Callback Queue Settings
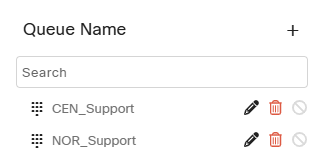
The Queue Settings tab within the Callbacks Admin tool allows callback administrators to add or remove dial numbers. They can also configure the settings for the queue associated with each dial number.
Select the Queue Settings tab within the Callbacks Admin tool.

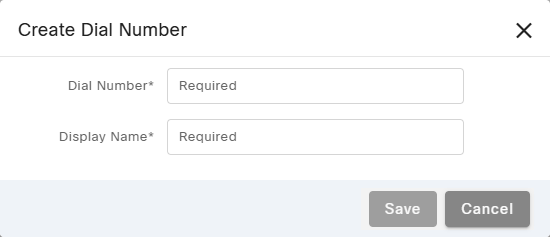
To create a new queue:
- Click the Add Dial Number icon.

- Enter the dial number that is set up in ICM into the Dial Number field.
- Enter a name for the queue into the Display Name field.
- Click the Save button to save the dial number, or click the Cancel button to cancel the operation.
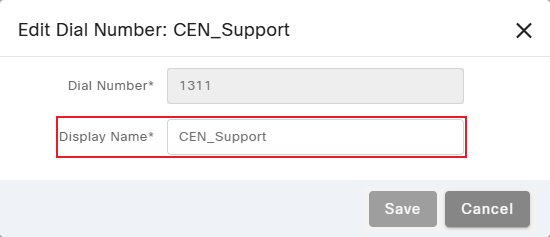
To rename a queue:
- Click the Edit Queue Name icon next to the queue you wish to rename.

- Change the queue name by replacing the text in the Display Name field, and click the Save button to confirm the name. Click the Cancel button to cancel the operation.
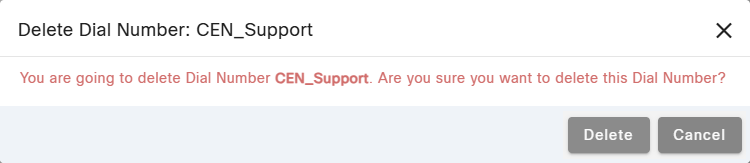
To delete a dial longer that is longer used:
- Click the Delete Dial Number icon next to the dial number you wish to delete.

- Confirm the deletion of the dial number by clicking the Delete button, or click the Cancel button to cancel the operation.
Selecting a Queue to Configure
Click to select the queue you want to configure from the Queue Name list. The Queue Name is highlighted to indicate that it is selected.

Configure the selected queue to control how callbacks function for the assigned dial number. The Queue Configuration tab is selected by default upon selecting a queue.
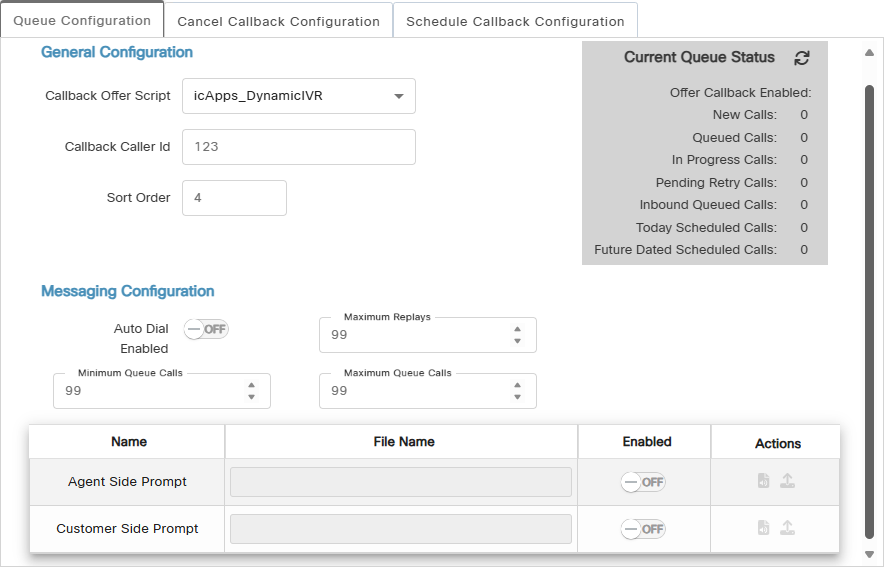
General Configuration:
- Callback Offer Script – Select the script to use from this drop-down menu.
- Callback Caller Id – Allows you to specify a number to display on the callback requester's caller ID.
- Sort Order – Changes the sorting for the Finesse Queue drop-down.
Current Queue Status:
 Refresh – Click to refresh the data displayed for the Current Queue Status section.
- Offer Callback Enabled – Displays the enabled or disabled status of offer callbacks.
- New Calls – Displays the number of calls currently in the new status (status code=0) for the selected queue.
- Queued Calls – Displays the number of calls currently queued in ICM (status code=5) for the selected queue. Note that this is the sum of all queued calls under the selected queue in all instances.

NOTE:
This is the sum of all queued calls under the selected queue in all instances.
- In Progress Calls – Displays the number of calls currently in progress (status code=9) for the selected queue.
NOTE:
This is the sum of all in-progress calls for the selected queue in all instances.
- Pending Retry Calls – Displays the number pending retries for a callback.
- Inbound Queued Calls – Displays the number of current inbound callbacks.
- Today Scheduled Calls – Displays the total number callbacks scheduled for the day.
- Future Dated Scheduled Calls – Displays the total number of callbacks schedule for future dates.
Messaging Configuration
- Auto Dial Enabled – Turn the auto dial feature On or Off.
- Maximum Replays – Enter the maximum number of times an agent can replay a customer voice mail in this field.
- Minimum Queue Calls – Define the minimum number of calls allowed in the queue by entering a number into this field.
- Maximum Queue Calls – Define the maximum number of calls allowed in the queue by entering a number into this field.
- Agent Prompt Enabled – Enable or disable the prompt played to the agent after answering a call by toggling the switch to the ON or OFF position.
- Customer Prompt Enabled – Enable or disable the prompt played to the customer after answering a call by toggling the switch to the ON or OFF position.
- Agent Side Prompt – Enable, disable, select, and upload audio for the agent side prompt.
- Customer Side Prompt – Enable, disable, select, and upload audio for the customer side prompt.
- Agent/Customer Side Prompts – Audio prompts are configurable for both the agent and customer sides.

- File Name Column – Displays the path and file name for the audio prompt files. If the prompt is enabled, you can edit the text in this field to manually change the path or file name.
- Enabled Column – Allows you to enable or disable the prompt. Toggle to the slider to the ON position to enable the prompt, or OFF to disable.
- Actions Column – Use these icons to do the following:
 Select File – Opens the Prompt File Manager dialog allowing you to select from a list of audio prompt files.
 Upload File – Opens the File Selection dialog allowing you to upload an audio file.


Managing or Uploading an Audio Prompt File:
Upload and manage an audio prompt file by following the instructions in the Upload and Select Audio Prompts topic.
Configure the automatic daily cancellation of pending callbacks by accessing the Cancel Callback Configuration tab. This configuration allows you to select specific days and times to automatically cancel any pending callbacks.
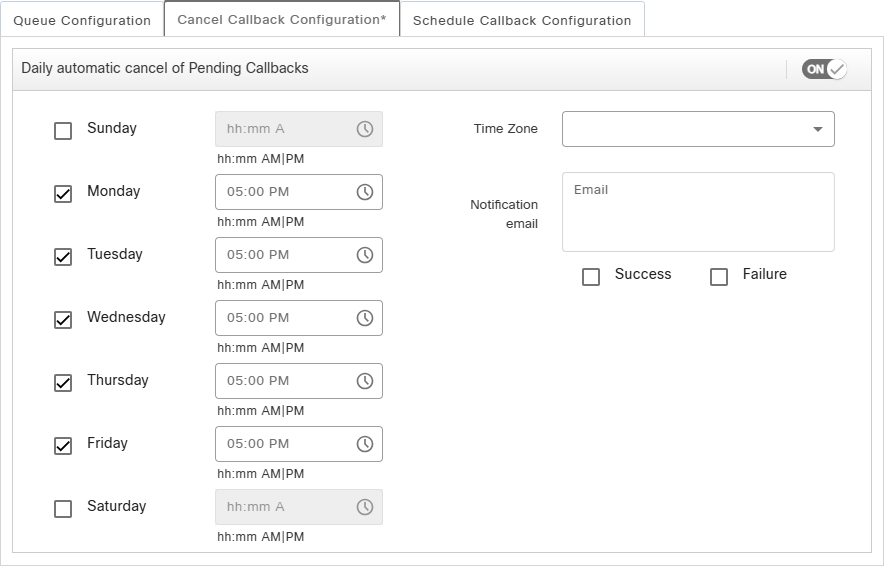
- Enable the Daily automatic cancel of Pending Callbacks – Enable the feature by setting the slider to the ON position. Disable it by setting it to the OFF position.

Enabled

Disabled
Configure Daily Pending Callback Cancellation Schedule
- To enable the schedule for specific days, place a check in the box located next to the desired days.

Enabled

Disabled
- Enter the time for the pending callbacks to cancel.

- Select the time zone in which the cancel pending callback schedule is occurring from the Time Zone drop-down menu.

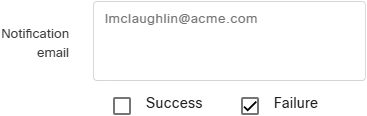
- Enter the email address or addresses (separated by a ;) for any users that need to receive notifications for the cancel pending callback schedule into the Notification email field. Select the Success and Failure options as needed to determine the type of notification emails they receive.
Under the Schedule Callbacks Configuration tab you can override the schedule callbacks configuration.
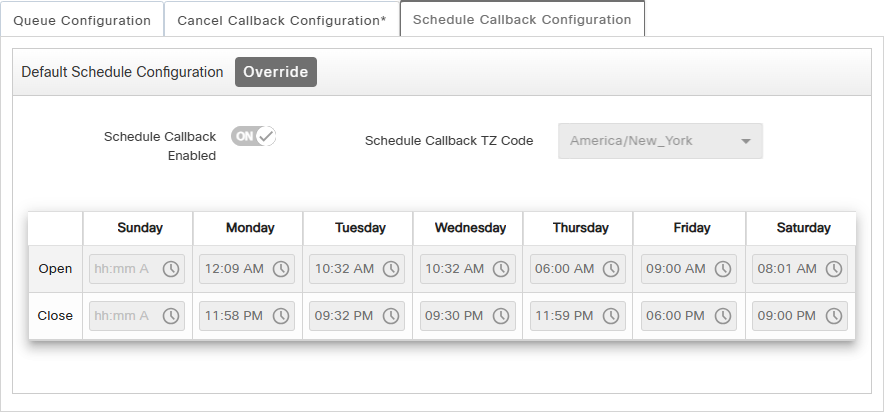
- Click the Overridebutton to enable the Schedule Callback Configuration. Restore the schedule to default at anytime by clicking the Restore to Default button that replaces.


- Enable schedule callbacks by setting the slider to YES. Disable the schedule by setting the slider to NO.


- Select timezone for the scheduled callbacks by selecting it from the Schedule Callback TZ Code drop-down menu.

- Enter the Open time for each day of the week. You can also click the
 icon to open a dialog allowing you to select a time.
 - Enter the Close time for each day of the week. You can also click the icon to open a dialog allowing you to select a time.


Save Configured Queue Settings
Save any changes made to the Queue Configuration by clicking the Save button, or click the Cancel button to restore the previous settings and cancel any changes.

See Also
Copyright © 2025 Cisco. All rights reserved.
![]()
![]()
![]()