Topic Updated: September 06, 2024
Create a New Non-Agent User
This topic covers the process of creating a new non-agent user, using the Clone User function found on the Users page. Using this function to create a user allows the cloned user's settings to copy over to the new user. This saves a lot of time, as the copied settings do not require manual entry or configuration.
Copied settings include:
- Collection assignments
Creating a New User Using Clone User
Create a new contact center user by completing the following steps:
- On the Users page, locate an existing user whose settings align with those needed for the new user.
- To distinguish between an agent and non-agent user on the Users page, look under the Agent ID column for each user. A non-agent user does not have an agent ID assigned.
- For assistance with using the search and filter features on the Users page to find a specific user, see Users Grid Features.
- Click the Clone User task icon located on the same row of the user to clone. This opens the Clone User dialog box.

- Under the User Info tab, complete the following fields:
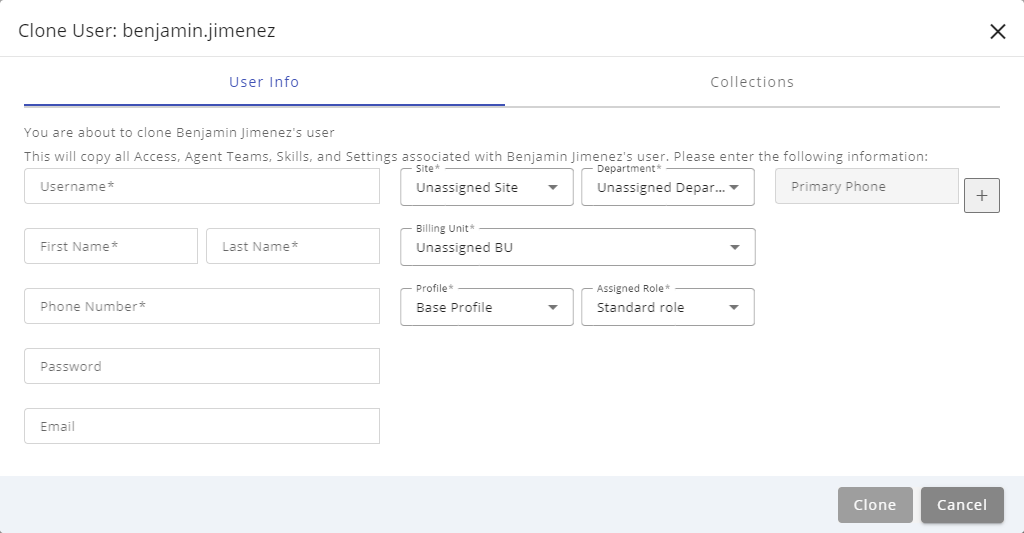
- Username – Required field. Username used for the user to sign into Portal or other related contact center applications. The username must be unique and is limited to 20 characters. When signing in, the username is in the form of username@tenant-suffix, in which the username is the name used in the Username field. The tenant-suffix is three characters used to identify the organization or contact center.
- First Name – Required field. New user's first name.
- Last Name – Required field. New user's last name.
- Phone Number – *Required field. Non-business phone number used to contact the new user. This field supports up to 15 digits allows for entry of international phone numbers as well.
*This field is optional when using SSO and the AD service is set to read only.
- Password – Optional field. Enter a password to assign to the new agent.
- Email – Optional field. Business email address assigned to the new user. If the email address is currently in use by another user, an error message displays when trying to save the changes.
- Site – Required selection. Drop-down menu for selecting the new user's site location. The site is usually the city, state, or the name of the user's physical location.
If the
- Department – Required selection. Drop-down menu for selecting the new user's department assignment.
- Billing Unit – Required selection. Drop-down menu for selecting the new user's billing unit.
- Profile – Required selection. - Drop-down menu for selecting a profile for the new user. A profile is pre-selected by default.
- Assigned Role – Required selection. Drop-down menu for selecting a new user's role assignment. For additional details about roles, see . To learn more about roles and how they affect user access, see Features for Standard Portal Roles.
- Primary Phone – Allows for the selection of an available business phone for the new user. To select a phone, click the Add Primary Phone icon (
 ) to display a list of available phones. On the Select a Primary Phone dialog box, click the check-box next to the phone to assign it to the new user.

Portal Administrator users may see a Clusters drop-down menu above the Select a Primary Phone section, allowing them to filter the phones by available Cisco Unified Communications Manager (CUCM) clusters. This menu only displays if multiple CUCM clusters are configured and available.
- Select the Collections tab to assign collections to the new user.
- The Collections tab consists of two assignment panes:
- Users – Lists all collections available for users.
- Agents – Lists all collections available for agents.
- All collections are already selected by default. Place a check next to each collection to associate with the new user. Remove the check next to each collection to not have it associated with the new user. Options to quickly select or deselect all collections are available above each list.
- Select All – Adds a check to all collections listed below.
- When finished with selecting and deselecting collections for the new user, click the Clone button. The new user now displays on the Users page. Cancel the creation of a new user at any time by clicking the Cancel button.

Upon clicking the Clone button, Humanify Portal automatically creates a default password for the new user and sends an email notification for their new account. The user must initially sign in using this default password.
The default password will be a combination of the following:
- First Name Initial (upper case) + Last Name Initial (lower case) + Phone Number + !!
For example, a user named Jane Doe with the phone number 555-555-1234 will have a default password of "Jd5555551234!!".
After signing in with the default password, Humanify Portal will require the user to change their password. When the user has changed their password, it can then be used to sign into other applications that share the username and password, such as Jabber.
See Also
Please let us know how we can improve this topic by clicking the link below:
© TTEC Digital 2024
![]()
![]()
![]()