Topic Updated: April 01, 2025
Add a New Reason Code
Create new reason codes to provide a status for any specific situation that may come up for agents working at the contact center.
REQUIREMENTS:
The following user types can add, edit, and delete reason codes:
- Supervisor
- Manager
- Program Administrator
- Program Owner
Adding a New Reason
To create a new reason, do the following:
- Click the Menu button located at the top of the Reasons grid.

- Select the Add New Reason option.
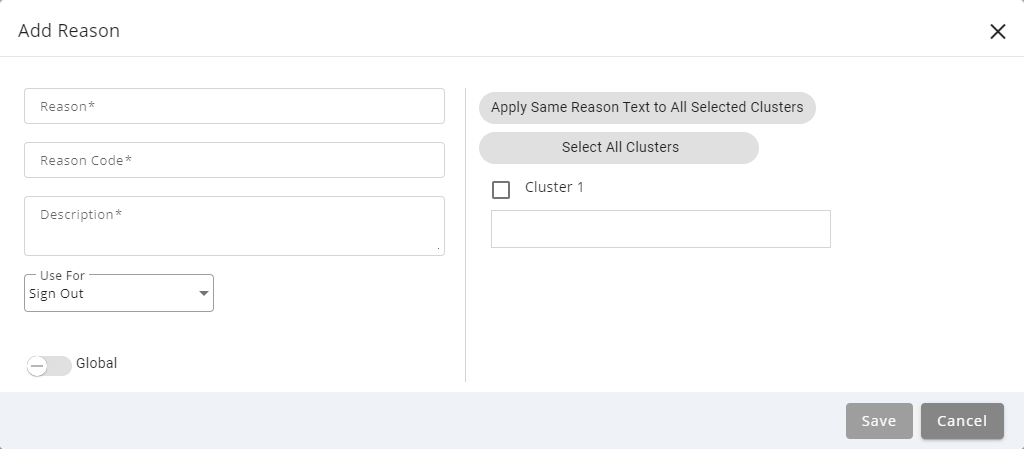
- Enter a descriptive name for the new reason code in the Reason field. The field can include both spaces and special characters. This name will display to agents in the list of reason codes. (Required field.)
- Enter a brief description for the new reason code into the Description field. (Required field.)
- Select an option from the Use for drop-down menu. This option will change how the reason code will affect the agent's status.
NOTE:
See the descriptions for each of the available Use for options below:
Sign Out – This is the default option. When selected, the new reason code will function as a "signed out" status for the agent.
Not Ready – When selected, the new reason code will function as "not ready" status for the agent.
Wrap Up – When selected, the new reason code will function as a "wrap up" status used when the agent is finishing up or finalizing a call.
- Enable the Global option by setting the slider to the YES position. When enabled, the new reason code can be used by all agent teams.
NOTE:
If the Global slider is set to the default NO position, the reason code must be assigned to at least one or more agent teams before it is usable. See Manage Reason Code Assignment for an Agent Team for more information.
- Click the Apply Same Reason Text to All Clusters button if you want to use the same reason text for all clusters.
- Click the Select All Clusters if you want to apply the reason to all available clusters.
- Select each cluster you want to enable the reason code for. You can also add custom reason text for each cluster in the text box provided below each cluster selection.
- Save the new reason code by clicking the Save button. Click the Cancel button to cancel the operation.
See Also
Please let us know how we can improve this topic by clicking the link below:
© TTEC Digital 2025
![]()
![]()
![]()