Topic Updated: April 01, 2025
The Dialer and Delay Settings Tab
When you click on the edit campaign icon  in the
Click on the Dialer and Delay Settings tab to make it the active tab. Notice that you must scroll down to see additional settings.
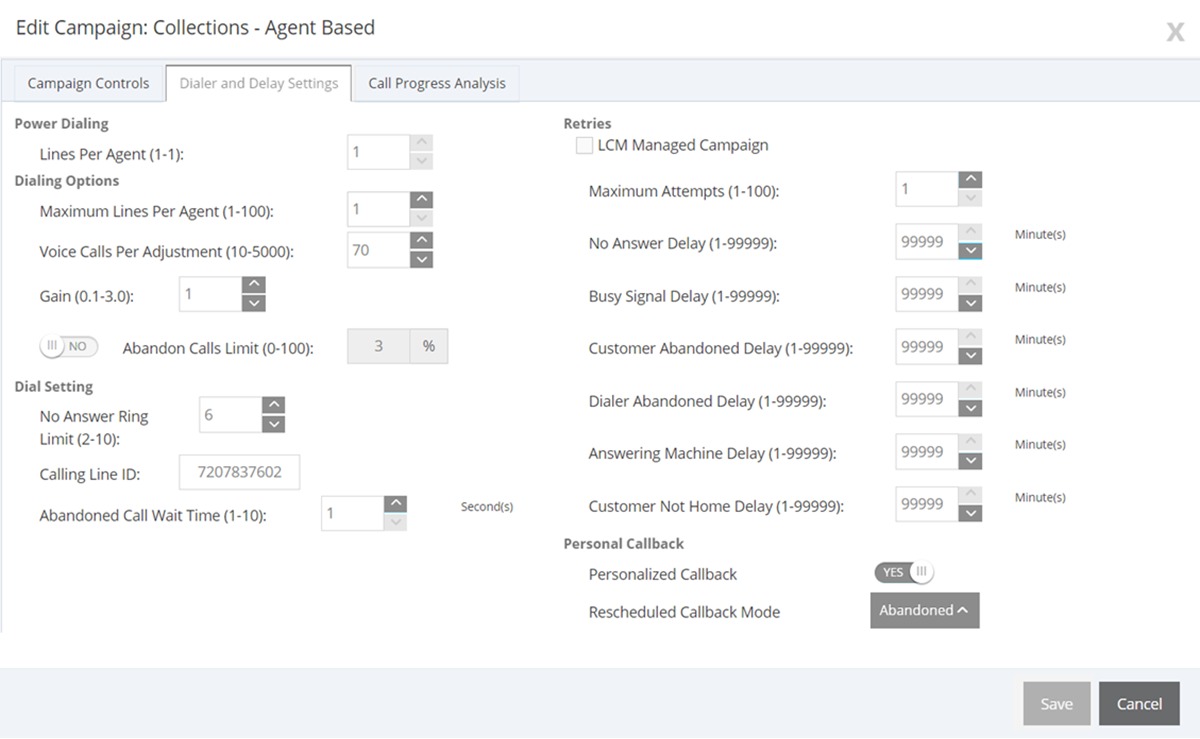
In the Dialer and Delay Settings tab, enter or update the following information:
Power Dialing:
Lines Per Agent (1-n) - This box sets the number of lines dedicated to each agent in this campaign. To change this setting, click on the upward-pointing arrow to increase the number of lines up to the maximum number of allowed lines; click on the downward-pointing arrow to decrease the number of lines to a minimum of one line. Alternatively, you can click in the box and over-type the current number in the box. The upper limit for this box is set in the Maximum Lines Per Agent box in this tab.
Dialing Options:
Maximum Lines Per Agent (1-100) - The upper limit for the number of customers the dialer will dial for a reserved agent at a time.To change this setting, click on the upward-pointing arrow to increase the maximum number of lines to a maximum of 100 lines; click on the downward-pointing arrow to decrease the maximum number of lines to a minimum of one line. Alternatively, you can click in the box and over-type the current number in the box. You can set this box to any number of lines between "1" and "100". This setting controls the upper limit for the Lines Per Agent box, both in this tab and in the Campaign Controls tab.
Voice calls per adjustment (10 - 5000) - A count of the number of live voice connections that must occur before the Dialer makes an adjustment. Increasing this number results in less frequent adjustments based on larger sample size. Decreasing this number results in more frequent adjustments using a smaller sample size.
Gain (0.1 - 3.0) - The size of the adjustment to lines per agent each time an adjustment is made. Increasing the Gain results in larger lines per agent adjustments; decreasing the Gain results in smaller lines per agent adjustments.
Abandon Calls Limit (0-100) - A call is considered abandoned if a person answers it and the contact center does not connect the call to a sales representative within two seconds of the person's completed greeting. To use this parameter, the decision icon must be set to YES.Enable this option to set an Abandon Calls limit (between "1" and "100") for the percentage of abandoned calls in this campaign. The granularity is to one-tenth of a percent and the default value for this box is "3.0" percent. If the decision icon is set to NO, the campaign dials without regard to the abandon limit.
NOTE:
Abandon Calls Limit option is exclusive for Predictive campaigns.
Dial setting:
No Answer Ring Limit (2 - 10) - This parameter defines the number of times the software allows a dialed telephone number to ring without the call being picked up. Enter the maximum number of rings allowed. The length of one ring is specified at the dialer level in the TimeToRingCustomer registry entry. The default setting for this box is "4" rings.
NOTE:
The default behavior is to allow calls to ring for 32 seconds (No answer ring limit - 4, TimeToRingCustomer key - 8 seconds). Assuming the default 8 second TimeToRingCustomer key is used, setting the "No answer ring limit" to the minimum "2" rings meets 15-second ring-time requirements.
Calling Line ID - Use this box to specify the phone number advertised as the calling number for the campaign.
Abandoned Call Wait Time (1 - 10) - This parameter sets the minimum duration (in seconds) of an outbound call. If the duration of an outbound call is less than this specified value, Outbound Option considers the call as customer abandoned, and the customer record that is associated with that call is scheduled for a retry. To disable this feature, set this value to "0" (zero). Enter the number of seconds into the box to set the parameter. The default value in this box is "1". Note that if this feature is disabled, then Outbound Option does not consider this call as customer abandoned. It affects the reporting of this call in the Outbound Option dialer detail table.
Retries: If an call ends in a "no answer" or a "busy" state, the options in this section govern how subsequent attempts to place the call will be handled.
NOTE:
If the
If this option is not selected (that is, there is no check mark in the check box), the remaining options are active and display your most recent settings.
Maximum Attempts (1-100) - This box Defines the maximum number of attempts allowed, including callbacks and retries. To set the maximum number of attempts to be made in zones 1 and 2, you can either click the up or down arrows to change the displayed value, or you can type the maximum number of attempts. The default in this box is "3" attempts. Note that increasing the number of attempts causes closed records to be reopened, which can result in slower performance.
NOTE:
This box is connected to the Maximum attempts (1-100) box in the Campaign Controls tab and displays the same information. If the
Modifying this parameter while the campaign is in progress can result in longer agent idle times and delays to retrieve records from the dialing list.
No Answer Delay (1-99999) - This box defines (in minutes) how long the software waits before calling back a no-answer call. To set the number of minutes, you can either click the up or down arrows to change the displayed value up or down or you can over-type the value in the box. The default value in this box is "60" minutes. You can specify any number of minutes between "1" minute and "99999" minutes.
Busy Signal Delay (1-99999) - This box defines (in minutes) how long the software waits before calling back a busy telephone number. To set the number of minutes, you can either click the up or down arrows to change the displayed value up or down or you can over-type the value in the box. The default in this box is "60" minutes.
Customer Abandoned Delay (1-99999) - This box displays the time (the delay in minutes) when the dialer should call a customer back if the customer abandons a call. To set the number of minutes, you can either click the up or down arrows to change the displayed value up or down or you can over-type the value in the box. The default in this box is "30" minutes.
Dialer Abandoned Delay (1-99999) - If the dialer abandons a call, this box displays the time (delay in minutes) when the dialer should call the customer back. To set the number of minutes, you can either click the up or down arrows to change the displayed value up or down or you can over-type the value in the box. The default value in this box is "60" minutes.
Answering Machine Delay (1-99999) - If the call is picked up by an answering machine or voicemail, this box displays the time (delay in minutes) when the dialer should call the customer back. To set the number of minutes, you can either click the up or down arrows to change the displayed value up or down or you can over-type the value in the box. The default value in this box is "60" minutes.
Customer Not Home Delay (1-99999) - If the customer was not at home and should be called back, this box displays the amount of time (in minutes) when the dialer should call the customer back. To set the number of minutes, you can either click the up or down arrows to change the displayed value up or down or you can over-type the value in the box. The default value in this box is "60" minutes.
Personal Callback: You can use the Personal Callback option to set up a callback with the customer wherein both you and the customer can reconnect, for example, to continue a conversation or to answer questions that you may not be able to answer at this time.
Personalized Callback - This option allows an agent to schedule a callback to a customer for a particular date and time, connecting the customer to the same agent with whom they originally spoke and at a time the customer requests. You can click on the decision icon to change the current setting. If the decision icon is set to "Yes", both personalized callback and the Rescheduled Callback Mode button are enabled; if the decision icon is set to "No", personalized callback is disabled.
Rescheduled Callback Mode button - Use this button to set the mode for rescheduled callback calls. Click on the button to display a pop-up that displays the following options from which you can choose:
- Use Campaign DN
- Same time next business day
- Abandoned
Click on one of the options to set the callback mode. The button is updated to display your selection.
When you have finished working in the Dialer and Delay Settings Tab, perform one of the following actions:
Click on one of the remaining tabs to update settings in these tabs. To view information about the contents of the selected tab, click on one of the following links:
Click on the Save button. Changes made in all the three tabs are saved and the Campaign Settings pop-up window closes. When your changes have been successfully saved, a confirmation pop-up window opens and displays the "Saved Successfully" message.
NOTE:
If you change your mind about the updates you specified, you can click the Cancel button to discard your changes. When you click on the Cancel button, the Campaign Settings pop-up window refreshes to display a message warning that you have not saved your changes. In addition, the Save button changes to the Continue button.
To discard your changes, click on the Continue button. Otherwise, you can click on the Cancel button to return to the previous window to save your changes.
Please let us know how we can improve this topic by clicking the link below:
© TTEC Digital 2025
![]()
![]()
![]()