Topic Updated: April 01, 2025
The Call Progress Analysis Tab
When you click on the edit campaign icon  in the
Click on the Call Progress Analysis tab to make it the active tab (see the following screen capture).
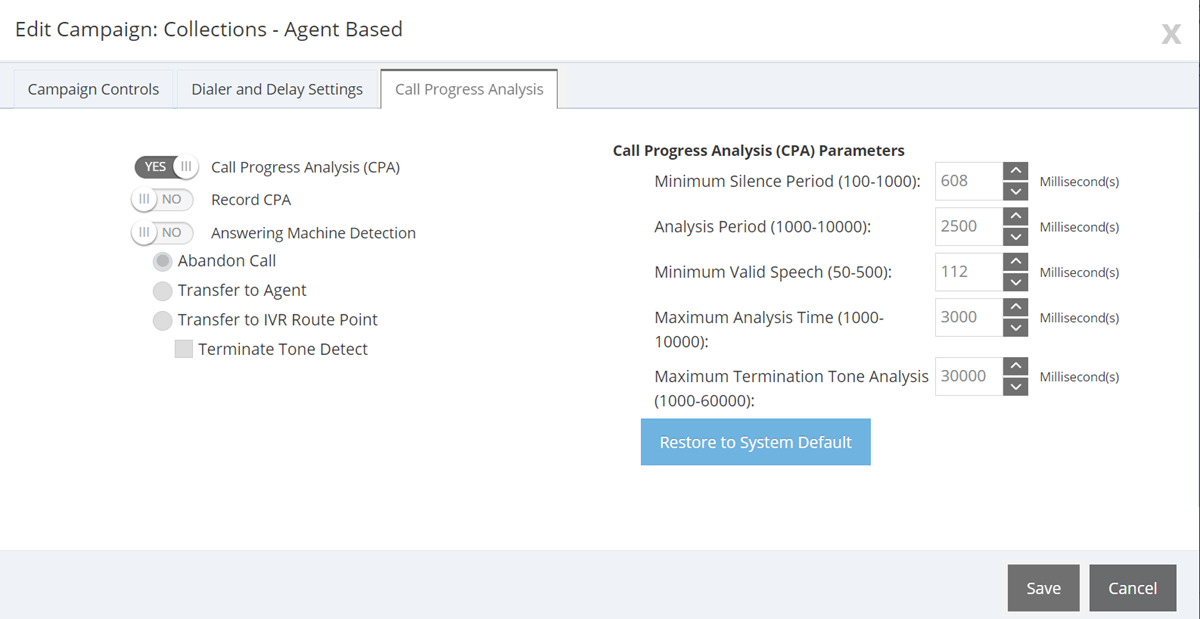
In the Call Progress Analysis tab, enter or update the following information:
Call Progress Analysis (CPA) - You can click on the decision icon either to enable or to disable the Call Progress Analysis (CPA) system. If the decision icon is set to YES, the CPA is enabled; if the decision icon is set to NO, the CPA is disabled and all controls and boxes in the tab are locked.
Record CPA - Use this control to cause the CPA to be recorded for later review and analysis. Click on the decision icon to change the current setting. If the decision icon is set to YES, the CPA parameters are both displayed and recorded; if the decision icon is set to NO, the current CPA parameters are displayed but not recorded. If the Call Progress Analysis (CPA) decision icon is set to NO, this decision box is locked.
Answering Machine Detection - You can use this control to detect an instance of an answering machine picking up the outgoing call instead of a person. Click on the decision icon to change the current setting. If the decision icon is set to YES, answering machine detection is enabled; if the decision icon is set to NO, answering machine detection is disabled. If answering machine detection is enabled, the following choices are also enabled:
Abandon Call - If you select this radio button, whenever an answering machine picks up an outgoing call, the call is automatically abandoned. If this option is selected, the other two options in this section are disabled.
Transfer to Agent - If you select this radio button, whenever an answering machine picks up an outgoing call, the call is automatically rerouted to an available agent for handling. If this option is selected, the other two options in this section are disabled.
Transfer to IVR Route Point - If you select this radio button, whenever an answering machine picks up an outgoing call, the call is automatically rerouted to an IVR (Interactive Voice Response system) that is able to leave an appropriate message on the answering machine. If this option is selected, the other two options in this section are disabled.
Terminate Tone Detect - This check box is active only if the Transfer to IVR Route Point option is selected. If selected, the tone detect function is terminated.
Call Progress Analysis (CPA) Parameters
Minimum Silence Period (100-1000) - The minimum period of silence, in milliseconds, required to classify a call as voice detected. If many answering machine calls are being passed through to agents as voice, then increasing this value accounts for longer pauses in answering machine greetings. To set the number of milliseconds, you can either click the up or down arrows to change the displayed value up or down or you can over-type the value in the box. The system default setting for this parameter is 608 milliseconds.
Analysis Period (1000-10000) - The number of milliseconds to spend in analyzing the current call. If there is a short agent greeting on an answering machine, then a longer value here categorizes that answering machine call as voice. If the call is to a business where the operator has a longer scripted greeting, a shorter value here categorizes the long, live greeting as answering machine. To set the number of milliseconds, you can either click the up or down arrows to change the displayed value up or down or you can over-type the value in the box. The system default setting for this parameter is 2500 milliseconds.
Minimum Valid Speech (50-500) - The minimum number of milliseconds of voice response required to qualify a call as voice-detected. To set the number of milliseconds, you can either click the up or down arrows to change the displayed value up or down or you can over-type the value in the box. The system default setting for this parameter is 112 milliseconds.
Maximum Analysis Time (1000-10000) - The maximum number of milliseconds allowed for analysis before identifying a problem analysis as dead air or low volume. To set the number of milliseconds, you can either click the up or down arrows to change the displayed value up or down or you can over-type the value in the box. The system default setting for this parameter is 3000 milliseconds.
Maximum Termination Tone Analysis (1000-60000) - The maximum number of milliseconds used by the dialer to analyze an answering machine voice message while looking for a termination tone. If the message has an odd tone and the analysis does not recognize it, the call is not transferred or dropped until this timeout occurs. To set the number of milliseconds, you can either click the up or down arrows to change the displayed value up or down or you can over-type the value in the box. The system default setting for this parameter is 30000 milliseconds.
- Restore to System Default button - Whenever the Call Progress Analysis is enabled, you can click this button to restore the default settings in the Call Progress Analysis (CPA) Parameters section of the page.
When you have finished working in the Call Progress Analysis Tab, perform one of the following actions:
Click on one of the remaining tabs to update settings in these tabs. To view information about the contents of the selected tab, click on one of the following links:
Click on the Save button. Changes made in all the three tabs are saved and the Campaign Settings pop-up window closes. When your changes have been successfully saved, a confirmation pop-up window opens and displays the "Saved Successfully" message.
NOTE:
If you change your mind about the updates you specified, you can click the Cancel button to discard your changes. When you click on the Cancel button, the Campaign Settings pop-up window refreshes to display a message warning that you have not saved your changes and the Save button changes to the Continue button.
To discard your changes, click on the Continue button. Otherwise, you can click on the Cancel button to return to the previous window to save your changes.
Please let us know how we can improve this topic by clicking the link below:
© TTEC Digital 2025
![]()
![]()
![]()