Topic Updated: April 01, 2025
Upload and Process a Bulk Request File
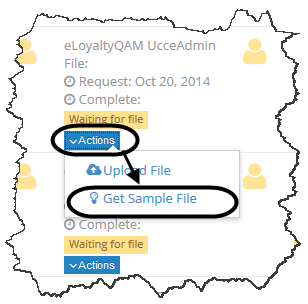
Before you upload a file, the yellow information line in the bulk request displays the "Waiting for file" message. When uploading a file for the bulk request, the file must be in Microsoft Excel® file format. It is recommended that you upload the sample Excel file by clicking on the Get Sample File menu item in the Actions drop-down menu (see the following screen capture; not to scale).
When you click on Get Sample File, the Opening SaveAsExcelWorkbook.xltx pop-up window opens.
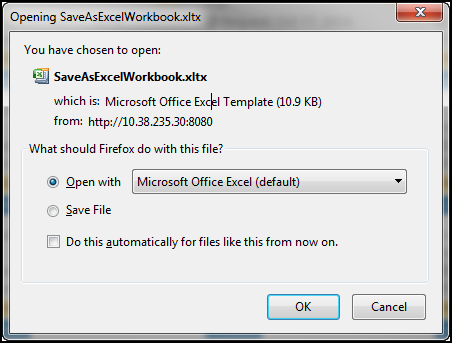
In the Opening SaveAsExcelWorkbook.xltx pop-up window, click on the OK button to open the sample Excel file (SaveAsExcelWorkbook.xltx) in Microsoft Excel (see the following screen capture).
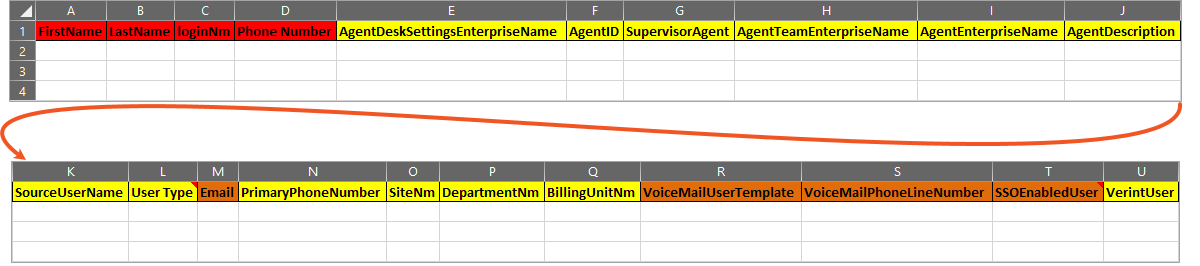
If you are creating a new file to upload, it is recommended you use the sample file as a template to create your new upload file. The upload file must meet the following requirements:
The following columns are required:
- FirstName
- LastName
- LoginNm (This field is limited to 20 characters.)
- The FirstName, LastName, and LoginNm fields for agents and supervisors support the use of the following ASCII characters:

- Due to a restriction in Active Directory, the LoginNm field must also contain a combination of alphanumeric characters. It must also contain at least one alphabetic character.
- The last character of the LoginNm field may not be a period (.).
- Phone Number
The following columns are optional, but if you enter information in any of the columns, then all columns must contain information:
- AgentDeskSettingsEnterpriseName
- AgentID
- SupervisorAgent
- AgentEnterpriseName
If left blank, the AgentEnterpriseName is automatically generated based on the LastName and FirstName fields (LastName_FirstName). This field only supports the use of the underscore (_) and period (.) special characters with the following exceptions:
- If the first character of the LastName field is any special character, it is removed when the AgentEnterpriseName is generated.
- Any unsupported special characters are also removed when the AgentEnterpriseName is generated, regardless of character position.
If the first character of the FirstName field is any supported special character, it remains when the AgentEnterpriseName is generated.
- AgentDescription
- SourceUserName
- User Type
- PrimaryPhoneNumber
- SiteNm
- DepartmentNm
- BillingUnitNm
- VoiceMailUserTemplate
- VoiceMailPhoneLineNumber
- SSOEnabledUser
- VerintUser
- AgentAnswers
- CallTranscript
- VAVTranscript
- PersonDescription
- SupportDigitalChannel
- AgentStateTrace
NOTES:
- The Agent Desk Setting Enterprise Name and Agent Team Enterprise Name must be provided by TTEC Digital.
- The SourceUserName field allows bulk requests to use the clone user process. Enter the username of the user you want to use as a clone in this field.
- A mailbox is created if the VoiceMailUserTemplate and VoiceMailPhoneLineNumber fields are completed.
- The AgentEnterpriseName and AgentDescription fields are the details used for the agent in Cisco Configuration Manager.
- FirstName, LastName, and EnterpriseName fields may not contain spaces. They may contain periods (e.g.: j.doe) or underscores (e.g.: j_doe).
- The VerintUser field accepts Y, Yes, y, or yes for enabling and adding the user to Verint. It accepts N, No, n, no, or leaving the field blank if you do not want to add the user to Verint.
- Agent Answers – Enter Y, Yes, y, or yes to enable or N, No, n, no, or leave the field blank to disable. Enable this option to enable the Agent Answers gadget on the Finesse Desktop Layout.
- Call Transcript – Enter Y, Yes, y, or yes to enable or N, No, n, no, or leave the field blank to disable. Enable this option to enable the Call Transcript feature for the agent.
- VAV Transcript – Enter Y, Yes, y, or yes to enable or N, No, n, no, or leave the field blank to disable.Enable this option to enable the Virtual Assistant Voice transcript feature for the agent. This feature requires that UCCE 12.6.2 support is enabled for Portal. Contact your account manager to have this feature enabled.
- Person Description – Enter a description of the person in this field, if needed.
- Support Digital Channel – Enter Y, Yes, y, or yes to enable or N, No, n, no, or leave the field blank to disable. Enable to add the Support Digital Channel feature for the agent or supervisor. This feature requires that UCCE 12.6.2 support is enabled for Portal. Contact your account manager to have this feature enabled.
- Agent State Trace – Enter Y, Yes, y, or yes to enable or N, No, n, no, or leave the field blank to disable. Enable this feature to track every state change made by the agent. This feature is available for up to 100 agents total.
The User Type field supports the following entries:
- PHONE_ADM
- CMPGN_ADM
- ICR_ADMIN
- CF_ADMIN
- ICR_MGR
- CF_DEVLPER
- PRG_USER
A password is automatically generated for each user. The password is generated as follows:
- <First Character of First Name in Uppercase> + <First Character of Last Name in Lowercase> + <Phone Number> + !!
- An example generated password for an agent named Tim Smith, with the phone number 555-123-0001, would be: Ts5551230001!!
If the first character of the FirstName and LastName fields contain any special characters, the password fails to automatically generate and the bulk import fails.
See the following example upload file with three rows that contain valid information.

After creating an upload file, perform the following steps to upload the file:
In the Bulk Request home page, locate the request for which you want to upload the file. The information line displays the "Waiting for file" message to indicate that the request is still pending.
Tip: If you just finished creating the bulk request, the request may be located in the topmost request location (beside the request template, see the following screen capture).

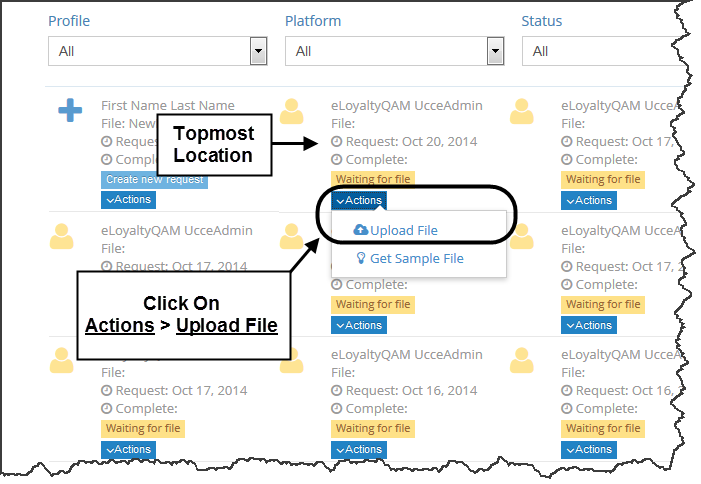
In the request for which you want to upload the file, click on Actions to open the drop-down menu. In the drop-down menu, click on Upload File (see the above screen capture). The following windows open:
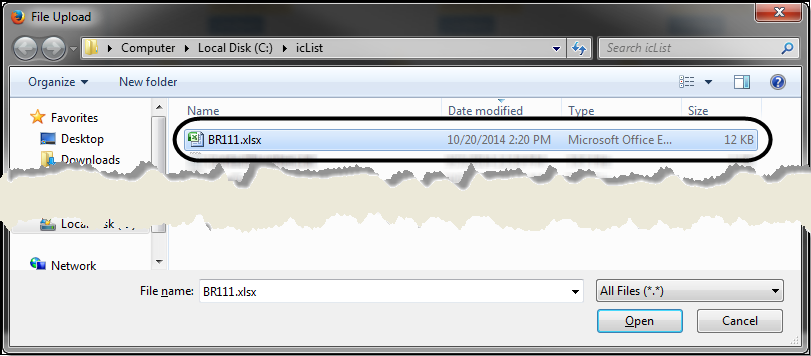
The Microsoft File Upload window.

The Bulk Request File Upload pop-up window.

In the File Upload window, locate and click on the file that you want to upload as the bulk request and then click on the Open button. The Microsoft File Upload window closes and the Bulk Request File Upload pop-up window refreshes to display information about the file that you are uploading (see the following screen capture).
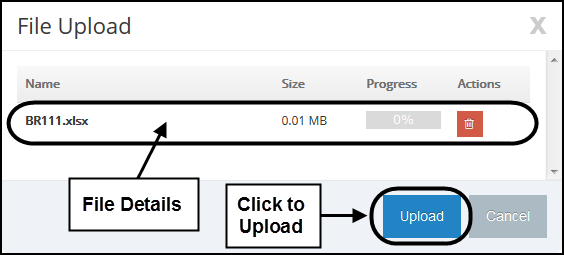
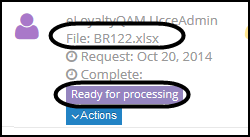
To complete the file upload, click on the Upload button. The file is uploaded and the Bulk Request File Upload pop-up window closes. The name of the file you uploaded is now displayed in the File field in the bulk request, the information line displays the "Ready for processing" message, and the information line changes to purple.

Note: You can upload only one file at a time. If you upload a second file, the second file will over-write the first file and only the second file will be processed. During upload, the file is validated to ensure the correct Bulk Request template was used.
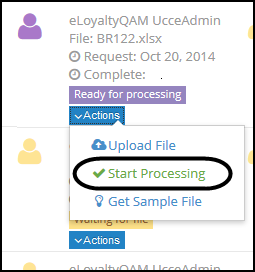
If you click on the Actions drop-down menu, you will see the Start Processing menu item.

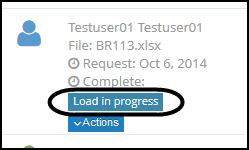
Click on the Start Processing menu item to process the uploaded file. The menu closes and the information line changes to display the "Load in progress" message.


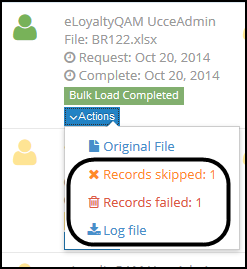
After a short period of time, if you refresh (reload) the Bulk Request page, the information line updates to display the "Bulk Load Completed" message. Information about any errors that may have been encountered during the processing are displayed in the drop-down menu and the Log file menu item is added to the menu to enable you to see details about the processing.

Note: Upon completion, Humanify Portal sends an email notification to all new users for their new accounts.
Please let us know how we can improve this topic by clicking the link below:
© TTEC Digital 2025
![]()
![]()
![]()