Configure OneView settings
The settings page provides OneView the connection between your Salesforce org and your Genesys Cloud org, as well as state synchronization , Salesforce flow triggers, Task Logging and Outbound Campaigns.
Notes:
-
Upon upgrading OneView package from 3.x version to 4.x version, OneView settings now has a new page layout. To remove the old page layout from navigation, see Remove the old OneView settings page from Salesforce navigation.
-
State synchronization feature is only applicable for environment's using Omni-Channel. It track's an agent's ready and not ready status and synchronizes the states between Salesforce and Genesys Cloud. To implement this feature, Omni-Channel must be enabled and presence statuses configured in Salesforce.
For information on Salesforce Omni-Channel, see:
For more information on Salesforce flows and triggers, see Salesforce flow automation integration.
-
Outbound Campaigns feature on the OneView settings page will only be available if the campaign sync package is installed. For more information , see Voice Outbound Campaign Synchronization
-
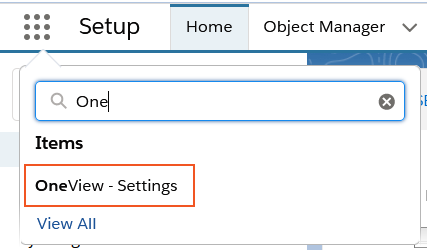
Go to the App Launcher and locate OneView - Settings.
-
Select the OneView Call Center from the drop-down list.
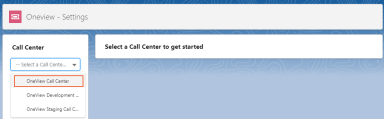
Call Center
General Options
Agent Workspace Transfers
In the General Options section, admins have the Allow Workspace Transfer option to provide the transfer workspace ability for the agents. Based on the option enabled or disabled, agents will have the Transfer workspace option visible either in the CTI panel or in the embedded framework when a transfer is initiated.
Disable Alert Panel
Admins can determine how the incoming interactions appear. When the option is not selected, the incoming interactions appear via the OneView alert panel else the incoming interactions utilizes the default Embedded Framework interface provided by Genesys.
Allow CTI Panel Pop-out
The Allow CTI Panel Pop-out feature enables admins to provide agents with the option to pop out the CTI panel into a separate window before receiving a call. When enabled, agents will see a popout symbol on their CTI panel, which they can click to open in a separate window. By default, the option is not selected.
Important: To prevent the call from disconnecting:
-
Ensure the CTI panel is popped out before receiving a call.
-
Donot close the CTI panel during a call.
Add Participant data to Outbound call
Enable the option to get the participant data added to the conversation when an outbound call is performed from the salesforce tab. For additional information, see Outbound call data.
Participant data is added to the conversation only when an outbound call is perfomed via Dial Direct, Dial on Behalf of Queue, and Click-to-data.
Enable Additional Click-to-dial Options
Enable the option to allow agents to send an SMS text from OneView by either typing in the number or using the click-to-dial option.
Prevent Inactivity Timeout
Enable the option to allow agents signed in, regardless of the timeout value set in Genesys Cloud.
Hide CTI Panel on Interaction Accepted
Enable the option to hide the OneView alert panel and embedded CTI panel once an interaction is accepted.
Hide SMS Button
Enable this option for the SMS button to not appear in the OneView CTI panel, when an interaction is initiated using click-to-dial.
Chat/Message Input Height
Admins can set the size of the Chat Message input box for interactions. The size can be adjusted within the range 50 to 100, with a default size of 60.
-
Enter the number you want the height of the input box to appear.
-
Click Save.
Call Controls
Admins have the ability to configure which buttons are available to the agents. To configure, select the checkbox Customize available call control buttons.
-
The CTI panel will display all buttons from the Selected Options, but not all of them are available in the embedded controls.
-
To remove a button , choose the option from Selected Options and press single right arrow (<).
-
The order of the buttons in the configuration list determines their order in the CTI panel but does not affect the embedded controls.
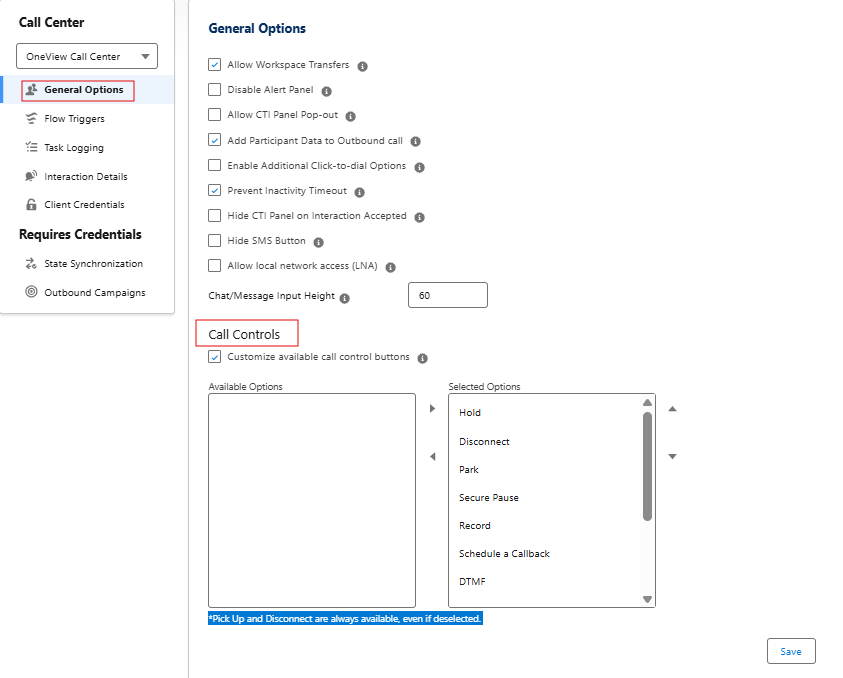
Click Save, upon choosing the options.
Flow Triggers
Important: Salesforce flows may be triggered in different ways. See Triggering flows for alternative methods. Configuring more than one method may create conflicts and/or duplications. This section should be left blank if triggering flows from participant data or outbound calling lists.
- In the Flow Triggers section, map the triggers to your Salesforce flows using the drop-down menu for each flow type.
Flow trigger Description Alerting Flow Flow to be triggered when a inbound conversation is alerted. Connected Flow
Flow to be triggered when a inbound conversation is accepted.
Important: For callback interactions, flow to be triggered when the agent accepts the callback interaction.
Callback Connected Flow to be triggered when a callback is accepted by the customer. Disconnected Flow
Flow to be triggered when an conversation is disconnected.
Completed Flow
Flow to be triggered when ACW is completed on an conversation.
Note: Only applies to conversations with an ACW portion.
- Click Save Flow Triggers.
Task Logging
Enable Task Logging
Task Logging must be enabled to access the following features:
-
Create task records for incoming interactions
-
Define object types available to agents during wrap-up
-
Access the Get Transcript feature for chat and inbound calls
- Select Enable Task Logging.
- Select the Who objects to be available in the Name field of agent interactions.
- Select the What objects to be available in the Related To field of agent interactions.
Enable Pop Task and Save Button
-
Enable Pop Task and Save Button: Enable the option to add a Pop Task and Save button within the notes section. This button will open the task related to the interaction in a new tab. Notes entered will be visible in the task tab, and the notes field will continue to auto-save even after the interaction is disconnected.
-
Click Save Task Settings.
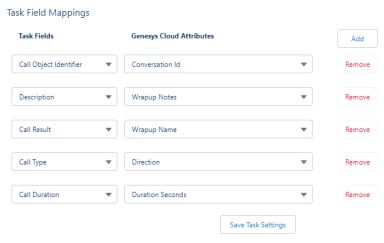
Task Field Mappings
For example: Genesys Cloud attribute of type "String" is compatible with Salesforce Task field "text" but not necessarily a type of “DateTime”. Listed below are the fields that can be mapped onto fields of the task record.
|
Name |
Type |
|---|---|
| Address | String |
| ANI | String |
| Callback User Name | String |
| Connected Time | DateTime |
| Conversation Id | String |
| Customer Callback Scheduled Time | DateTime |
| Direction | String |
| Disconnect Type | String |
| Disconnected Time | DateTime |
| Display Address | String |
| Display Name | String |
| DNIS | String |
| Duration Seconds | Integer |
| End Acw Time | DateTime |
| Media Type | String |
| Queue Id | String |
| Queue Name | String |
| Start Acw Time | DateTime |
| Subject | String |
| User Id | String |
| User Queue Id | String |
| Wrapup Code | String |
| Wrapup Duration Seconds | Integer |
| Wrapup End Time | DateTime |
| Wrapup Name | String |
| Wrapup Notes | String |
The Task Field Mappings section, maps the Salesforce Task field from the Genesys Cloud properties using the drop-down menu for each type. The mapping occurs when an interaction is connected to the agent and on complete.
For example:
-
Click Save Task Settings.
Notes:
-
When created taskid with the task logging, the task is saved under the key OneView_taskId. Pops the task when the conversation is completed.
-
Agents must refresh their web browser to receive any changes made to these settings while they are signed in.
Interaction Details
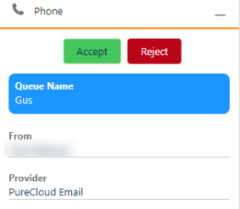
In OneView settings page, Interaction details, there are labels describing each interaction including queue name, provider, and customer contact. These labels can be controlled by interaction type, the order the values are shown, and the attributes to be used.
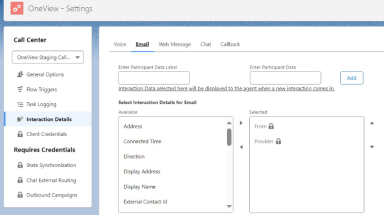
Interaction Details tab contains sections for each interaction types.
Within each section:
-
Select the attributes from the Available list.
-
Move the selected attributes to the Selected list. The selected attributes list drives which attributes will be used for the respective interaction type.
-
Click Save Details.
Result: Interaction details are saved and are displayed to the agent upon receiving an interaction.
Custom attributes can also be configured by applying participant data to the interaction:
-
Participant Data Label: Enter the label to be displayed as the subject when an interaction appears.
-
Participant Data: Enter the data associated with the Participant data label. The data can also be retrieved from Genesys Cloud conversations.
-
Click Add to display the attributes in the Selected list.
-
Click Save Details.
Client Credentials
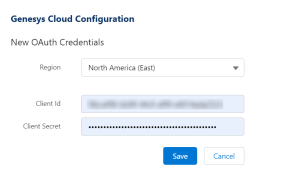
Genesys Cloud Configuration
Important: Genesys Cloud Configuration is necessary only if Salesforce Omni-Channel is enabled or when intend to install the OneView Voice Outbound Campaign Synchronization add-on. If neither of these tools are used, configuring this setup is not required.
- Select your Genesys Cloud region. This must match the region configured in the call center settings.
- Return to your Genesys Cloud browser window and
go to Admin > OAuth.
- Click Avtex_OneView_OAuth app.
- Copy the Client ID and Client Secret to the OAuth Client Credentials field in your OneView - Settings in Salesforce.
- Click Save Configuration.
State Synchronization
-
If Omni-Channel is enabled, select Enable State Synchronization to configure the state mappings between Genesys Cloud and Salesforce.
Section Description Ready States Select a default ready state for each system.
When an agent enters the On Queue state in Genesys Cloud, they are automatically assigned the corresponding Omni-Channel state. This mapping ensures that both systems reflect the agent's availability consistently.
Note: Not supported for Genesys Cloud Communicate users.Default Not-Ready States Define a default not ready state for each system. These states are used whenever the agent transitions from a ready state to a not ready state.
Example: You can map Available(At my desk) in Genesys Cloud to Busy in Salesforce.
Note: Not supported for Genesys Cloud Communicate users.Interacting States Configure mappings for states used while handling interactions. For each scenario, select a matching state in the alternate system. These states are used when the agent is handling an interaction.
Example: An agent may be Available while handling an interaction and switch to Busy upon completion.
Custom State Mappings If required beyond the default ready or not-ready configurations, you can define additional custom state mappings. These mappings allow specific state relationships between Genesys Cloud and Salesforce. Note: These custom state mappings do not take priority over the Default Not-Ready States above.
-
Click Save State Mappings.
Outbound Campaign
Outbound Campaigns feature on the OneView settings page will only be available if the campaign sync package is installed. For more information , see Voice Outbound Campaign Synchronization