Topic Updated: April 01, 2025
Create a New Agent
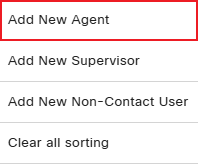
To create a new agent, use the Add New Agent option from the Portal Users grid menu. This process allows you to define key agent details, assign roles, and configure necessary settings to ensure proper access and functionality within the system.
Adding a New Agent
To create a new agent, do the following:
- Access the grid menu.
- Select Add New Agent to create a new agent.
Configuring the Agent Info Tab
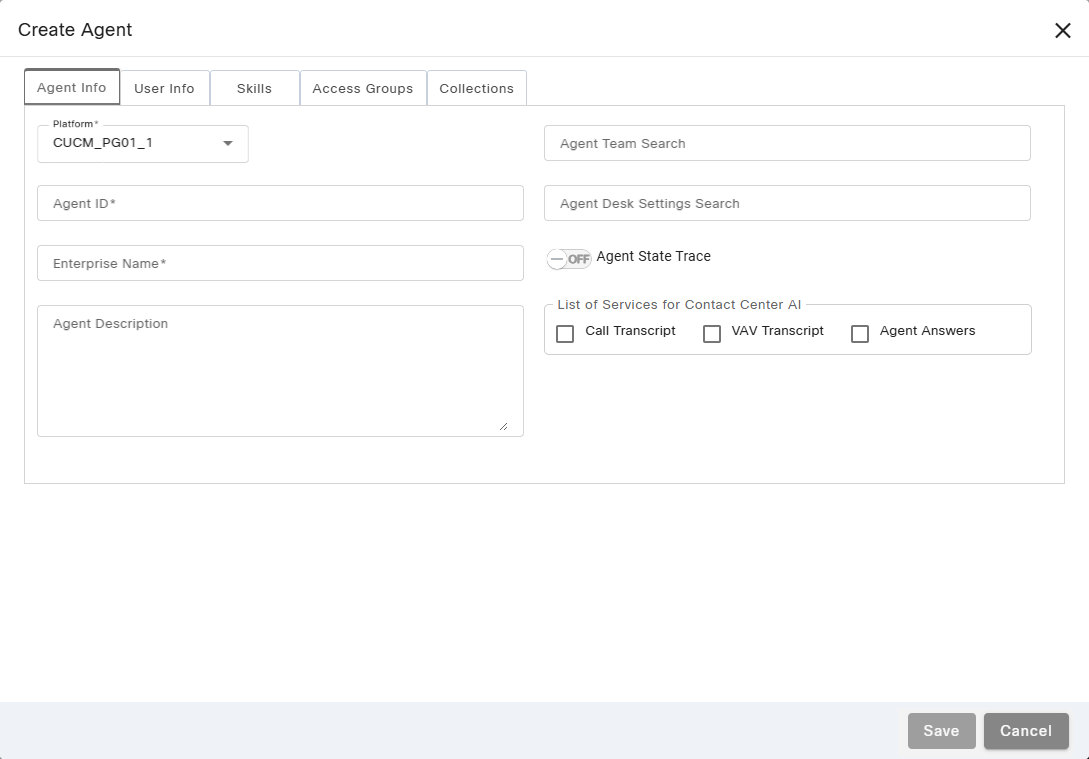
Configure the settings and features under the Agent Info tab:
- Platform – If your organization supports multiple platforms, you can select which platform to associate the new agent with.
- Agent ID – Required field. New agent's ID. The new agent must have an agent ID for agent team assignment.
- Enterprise Name – Required field. Name assigned to the new agent in Cisco Configuration Manager.
- Agent Description – Optional field. Description of the agent used in Cisco Configuration Manager.
- Agent Team Search – Search field used for finding and selecting the new agent's agent team. For additional information about agent teams, see Agent Teams.
- Agent Desk Settings Search – Search field used for finding and selecting the new agent's desk settings.
- Agent State Trace – Enable this feature to track every state change made by the agent. This feature is available for up to 100 agents total.
List of Services for Contact Center AI
Enable any available Contact Center AI services by placing a check next to the following options:
- Call Transcript – Select this option to enable the Call Transcript feature for the agent.
- VAV Transcript – Select this option to enable the Virtual Assistant Voice transcript feature for the agent. This feature requires that UCCE 12.6.2 support is enabled for Portal. Contact your account manager to have this feature enabled.
- Agent Answers – Select this option to enable the Agent Answers gadget on the Finesse Desktop Layout.
Configuring the User Info Tab
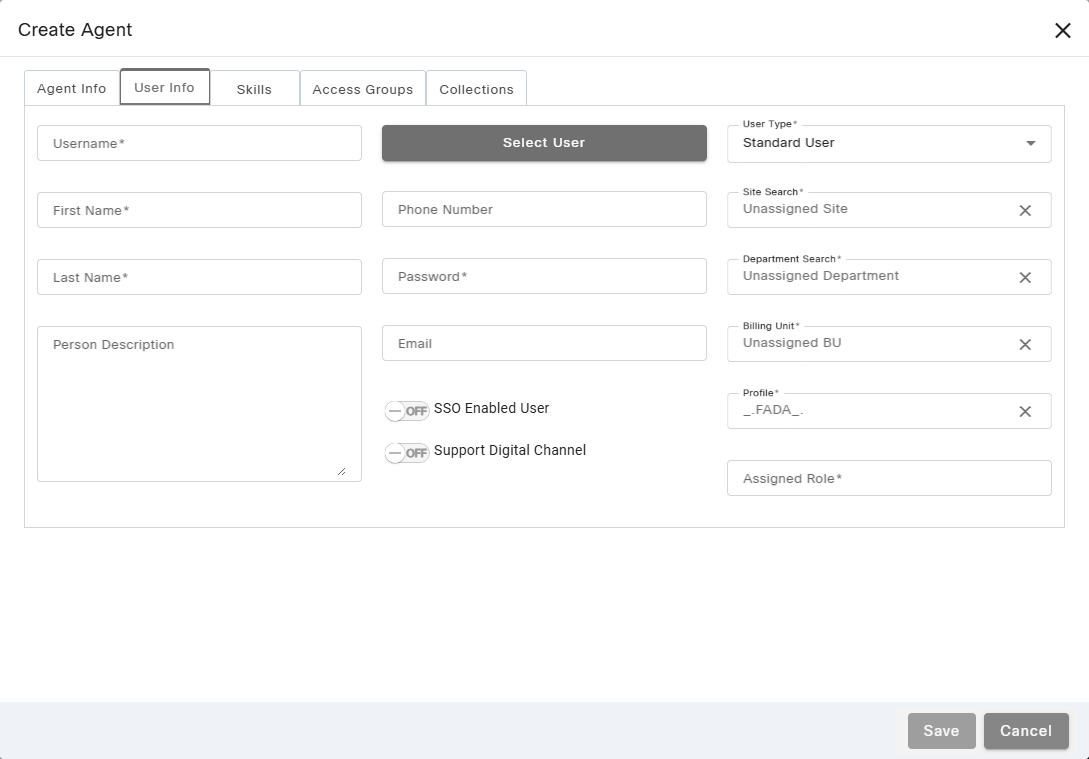
Configure the settings and features under the User Info tab:
- Username – Required field. Username used for the new agent to sign into Portal or other related contact center applications. The username must be unique and is limited to 20 characters. When signing in, the username is in the form of username@tenant-suffix, in which the username is the name used in the Username field. The tenant-suffix is three characters used to identify the organization or contact center.
- First Name – Required field. New agent's first name.
- Last Name – Required field. New agent's last name.
- The Username, First Name, and Last Name fields for agents and supervisors support the use of the following ASCII characters:
- Due to a restriction in Active Directory, the Username field must also contain a combination of alphanumeric characters. It must also contain at least one alphabetic character.
- The last character of the Username field may not be a period (.).
- Person Description – Optional field. Enter a description of the person in this field, if needed.
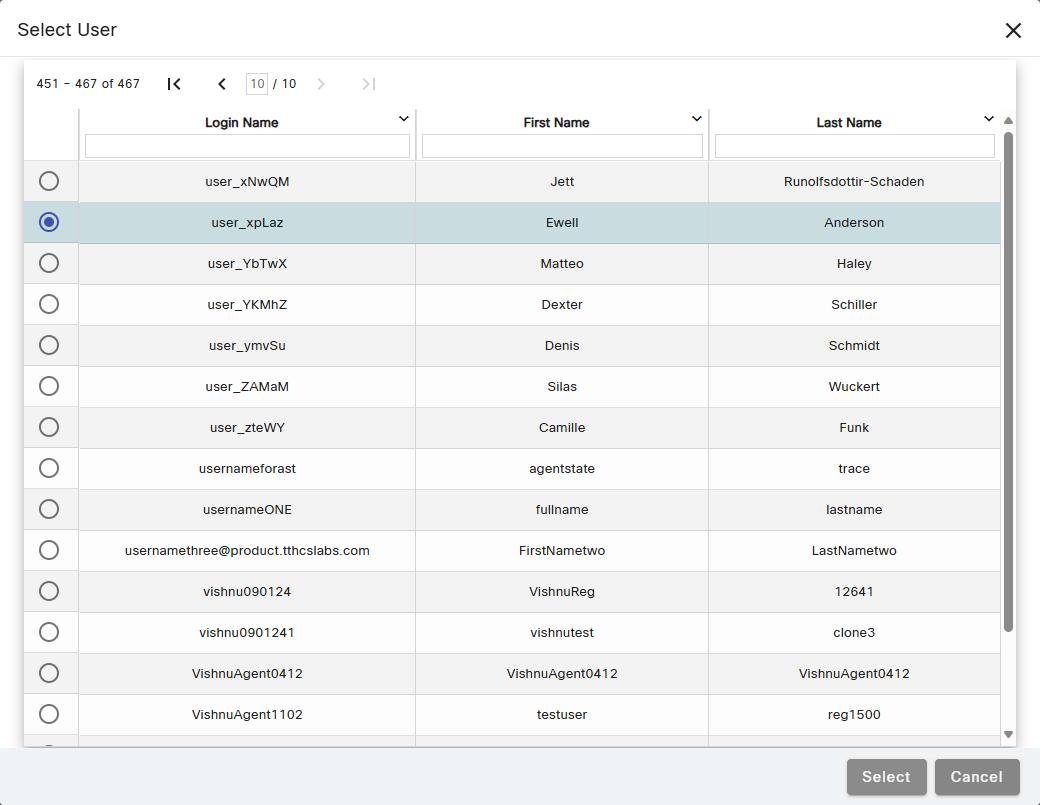
- Select User – Optional. Click this button to open the Select User dialog allowing you to select a user to associate with the new agent. On the Select User dialog, you can use the pagination controls and search filters to quickly find a specific user. Select the user and then click the Select button to confirm.
- Phone Number – Required field. Non-business phone number used to contact the new agent. This field supports up to 15 digits and allows for entry of international phone numbers as well.
NOTE:
The Phone Number field is optional when using SSO and the AD service is set to read only.
- Password – Required field. Enter a password to assign to the new agent.
- Email – Optional field. Business email address assigned to the new agent. Humanify Portal validates the email address entered across all tenants to ensure it is not currently in use. If the email address is currently in use by another user, an error message displays when trying to save the changes.
- SSO Enabled User – Set this slider to ON if you want the user to use Single Sign-On (SSO).
- Support Digital Channel – Enable or disable the Support Digital Channel feature. This feature requires that UCCE 12.6.2 support is enabled for Portal. Contact your account manager to have this feature enabled.
- User Type – Drop-down menu for selecting the user type for the user. The available user types are:
- Portal Administrator
- Callback Administrator
- Phone Administrator
- Campaign Administrator
- Route Control Administrator
- Contact Flow Administrator
- Route Control Manager
- Contact Flow Developer
- Standard User
- Site Search – Required. Search field used for finding and selecting the new agent's site location. The site is usually the city, state, or the name of the agent's physical location.
- Department Search – Required. Search field used for finding and selecting the new agent's department assignment.
- Billing Unit – Required. Drop-down menu for selecting the new agent's billing unit.
- Profile – Required. Drop-down menu for selecting a profile for the new agent. A profile is pre-selected by default.
- Assigned Role – Required. Drop-down menu for selecting a new agent's role assignment. For additional details about roles, see . To learn more about roles and how they affect user access, see Features for Standard Portal Roles.
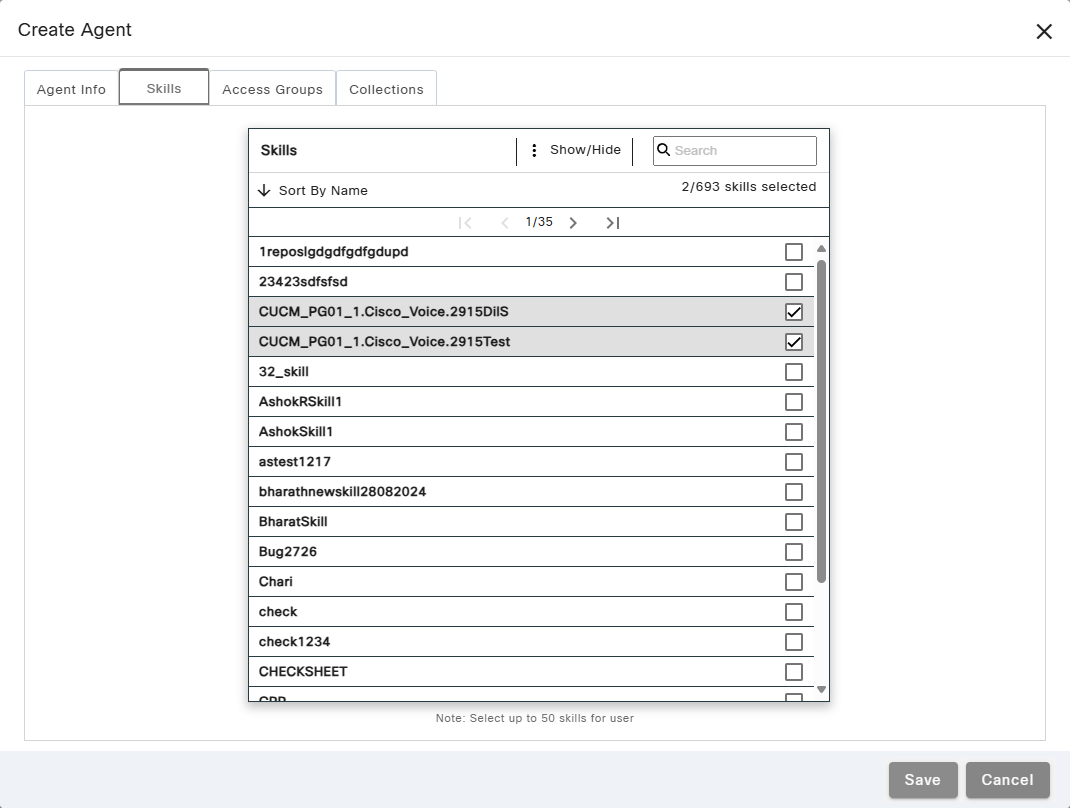
Assigning Skills to the New Agent on the Skills Tab
Assign skills to the new agent under the Skills tab:
Assign up to 50 skills to the new agent by selecting skills within the Skills assignment pane. See theAssignment Panes Interface topic for assistance.
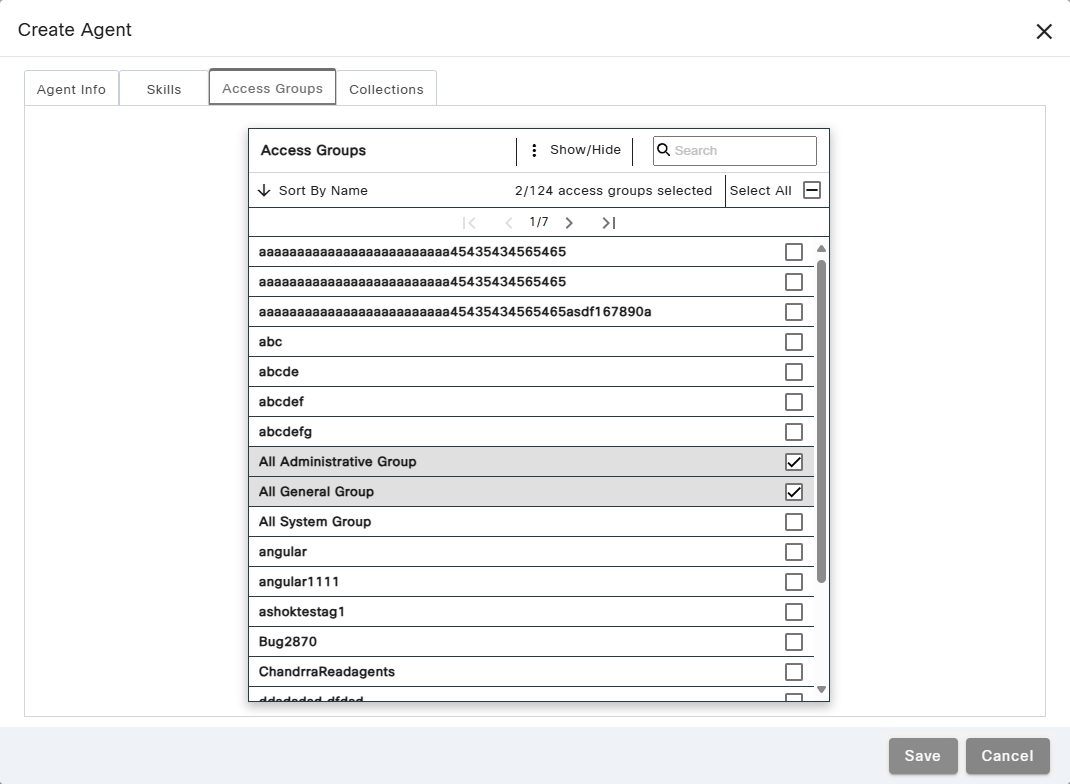
Assigning Access Groups to the New Agent on the Access Groups Tab
Assign access groups to the new agent under the Access Groups tab:
Assign access groups to the new agent by selecting any groups needed within the Access Groups assignment pane. See theAssignment Panes Interface topic for assistance.
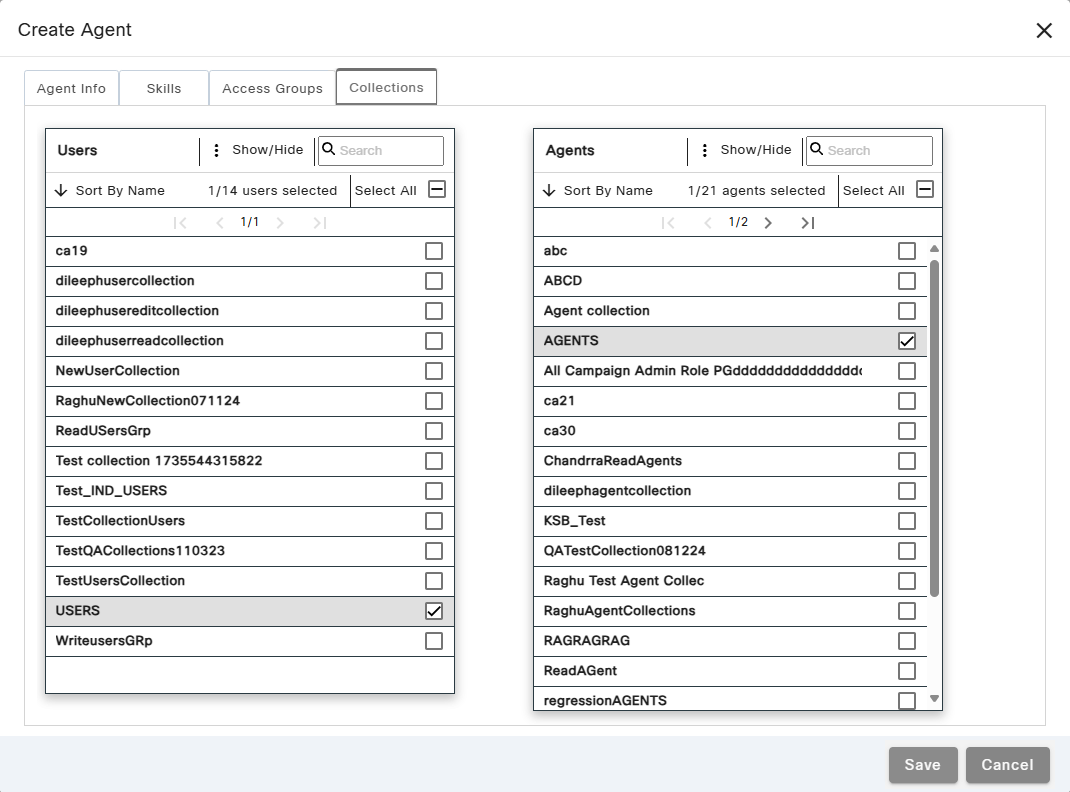
Assigning Collections to the New Agent on the Collections Tab
Assign collections to the new agent under the Collections tab:
Assign users or agents collections to the new agent by selecting any collections needed within the Users or Agents assignment panes. See theAssignment Panes Interface topic for assistance.
Saving the New Agent
Save the new agent by clicking the Save button, or Cancel the operation by clicking the Cancel button.
See Also
Please let us know how we can improve this topic by clicking the link below:
