Topic Updated: April 01, 2025
Assign Users to a Profile
A profile can do what it is designed to do only when one or more users (agents) are assigned to it. Conversely, whenever your needs change, a user can be un-assigned from a profile and reassigned to a different profile. Assignment to a different profile can be performed in a single action.
Note: A user can be assigned to a single profile only. When you assign a user to a profile, the profile to which that user was previously assigned is removed automatically.
To assign or un-assign users to or from a profile, perform the following steps:
In the Profiles page, locate the profile to which you want to assign one or more users (agents). You can locate the profile using any of the following methods:
If you know the name of the profile, you can search for the profile using the Search function.
Click on a column header label to sort the contents of the column (and therefore all profiles) either in ascending order or in descending order.
You can locate the profile by using the paging controls to move between pages.
Note: For more information about using the features included in the Profiles page to locate a profile, Features of the Profiles Page .
When you locate the profile to which you want to assign (or un-assign) users, if you click anywhere on the profile's row, the entire row changes to a light green to indicate that it is now the selected profile. See the following screen capture.
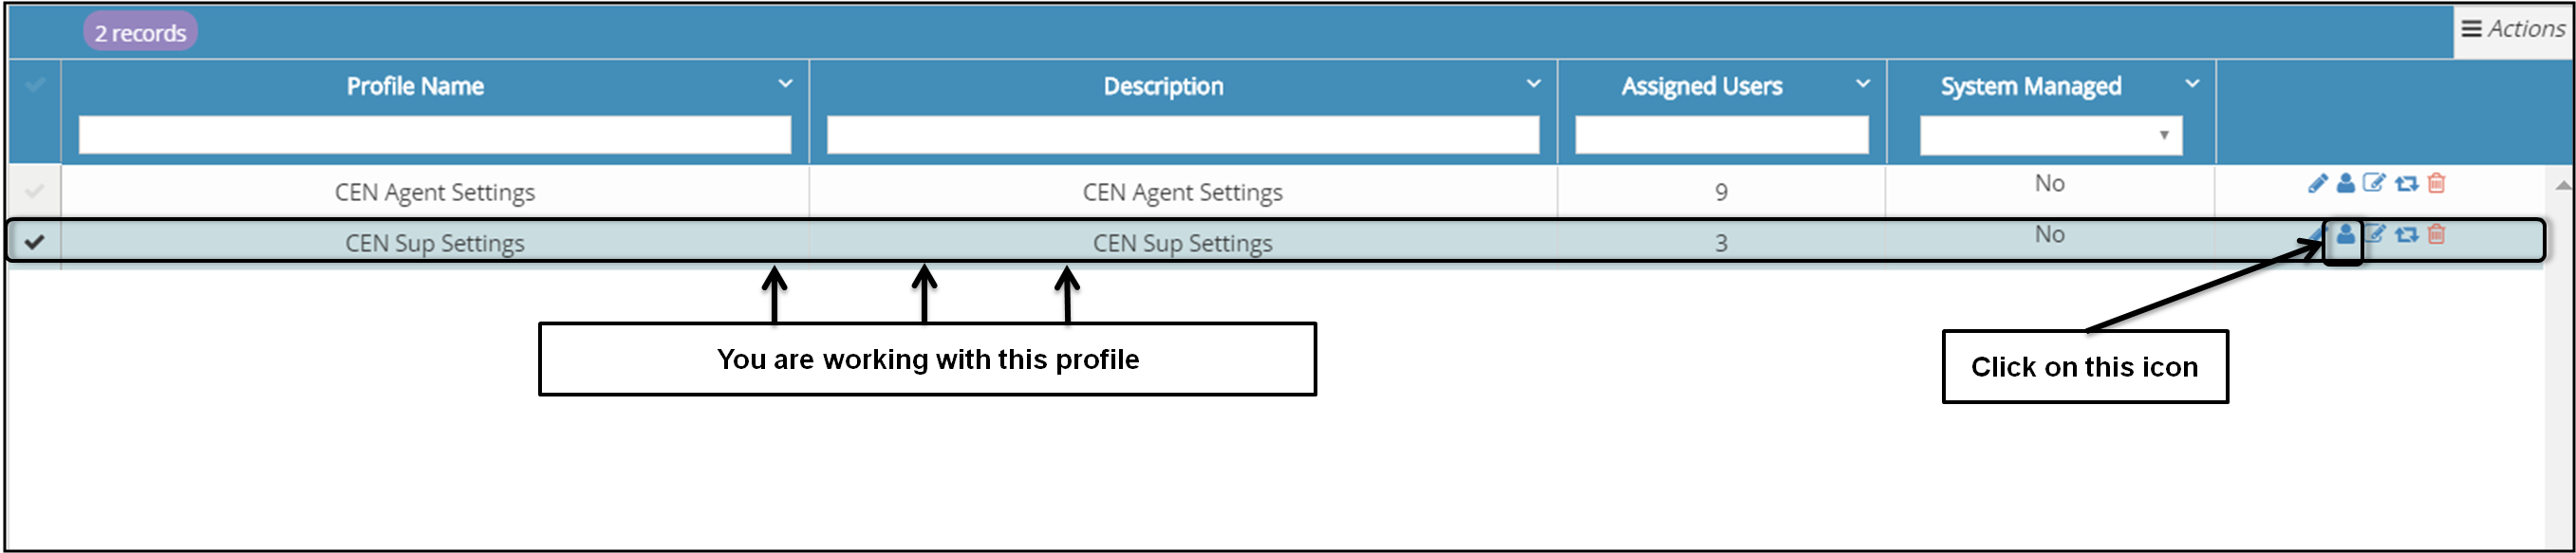
After locating the profile, click on the Edit Agents icon (
 ) on the right side of the row that displays the profile. The Users for Profile_Name pop-up window opens. See the following screen capture.
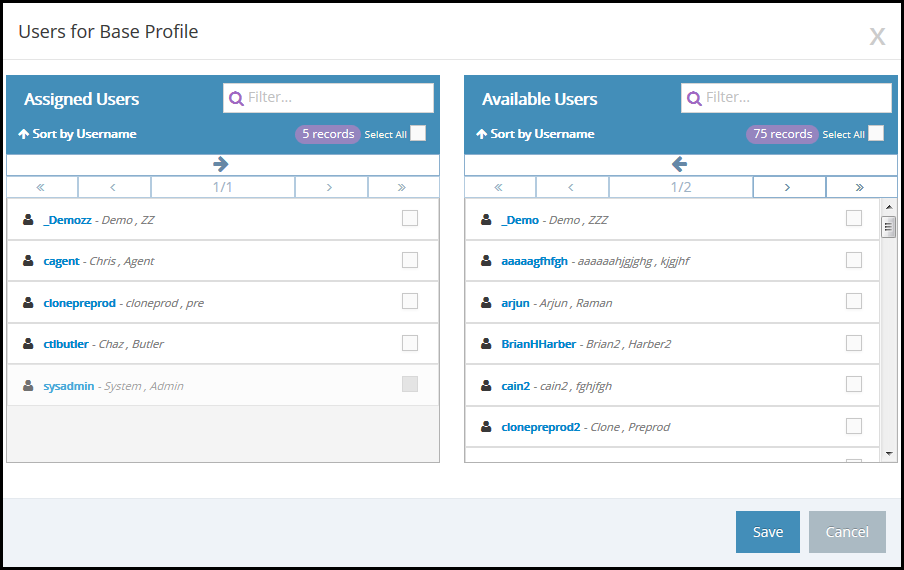
In the Users for Profile_Name pop-up window, the Assigned Users pane and the Available Users pane are displayed with the following information:
The Assigned Users pane on the left side of the pop-up window lists all users that are currently assigned to the profile.
The Available Users pane on the right side of the pop-up window lists all users that are available for assignment to the profile.
Note: By default, each pane is sorted alphabetically in ascending order. You can reverse the order by clicking on the arrow beside the column name. Each column can be sorted individually.
Depending on your needs, you can move users between the Assigned Users pane and the Available Users pane either to assign additional users to the profile or to unassign users from the profile.
Important: When you unassign a user from a profile, that user will no longer be associated to any profile and therefore will not have any settings associated with him or her. The user, although still active, will be extremely limited in what he or she can do. You should not unassign a user from a profile based on the assumption that you will later remember to assign that user to a new profile.
Instead of unassigning a user from a profile, consider simply assigning the user to a new profile, a process that automatically unassigns the user from the currently assigned profile.
To assign one or more users to the profile, in the Available Users pane, locate the user or users to be assigned to the profile and click in each associated check box to put a check mark into the check box. You can select as many users as is appropriate for the profile.
Notes:
You can also perform a search for users using the Filter box in the top of the Available Users pane.
You can re-sort the contents of either pane by clicking on the Sort by Username command in the pane's header.
You can select all users in the list by clicking on the Select All check box in the top of the pane to put a check mark into that check box.
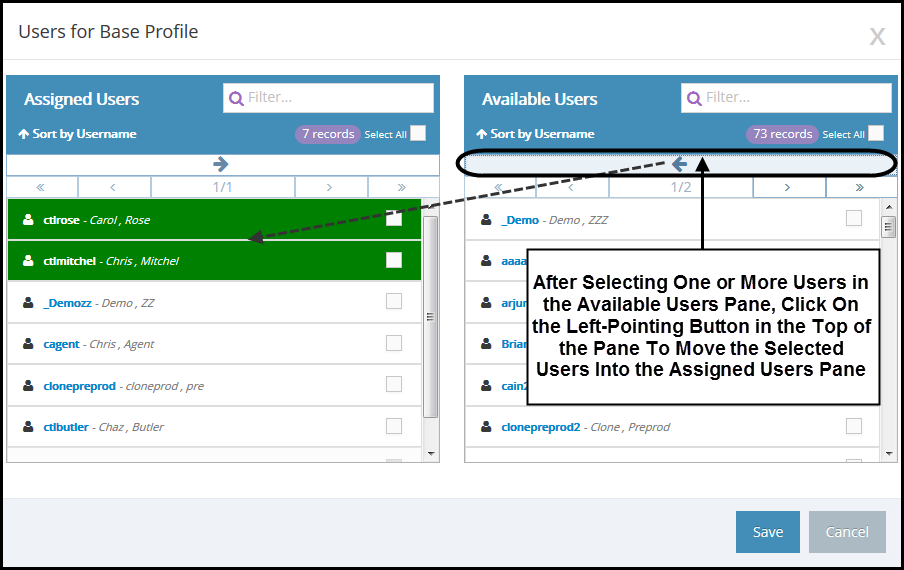
After selecting one or more users in the Available Users pane, click anywhere in the row that contains a left-pointing arrow (the Move button) to move all selected users from the Available Users pane into the Assigned Users pane. The selected users move to the top of the list of users in the Assigned Users pane and their color changes to green.

Notes:
Users that are moved into a different pane are always added to the top of the list of users. If the target pane includes more than one page of users and if you are on a page other than the first page, you must return to the first page to see the users that you moved.
You can both add (assign) and remove (un-assign) one or more users to and from the profile in the same task.
Similar to other procedures, this step describes how to unassign users from a profile. However, when you unassign a user from a profile, that user will no longer be associated to any profile and therefore will not have any settings associated with him or her. The user, although still active, will be extremely limited in what he or she can do. You should not unassign a user from a profile based on the assumption that you will later remember to assign that user to a new profile.
Instead of unassigning a user from a profile, consider simply assigning the user to a new profile, a process that automatically unassigns the user from the currently assigned profile. For information about assigning a user to a profile, see the previous step.
To un-assign one or more users from the profile, in the Assigned Users pane, locate the user or users to be un-assigned from the profile and click in each associated check box to put a check mark into the check box. You can select as many users as is appropriate to be un-assigned from the profile.
Notes:
You can also perform a search for users using the Filter box in the top of the Assigned Users pane.
You can re-sort the contents of either pane by clicking on the Sort by Username command in the pane's header.
You can select all users in the list by clicking on the Select All check box in the top of the pane to put a check mark into that check box.
After selecting one or more users in the Assigned Users pane, click anywhere in the row that contains a right-facing (the Move button) arrow to move all selected users from the Assigned Users pane into the Available Users pane. The selected users move to the top of the list of users in the Available Users pane and their color changes to red.

Notes:
Users that are moved into a different pane are always added to the top of the list of users. If the target pane includes more than one page of users and if you are on a page other than the first page, you must return to the first page to see the users that you moved.
Remember that you can both add (assign) and remove (un-assign) one or more users to and from the profile in the same task.
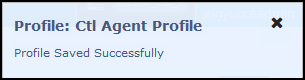
After you have finished moving users between the Assigned Users pane and the Available Users pane, click on the Save button to save your updates. The save operation may take a few seconds. When your changes have been successfully saved, a confirmation pop-up window opens and displays the "Profile Saved Successfully" message (similar to the following screen capture). The confirmation pop-up window closes automatically after a few seconds.
Note: If you change your mind about the updates you specified, you can click the Cancel button to discard your changes. When you click on the Cancel button, the Users for Profile_Name pop-up window refreshes to display a message warning that you have not saved your changes. In addition, the Save button changes to the Continue button.

To discard your changes, click on the Continue button. Otherwise, you can click on the Cancel button to return to the previous window to save your changes.


Please let us know how we can improve this topic by clicking the link below:
© TTEC Digital 2025
![]()
![]()
![]()