Email External Routing
Email external routing refers to the process of routing email messages from Salesforce to an external email system or provider.
OneView for Salesforce supports Email-to-Case method for external email routing. It allows Salesforce to forward case-related emails to Genesys Cloud.
As part of the integration, emails are first sent to the Salesforce Email-to-Case address. Salesforce automatically creates a case and triggers the email content to Genesys Cloud. This creates a new email interaction to a specified queue.
Agents receive a new interaction via OneView like any other interaction (e.g., phone or chat), with the linked Salesforce case kept updated through the integration.
Prerequisites
-
Salesforce:
-
Must enable Emails in the Object Manager to appear in the OneView settings page during an interaction.
-
To enable, go to Object Manager > Case > Case Layouts > Related Lists and search for Emails.
-
Drag Emails to the Related Lists section and click Save.
-
-
OneView settings: OAuth client must be configured. See Client Credentials.
-
Genesys Cloud: Email must be configured on the queue. For more information on ACD email routing and set up, see https://help.mypurecloud.com/articles/about-acd-email-routing/
Email-to-Case setup in Salesforce
To have the Email-to-Case feature setup in Salesforce, follow the steps below:
-
From OneView, go to Setup.
-
Search for Email-to-Case.
-
Go to Routing Addresses section and click New.
-
Provide the details for mandatory fields:
-
Routing Name
-
Input your own email address in the Email Addresses field.
-
Select Email from Case Origin drop-down.
-
Search for Email-to-Case in the Omni-Channel Flow field.
-
Search for the queue in the Fallback Queue field.
-
-
Click Save.
Result: You will receive an email from Salesforce to approve the email address that is created.
-
Copy the email address to a temporary file for future use.
Configure Email-To-Case attribute flow
Add Routing Options to Tabs
Email-To-Case flow must have a unique Routing Options object record created in Salesforce.
To create a new Routing Options record:
-
From Setup using the Quick Find box, search for and select Tabs.
-
Go to Custom Object Tabs and click New.
-
From the Object drop-down, select Routing Options.
-
Search for and select the desired Tab Style.
-
Click Next.
-
Click Save.
Result: Routing Options is available in Salesforce to configure.
Configure Routing Options
-
Go to the App Launcher and locate Routing Options.
-
Click New.
-
Enter the following input fields:
-
Routing Options Name. (Required)
-
Call CenterId: Call Center Id in Salesforce. See CallCenterId. (Required)
-
Genesys Cloud Queue Id: Genesys Cloud Queue Id through which the email is routed.
-
Genesys Cloud Architect Flow Id: Genesys Cloud flow Id used for routing.
Note: Genesys Cloud Architect Flow Id and Genesys Cloud QueueId cannot be utilized within the same element. -
Genesys Cloud LanguageId: Genesys Cloud language Id used for routing.
-
Genesys Cloud Skills: Genesys Cloud Skills used for routing.
-
Click Save.
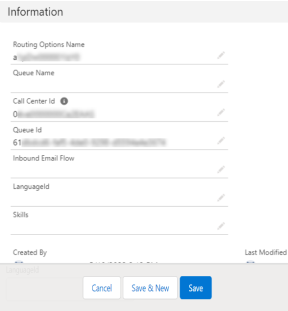
The Routing Options field must be populated with the Routing Options record. The record is utilized for routing within Genesys Cloud Routing Request > Routing Options field to be used in the email-to-case flow.
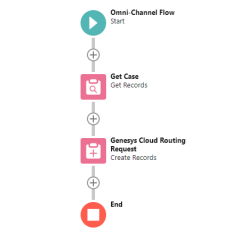
Configure the Flow
-
The Flow type must be Omni-Channel Flow.
-
Add a Get Records element to your canvas to search for an existing case.
-
Enter a Label and API Name for this flow element. For example, GetCase.
-
Configure the element using the following information:
Section Parameter Input Get Records of this Object Object Case Filter Case Records Condition Requirements All Conditions Are Met Field Id Operator Equals Value Record Id Sort Account Records Sort Order Not Sorted Storing Records How many Records to Store Only the first record How to Store Record Data Choose fields and assign variables
Where to Store Field Values In separate variables -
Click Done.
-
-
Add another Create Records element to the canvas.
-
Enter a Label and API Name for this flow action. For example, Genesys Cloud Routing Request.
-
Configure the element using the following information:
Section Parameter Input Create and Set the Records How many Records to Create One How to Set the Record Fields Use separate resources, and literal values Create a Record of This Object Object Genesys Cloud Routing Request Set Field values for the Genesys Cloud Routing Request Field RoutingOptions Value Id -
Click Done.
Note: Salesforce RecordId in Genesys Cloud Routing Request is utilized to screenpop the record based on the RecordId.
-
-
Connect the elements in the flow.
-
Save and name the flow.
 v
v
Initiate an Email-to-Case interaction
-
To initiate Email-to-Case interaction, send an email to the verified email address.
-
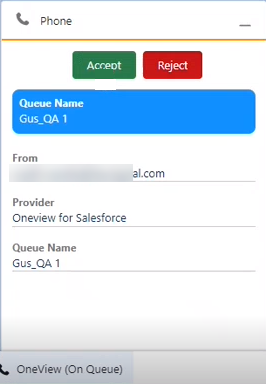
An alert with the interaction appears in the OneView CTI panel.
-
Once the interaction is accepted in OneView, case related to the email opens in a new subtab with the Email option.

-
Click the drop-down to Reply or Forward.
-
Click Send.
-
Disconnect the interaction and proceed to Wrap up.