The RealPlay™ BOT Onboarding Process
Onboarding is the process in which RealPlay™ BOT credentials are assigned to new users.
The RealPlay™ BOT onboarding process can be divided into four major steps:
- Access the Onboarding Request (on Smartsheet)
- Onboard the learners and special users
NOTES:
The RealPlay™ Admin Portal is the preferred onboarding tool for the following reasons:
- It is faster because it facilitates bulk onboarding.
- It generates user IDs that are based on the employee’s ID number.
- It lessens the risk of getting errors due to copying and pasting individual information.
Enroll learners through Auth0 only if the RealPlay™ Admin Portal is down.
- Update the Smartsheet records for learners and special users
- Update the status of the onboarding request
NOTE:
Although the actual RealPlay™ BOT enrollment takes place in step 2, do not skip any of the other steps, for these are necessary for monitoring, notification, and reporting.
Accessing the Onboarding Request
Onboarding requests are sent through a form that is linked to the RealPlay™ BOT Onboarding Request sheet on Smartsheet.
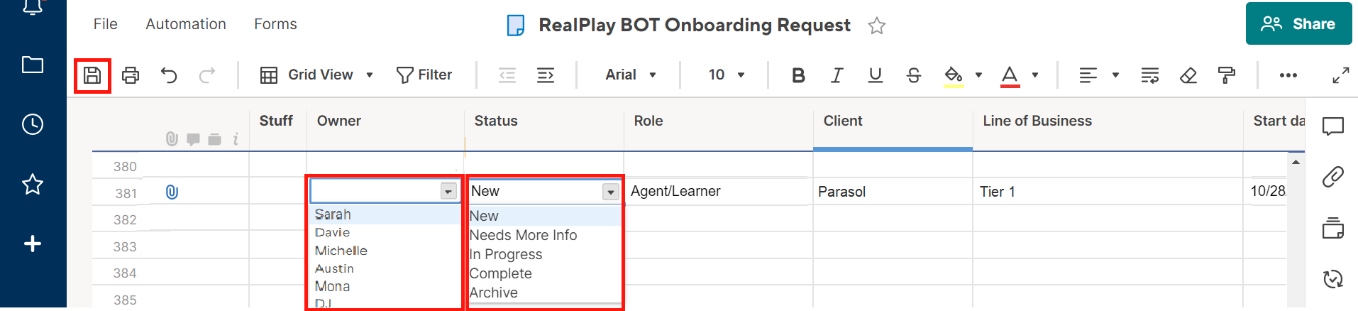
- Access and tag the onboarding request.
The new onboarding request on the bottom row of the RealPlay™ BOT Onboarding Request sheet.
- Select your name from the drop-down list under the Owner column.
- Select In Progress under the Status column.
- Click the Save icon to save the changes. Alternatively, hit Ctrl+S keys on your keyboard.
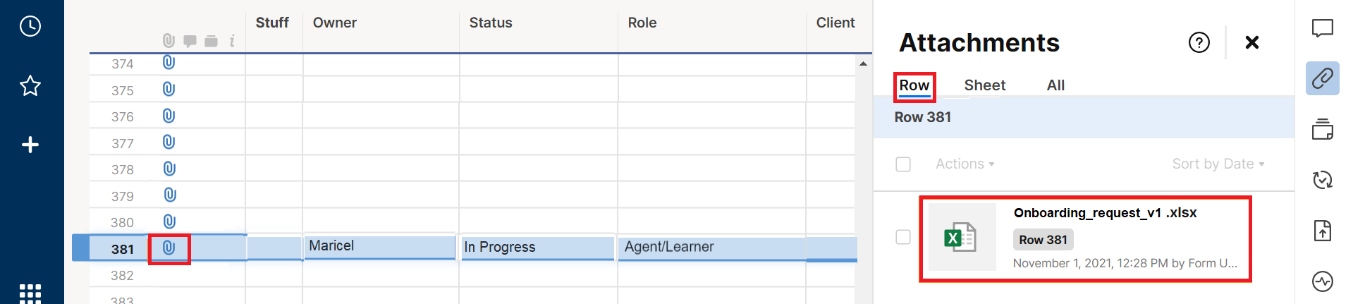
- Download the attachment.
- Click the paperclip icon next to the row number of the new request. This opens the Attachments panel on the right side of the sheet.
- Make sure that you are on the Row tab of the Attachments panel.
- Click the file name or the spreadsheet icon to download the attachment.
- Scan the data for issues, such as incomplete information and invalid characters in the email column. Check for special users in the list.
- When the first names and last names are submitted in separate columns, use the concatenate function to combine them into a single cell. The concatenate function in MS Excel hastens data creation and reduces risk for errors when combining the first and last names.

- In the original attachment, insert a new column between the Last Name and Email columns.
- Under the new column and on the first row that contains a learner’s data (in this example, this is cell D2), type: =concatenate(B2,”[space]”,C2) and press the Enter key.
Where:
B2 = cell that contains the first name of the topmost learner, and
C2 = cell that contains the last name of the topmost learner
Do not forget to type the commas, quotation marks, and the space in between.
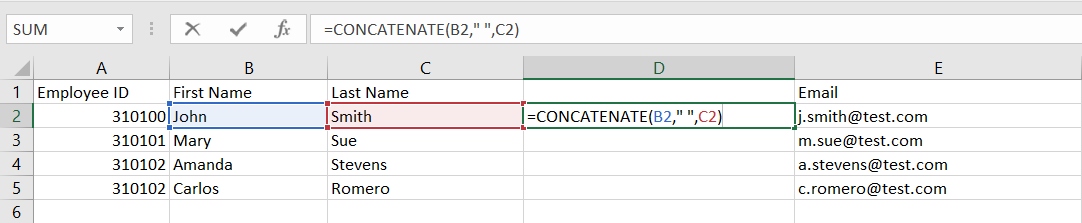
- From the lower right corner of cell D2, click and drag your pointer to the row of the last entry
- If the file contains missing or invalid information, use the Needs More Info automation/workflow in the RealPlay™ BOT Onboarding Request sheet to notify the requester.
- In the RealPlay™ BOT Onboarding Request sheet, change the status by clicking the In Progress option to Needs More Info option.

- Scroll to the rightmost part of the sheet. Under the AI Team Notes column, type what additional information is needed from the requester.
- Click the Save button.
Every time the status is changed to Needs More Info and the sheet is saved, this workflow sends an email to the requester that includes the text in the AI Team Notes section.
The requester will receive an email with the following message:
Hello,
Thank you for sending your request. For us to proceed with your RealPlay BOT access request, please see the AI Notes Team column for items/requests requiring your attention.
Thank you,
The AI BOT Team
[AI Team Notes]
Onboarding Learners and Special Users
There are two ways to onboard learners into the RealPlay™ BOT:
NOTES:
The RealPlay™ Admin Portal is the preferred onboarding tool for the following reasons:
- It is faster because it facilitates bulk onboarding.
- It generates user IDs that are based on the employee’s ID number.
- It lessens the risk of getting errors due to copying and pasting individual information.
Enroll learners through Auth0 only if the RealPlay™ Admin Portal is down.
Onboarding Learners and Special Users Through the RealPlay™ BOT Admin Portal
Using the RealPlay™ BOT Admin Portal is the most seamless and the preferred method of onboarding new users.
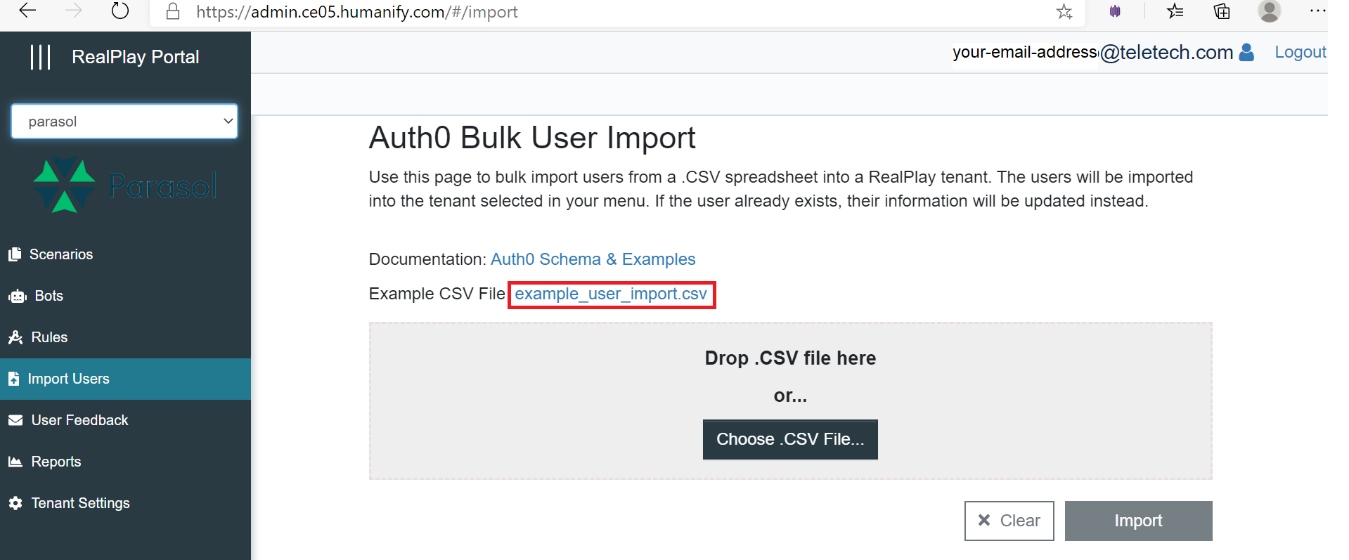
- Click the link in the Example CSV File field to download the sample file from the Admin Portal Import Users screen.
- Click the downloaded file in your browser’s Downloads section.
- Copy the data from the attachment into their proper columns.

NOTE:
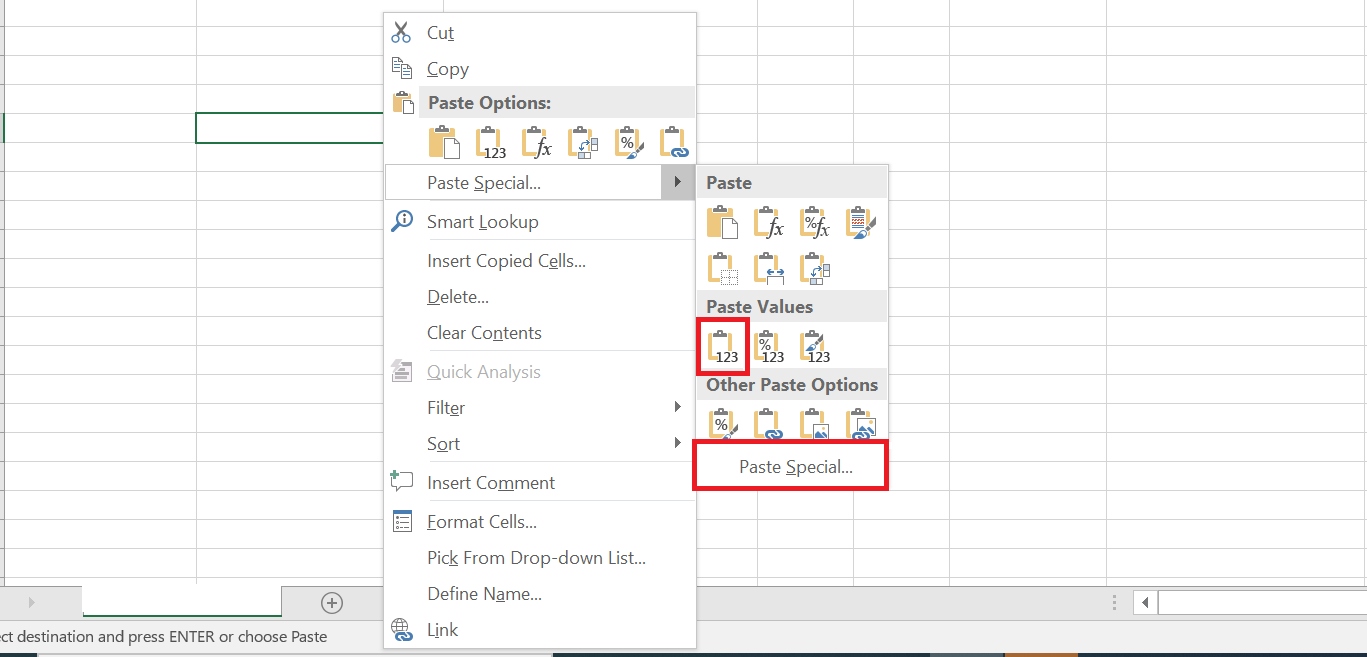
When pasting the data from the attachment, right click and select Match Destination Formatting or Paste Values to eliminate invisible characters and functions. This option is also available when you select Paste Special.
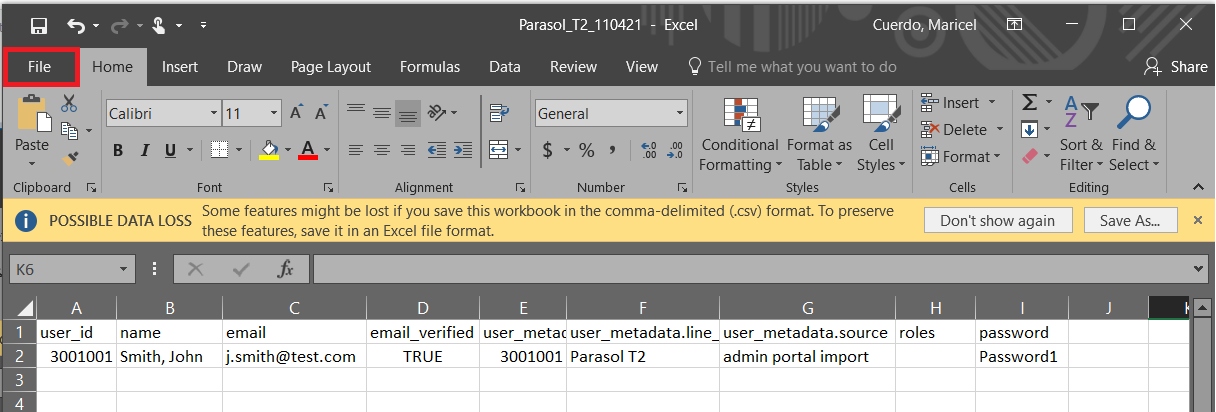
| Column Header | Data to be Entered |
| user_id | Employee’s ID number |
| name |
Employee’s name |
|
Employee’s email address |
|
| email_verified | TRUE |
| user_metadata.employeeID | Employee’s ID number |
| user_metadata.line_of_business | Client and line of business |
| user_metadata.source | admin portal import |
| roles |
Leave blank for Learners; for special users: enter SME, Manager, or Developer
|
| password | Password1 |
NOTES:
Only use the roles defined above. If the request contains roles that are not any of the four, assign one of the pre-defined roles based on the level of access that the user requires.
Example: A Quality Assurance (QA) coach, who should be able to access the production BOTs, test BOTs, and reports, should be assigned the role of a Manager.
| Levels of Access | Production BOTs | Test BOTs | Reports | BOT Development |
| Roles | ||||
| Learner | ✓ | |||
| SME | ✓ | ✓ | ||
| Manager | ✓ | ✓ | ||
| Developer | ✓ | ✓ | ✓ | ✓ |
- Cleanup the data to avoid importing errors.
- Delete the extra spaces within the entries. (A space before or after the email address causes an error.)
- Scan for employee ID or email address formatting errors, such as repeated, missing, or invalid symbols.
- Type the correct information.
- Save as a CSV file to eliminate special formatting.
- Click the File menu on the upper left corner of the screen.
- Select Save As from the options.
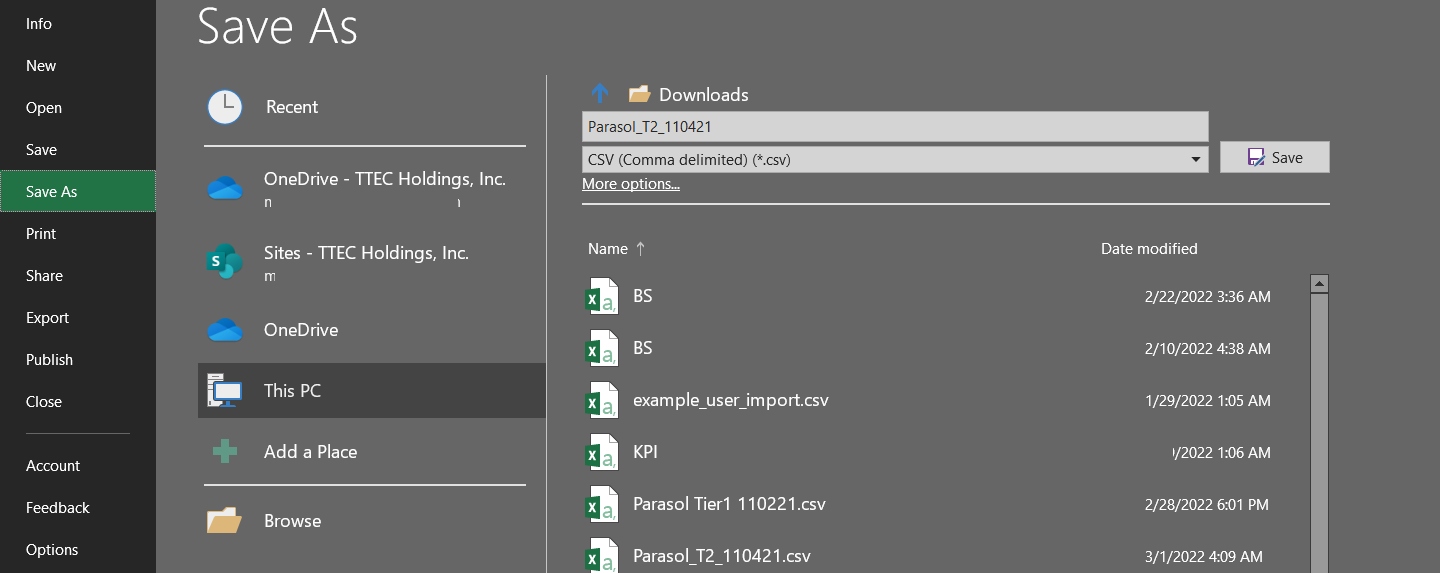
- Type the file name.
NOTE:
Use the name of the tenant and the current date as the file name. This will help you track any pending requests and will remind you to check your selected tenant before proceeding with the import.
- Select CSV from the file types.
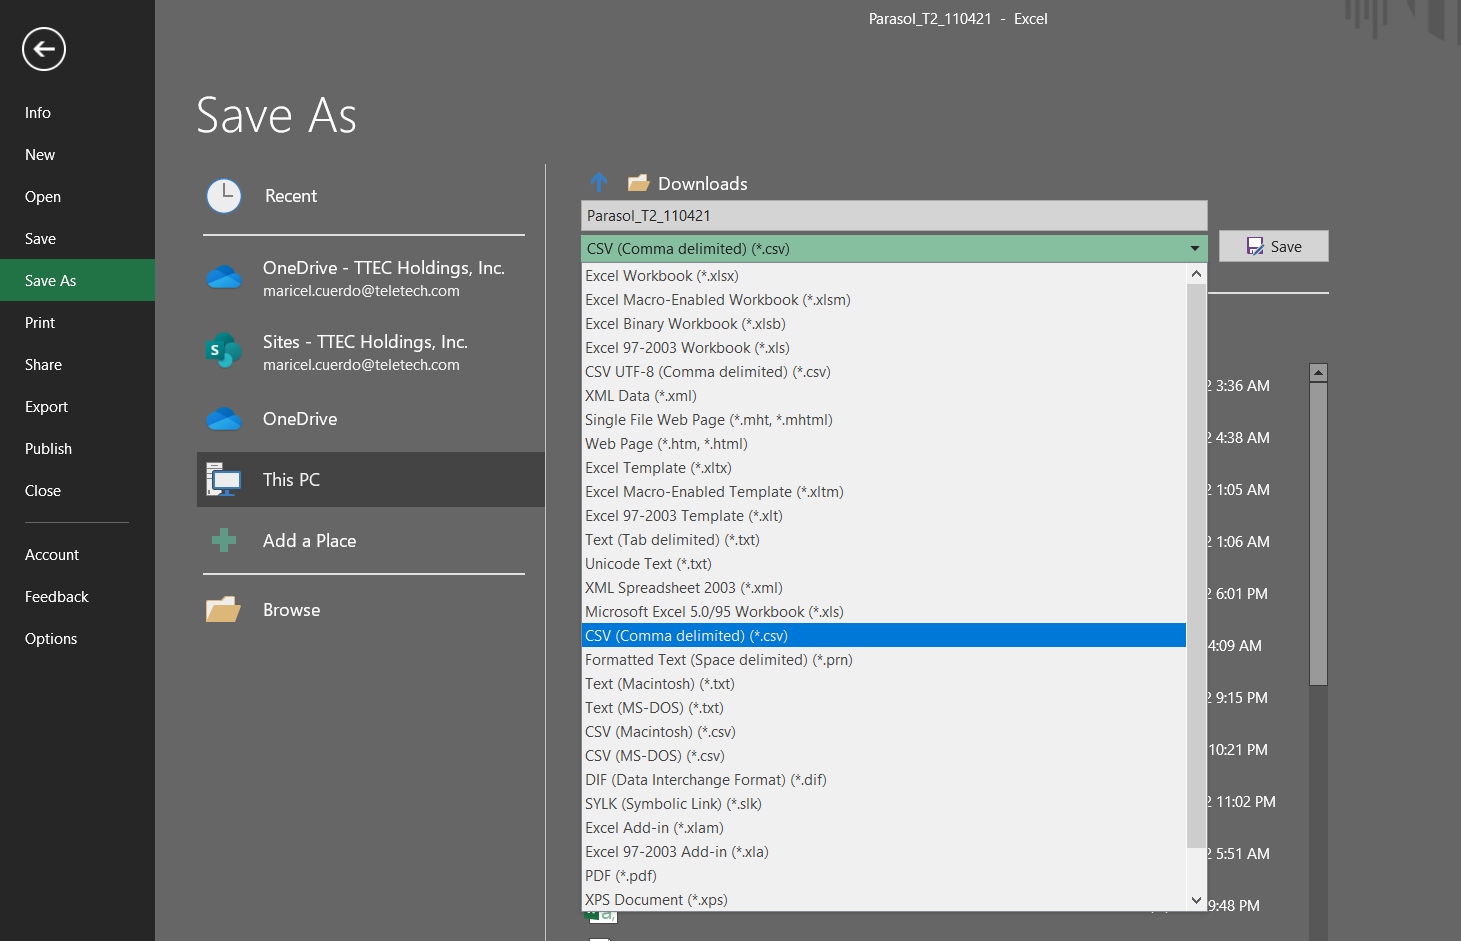
- Click the Save button.
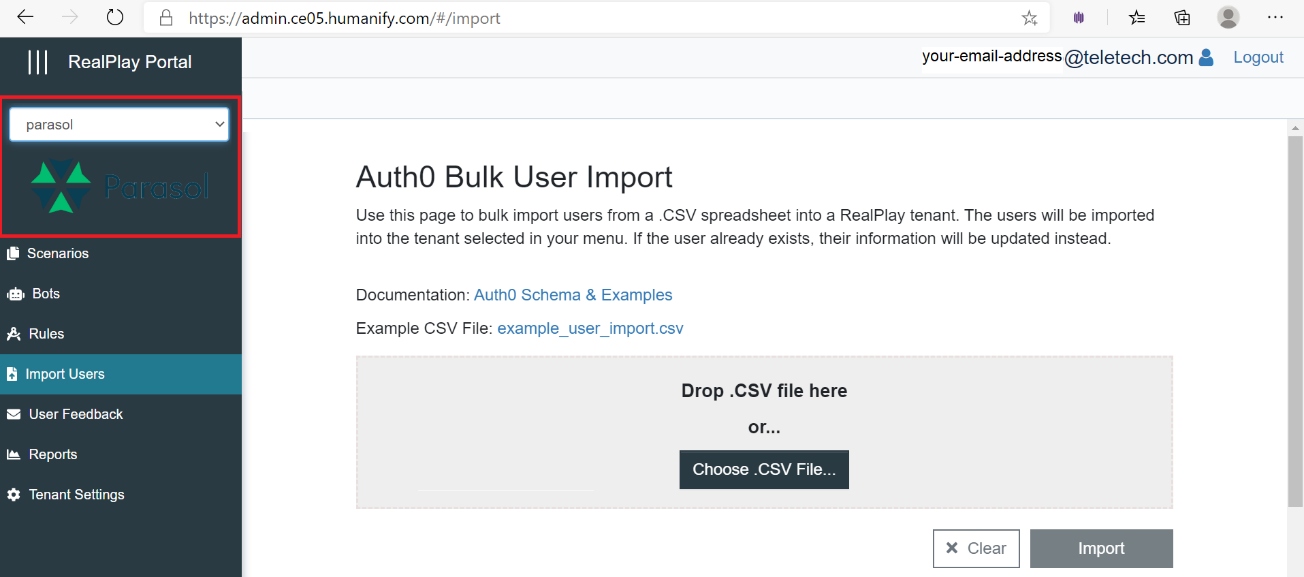
- Go to the RealPlay™ BOT Admin Portal Import Users page to import the file.
- Select the tenant.
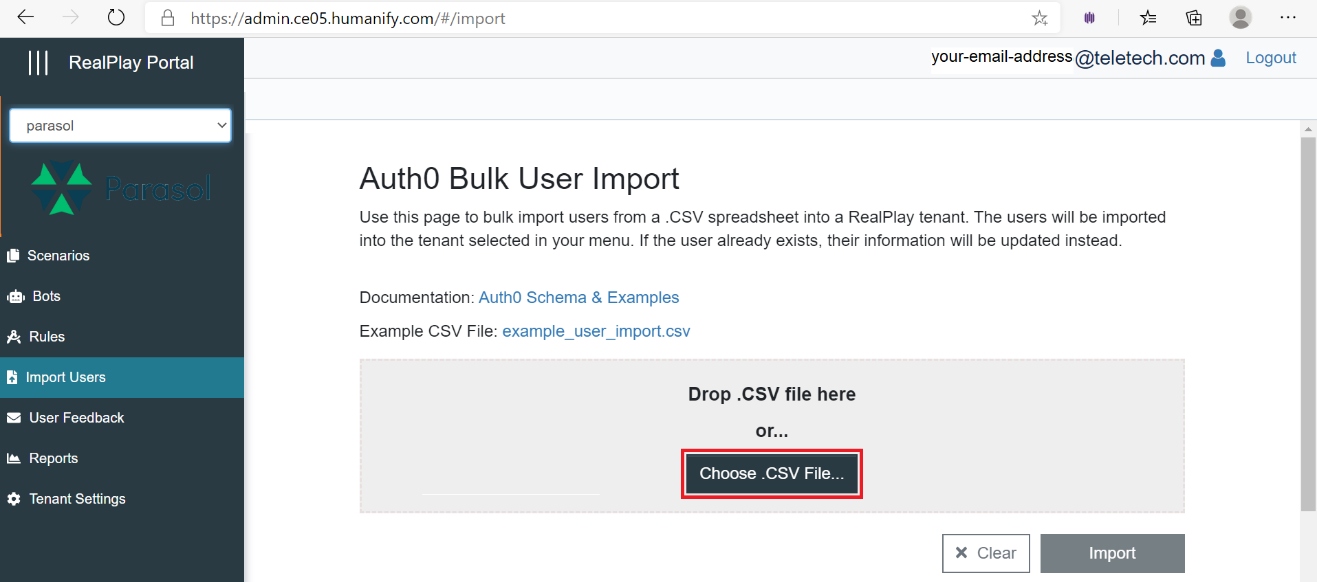
- Click the Choose .CSV file button to open the file browser.
- Select the file that contains the data.
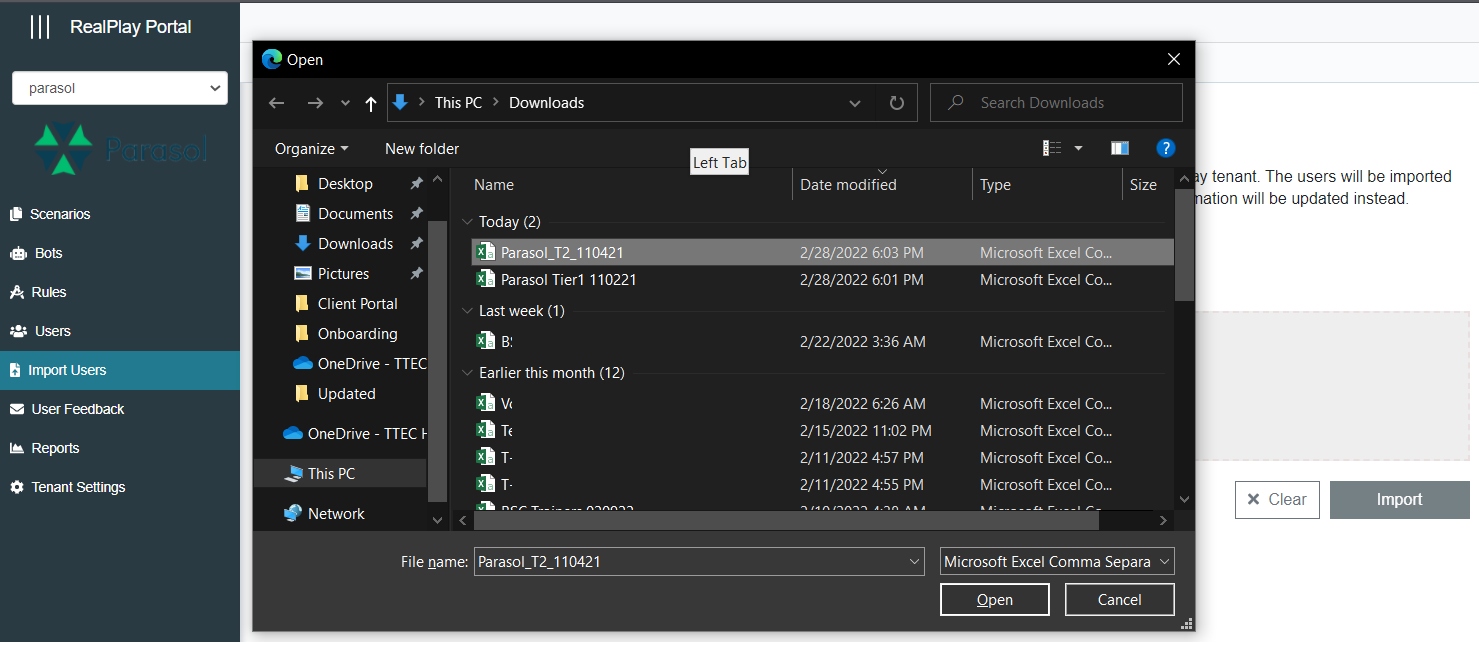
- Click the Open button.
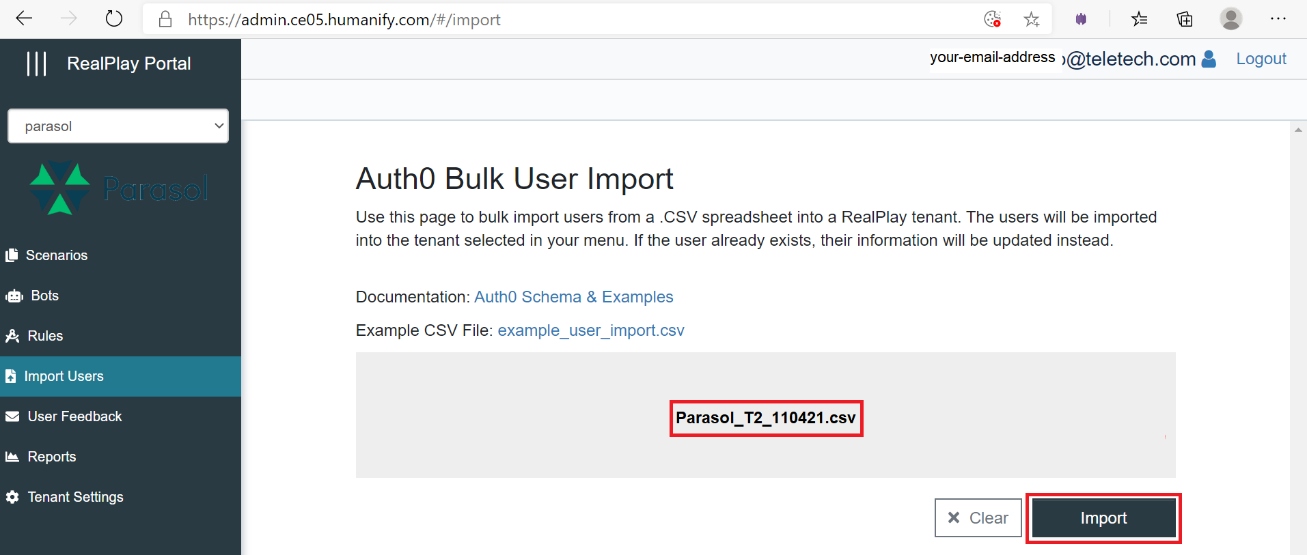
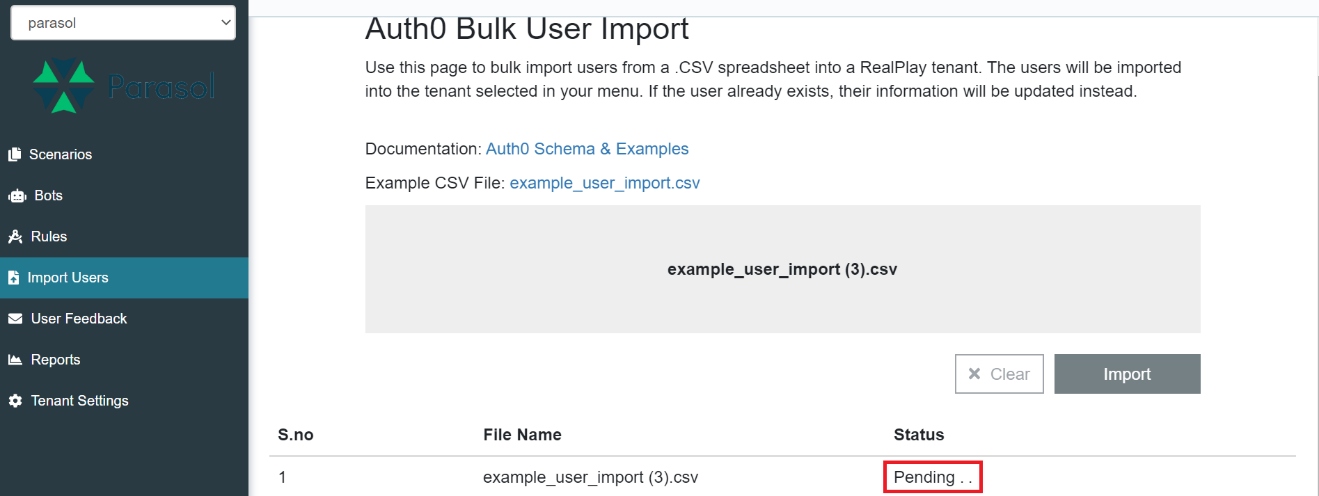
- Click the Import button once the gray area in the middle displays the name of the CSV file.
NOTE:
Check that you have selected the correct tenant and file before proceeding with the Import.
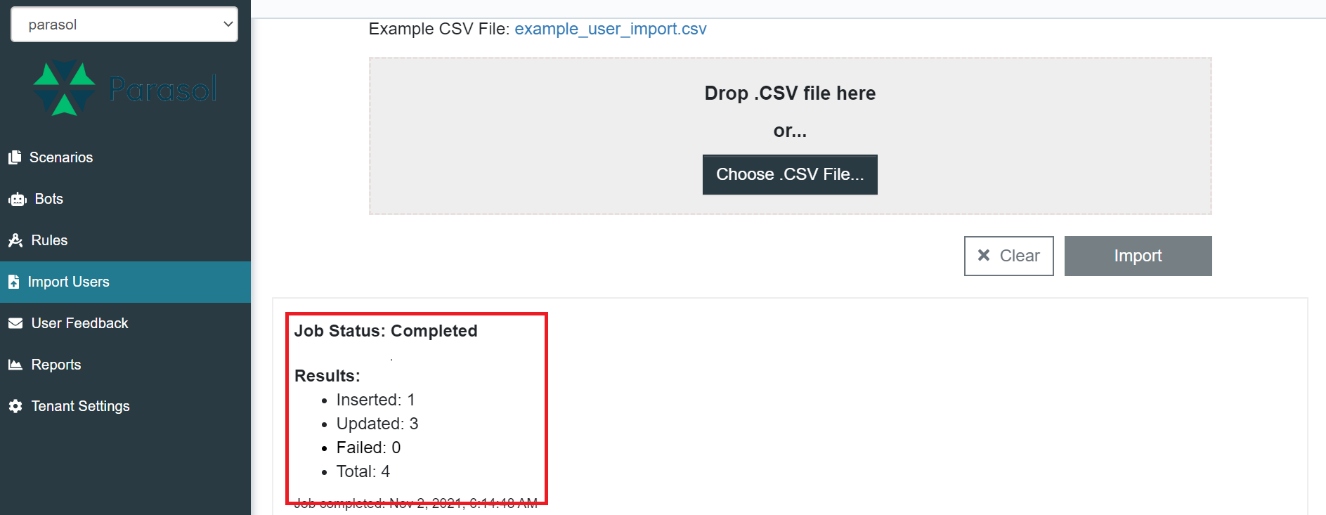
- Wait for the status at the bottom to change to Completed. The status may display Pending for a couple of minutes depending on the amount of data being imported.
NOTE:
Stay on this page until the status changes to Completed. Do not leave this page during the process.
- When the status changes to Completed, open a text editor to temporarily note the Results, particularly the number of Updated and Failed entries.
Updated entries are those accounts that were created in a prior onboarding. The new onboarding CSV file may be used to update the user’s name, email, line of business, or password.
Failed entries are those that contain invalid or incomplete information. A failed entry (row) prompts the Admin Portal to generate two files that may be downloaded from the Results section:
- A log file that contains the error messages
- A CSV file containing only the failed entries, which the administrator can edit with the correct information and re-import.
NOTE:
If an error prevents you from importing some of the data using the RealPlay™ BOT Admin Portal, see the Error Messages and Their Solutions section of this guide for details.
Onboarding Learners and Special Users Through Auth0
TIP:
Onboard new users using Auth0 only if the RealPlay™ Admin Portal is down.
If this is not the case, follow the steps in Onboarding Learners and Special Users Through the RealPlay Admin Portal.
- From the Auth0 dashboard, click the drop-down menu, and select Switch tenant.
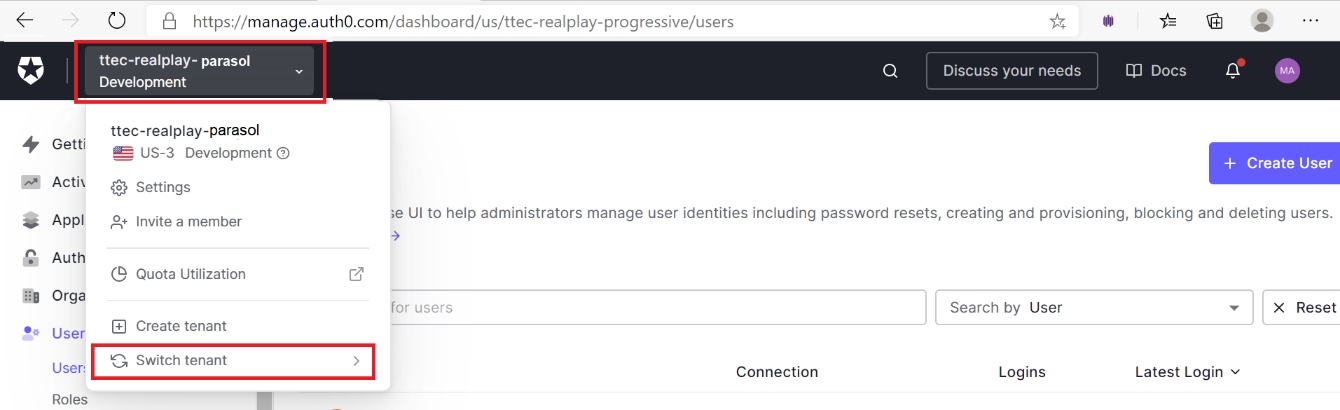
- From the list of tenants, choose the name of the client whose RealPlay™ BOT users are to be onboarded.
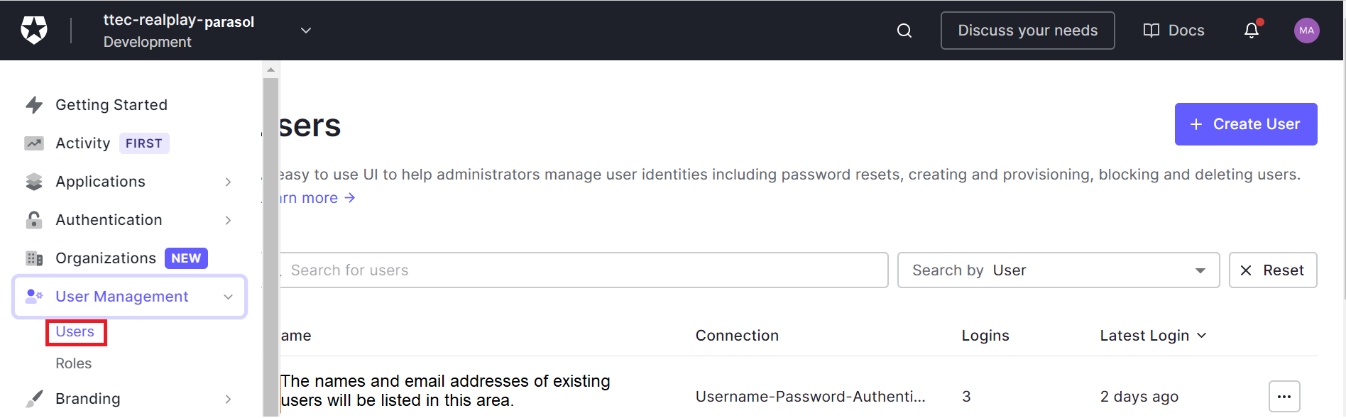
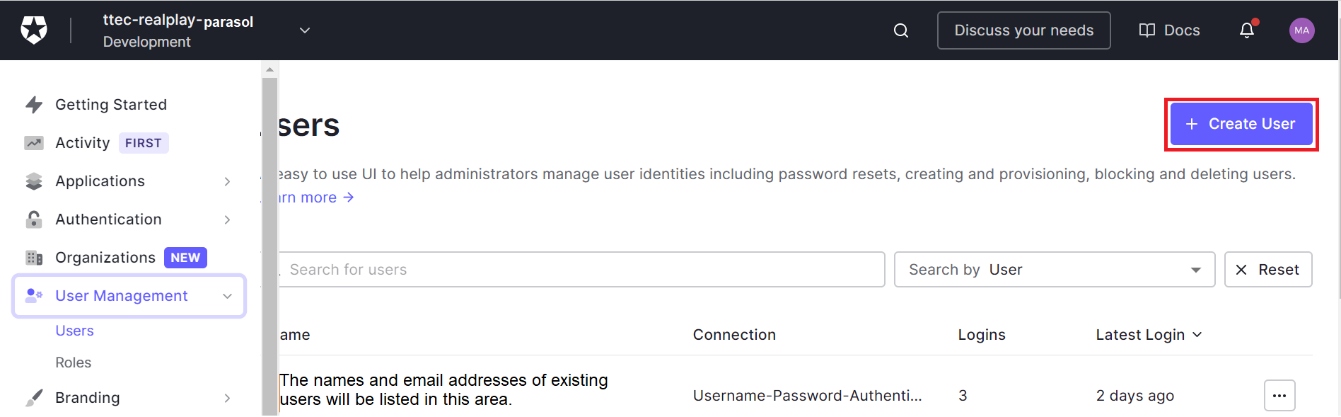
- On the left column, click the User Management drop-down arrow.
- Select Users from the drop-down menu.
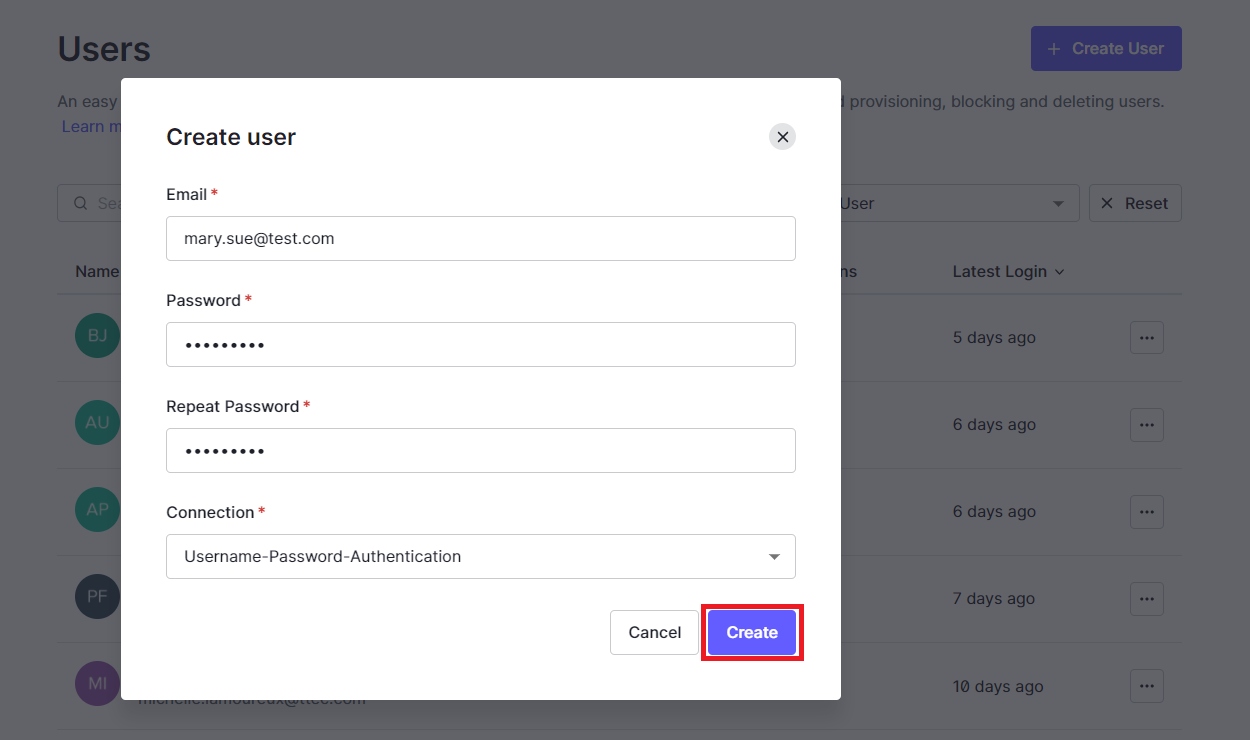
- On the upper right corner of the screen, click the Create User button.
- Fill in the required information.
- Type the user’s email address in the Email field.
- Type the password in the Password field. The default password is Password1.
- Enter the password again in the Repeat Password field.
- Click the Create button to save the information.
- Search for the user’s account.
- Type the user’s email address in the Search for users field.
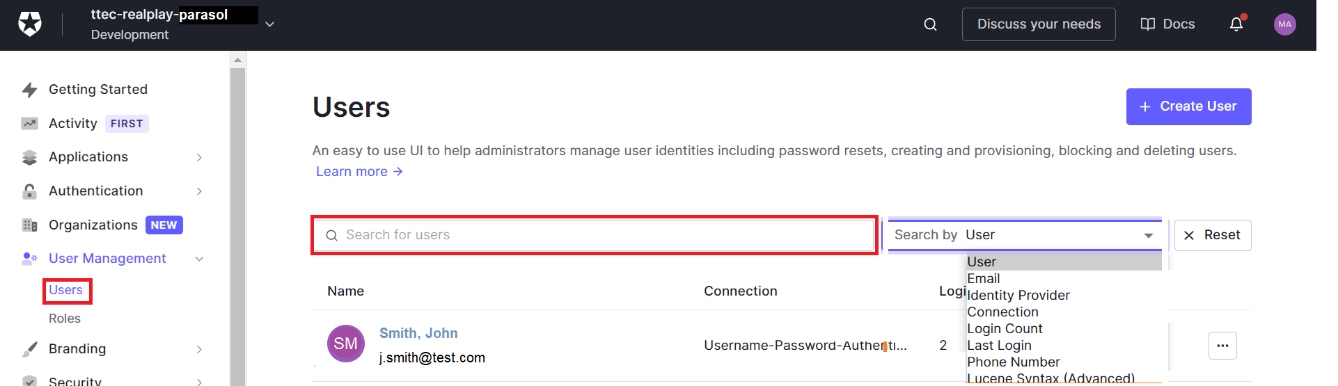
- Press the Enter key.
- Click the user’s name or email address from the search results.
NOTE:
The user’s email address becomes the default name for a new user’s account.
- Click the Edit link.
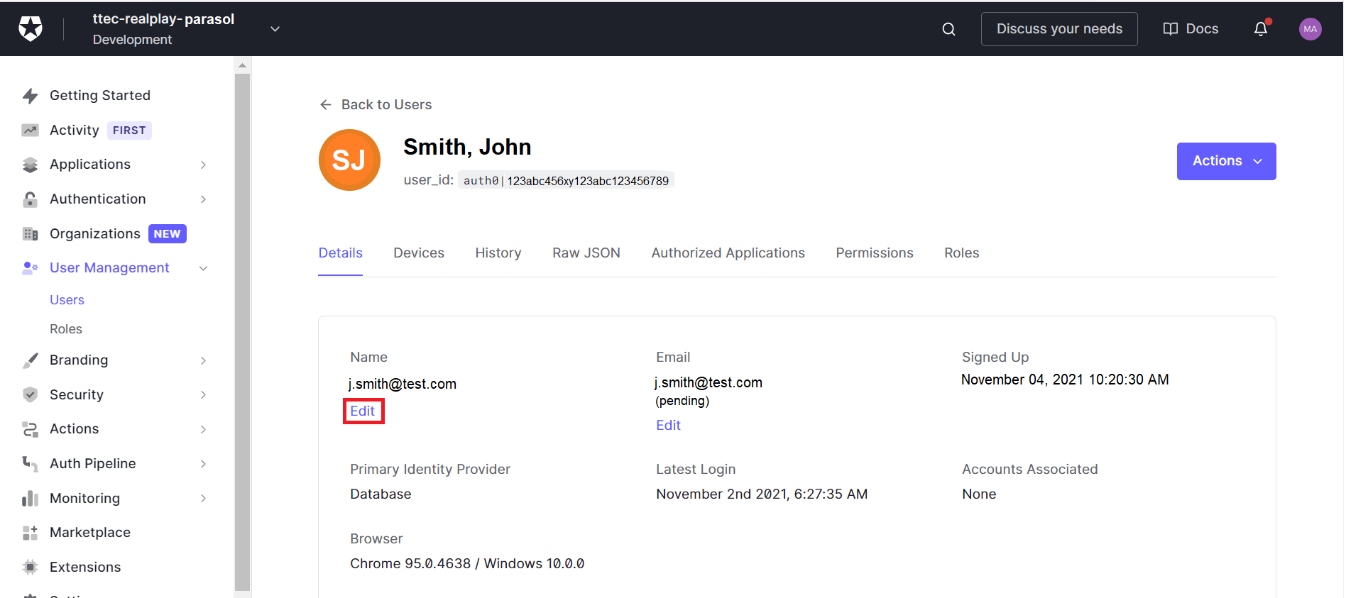
- Type the user’s name in the pop-up window.
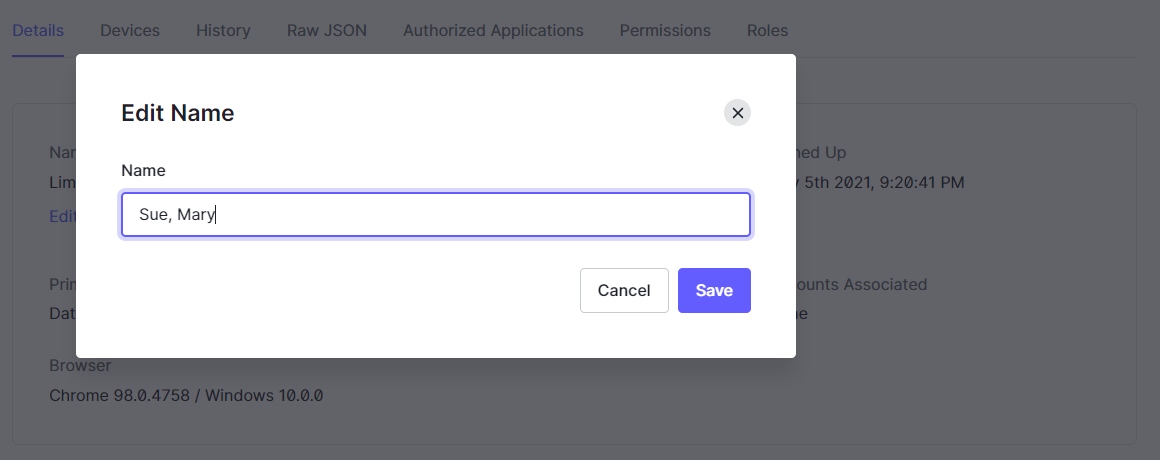
- Click the Save button.
- Verify the user’s email address.
- Under the Email section, click the Edit link.
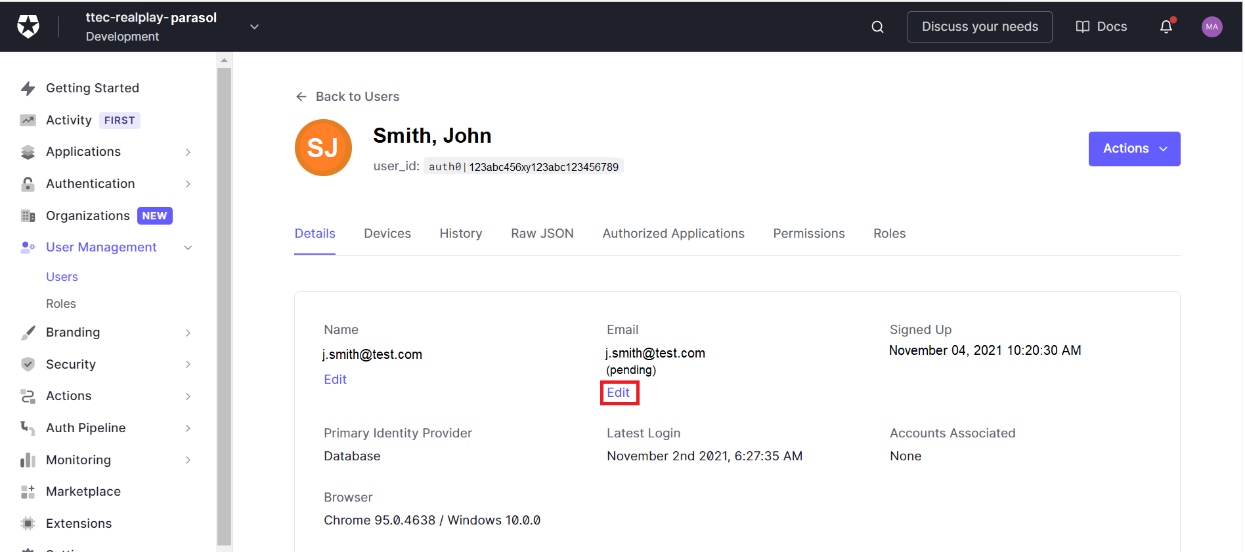
- Click the Set email as verified link.

- Click the Save button.
- Create a new column in the onboarding csv file.
- Type user_id as the column header.
- Copy the user_id, which is located underneath the user’s name.

- Paste this into the user_id cell for this learner.

- If the user needs special access, assign the user a special role.
- Repeat this process for each user in the onboarding request.
- Once each user in the request has been onboarded, update Smartsheet records for learners and special users.
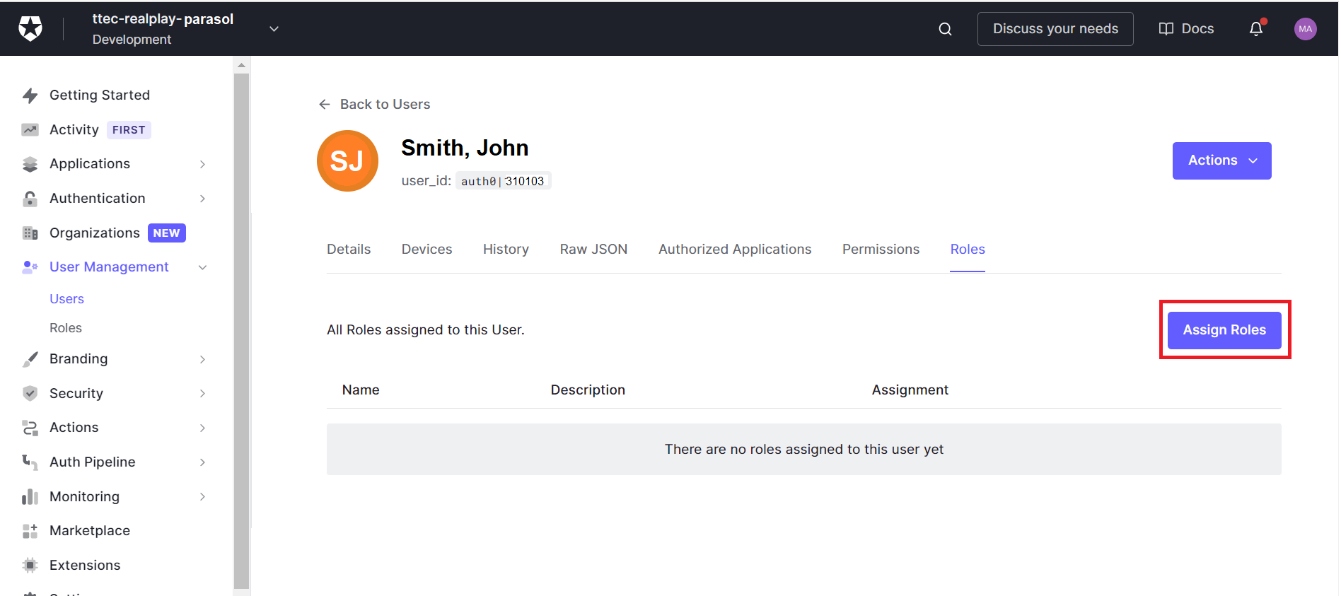
Assigning Special Roles Through Auth0
Onboarding using the RealPlay™ BOT Admin Portal submits the special role assignments along with the users’ information. No extra step is needed.
When onboarding using Auth0, roles for each special user must be manually assigned.
- Search for the user’s account on Auth0.
- Under the User Management drop-down, click the Users link.
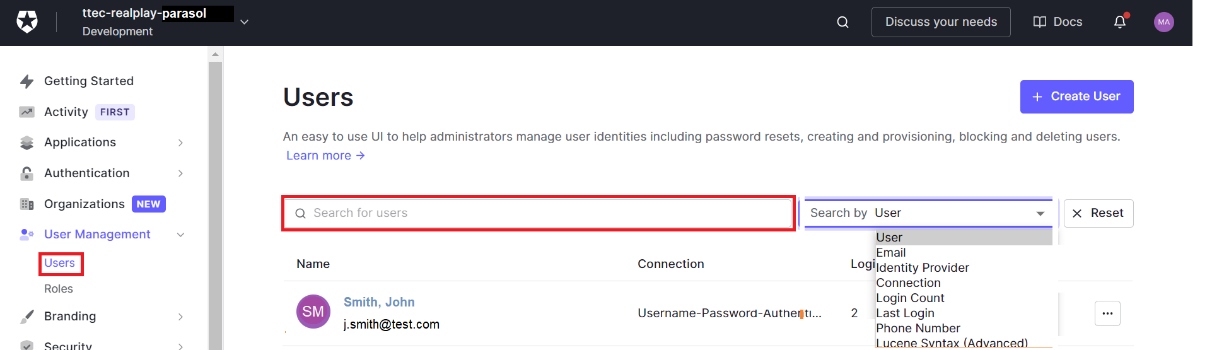
- Type the user’s name or email address into the Search for users field.
- Select the type of information that you entered from the drop-down menu.
- Press the Enter key.
- Click the user’s name to pull up the account’s details.
- After viewing the user’s details, click the Roles tab.
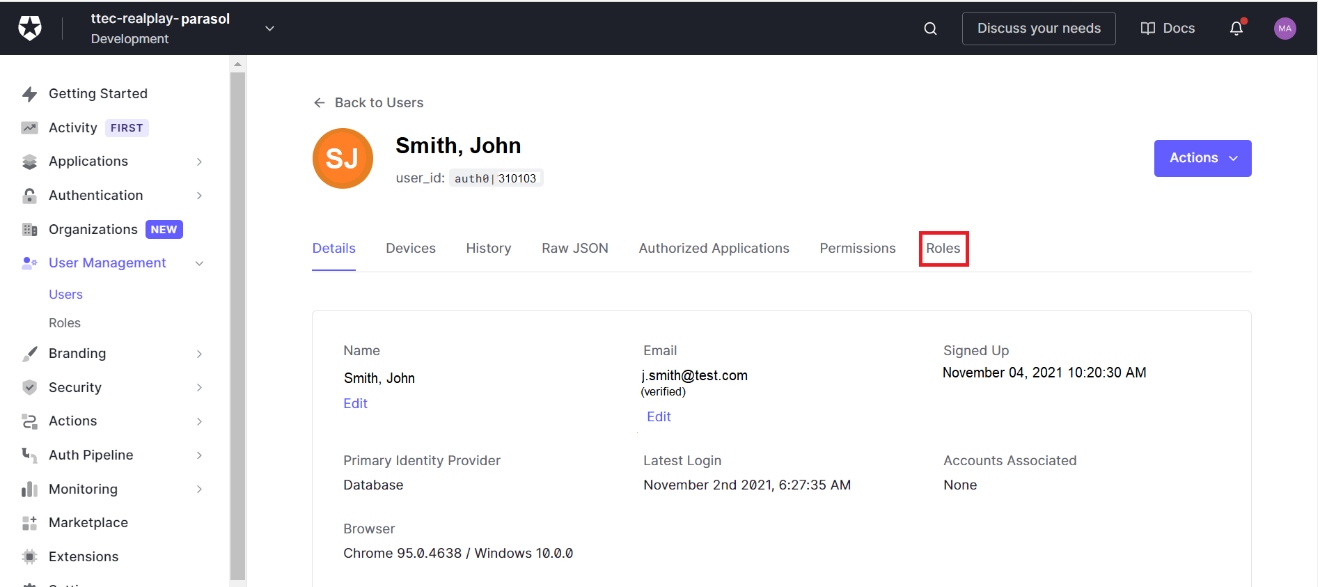
- Click the Assign Roles button.
- Click the Select Roles drop-down arrow.
- Select the role that will be assigned to the user.
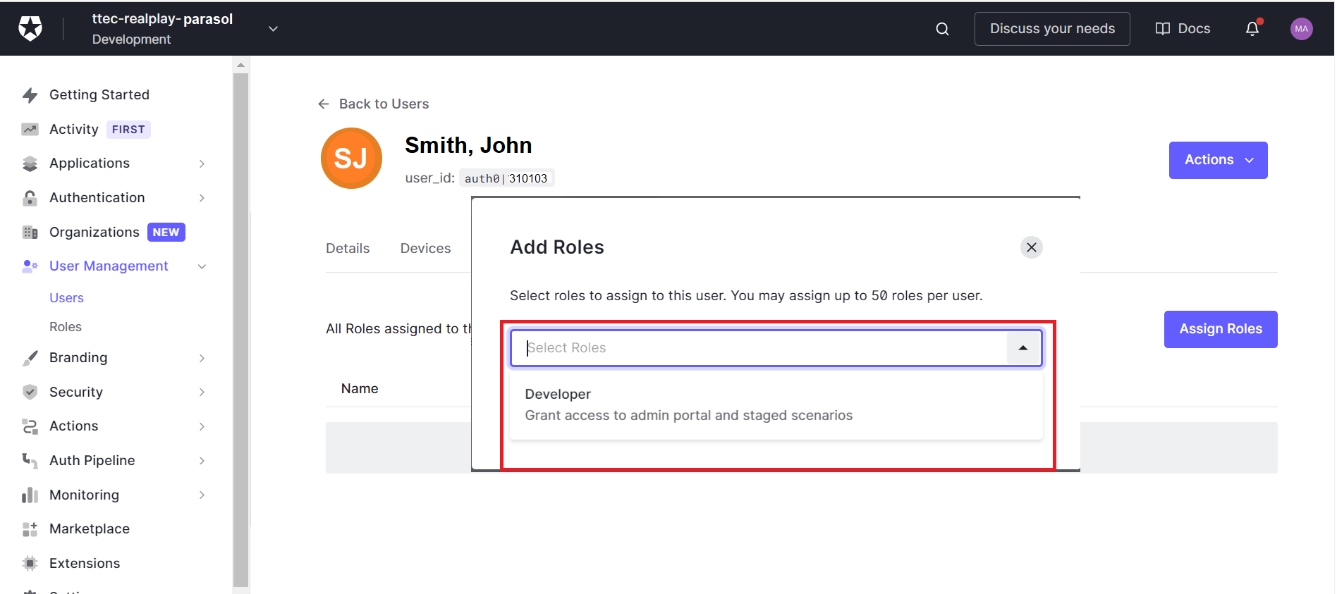
The only approved roles are:
- Learner: (leave the role field blank) Anyone who is not any of the special roles below
- SME: Someone who will test the BOT, but will not be granted access to reports
- Manager: A trainer, team lead, manager, or any support role who should be granted access to reports
- Developer: A member of the Innovation - RealPlay™ BOT Team or of the Innovation - RealPlay™ Product Engineering Team
NOTE:
Use only the roles defined above. If the request contains roles that are not any of the four, find the level of access that the learner requires and apply the corresponding role from our list.
Example: A QA coach, who should be able to access the production BOTs, test BOTs, and reports, should be assigned the role of a Manager.
| Levels of Access | Production BOTs | Test BOTs | Reports | BOT Development |
| Roles | ||||
| Learner | ✓ | |||
| SME | ✓ | ✓ | ||
| Manager | ✓ | ✓ | ||
| Developer | ✓ | ✓ | ✓ | ✓ |
The Assign Roles function can also be found by clicking the meatballs menu (three horizontal dots) at the end of each user’s name in the Users screen.
If this learner is the last name in the onboarding request, update the Smartsheet records for learners and special users.
Updating the Smartsheet Records for Learners and Special Users
After onboarding the new users into the RealPlay™ BOT, add their names to their respective sheets.
RealPlay™ BOT Auth0 UserIDs (for learners)
RealPlay™ BOT Auth0 UserIDs – SMEs and Support (for special users)
- After onboarding the learners, update the corresponding sheets with new learners’ information.
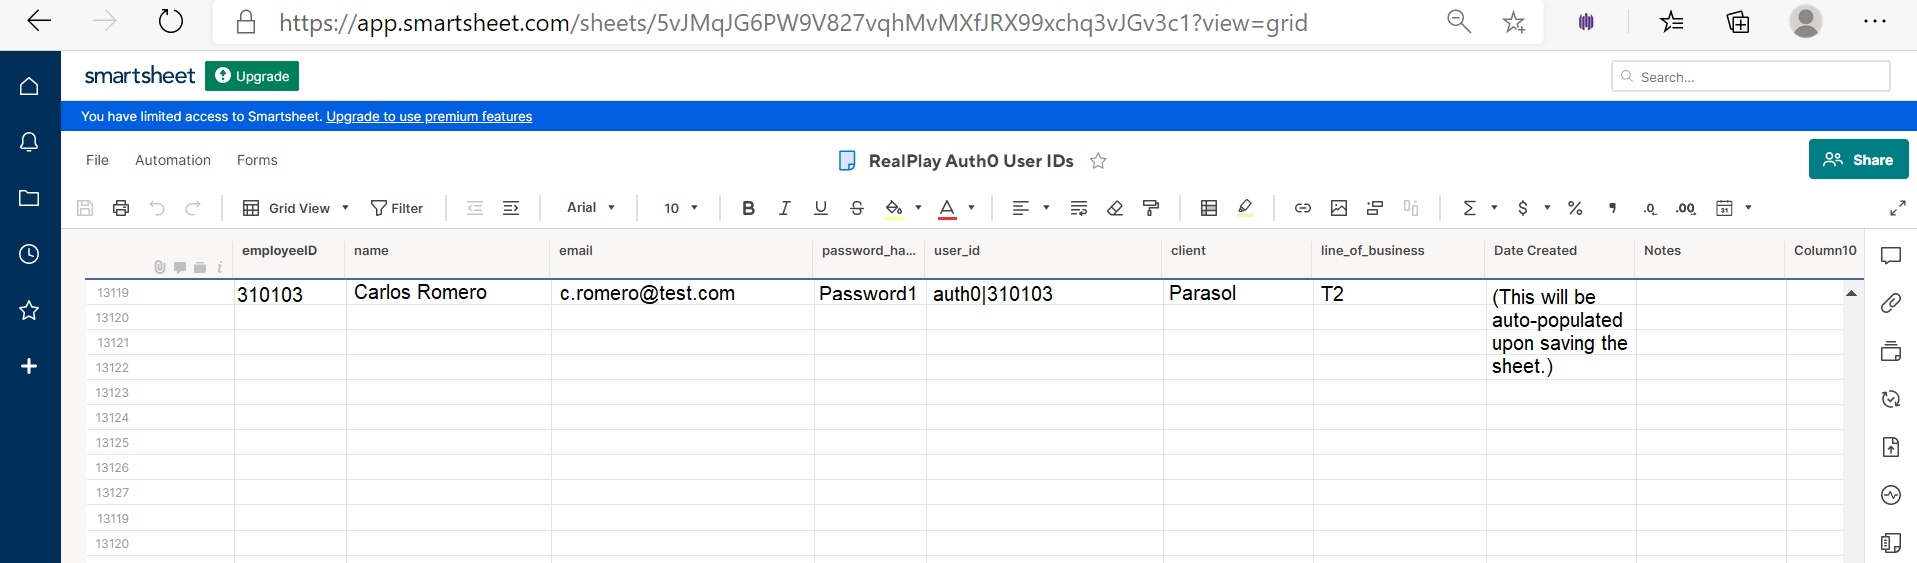
| Column Header | Data to be Entered |
| employeeID | Employee’s ID number |
| name | Name of user |
| Employee’s email address | |
| password | Password1 |
| user_id |
|
| client | Name of client |
| line_of_business | Line of business |
The concatenate function in MS Excel hastens data creation and reduces risk for errors when creating the user_id (only for learners onboarded through the RealPlay™ Admin Portal).
- In cell J2 of your CSV file, type: =concatenate(“auth0|”,E2) and press the Enter key.
Do not forget to include the quotation marks, pipe, and comma.

- From the lower right corner of cell J2, click and drag your pointer to the row of the last entry.
- Clean up duplicate entries in the RealPlay™ BOT Auth0 UserIDs sheets.
- In the RealPlay™ BOT Auth0 UserIDs sheet, find the duplicate entries using the employee ID or email address.
- Copy the employee ID.
- In the RealPlay™ BOT Auth0 UserIDs Smartsheet, press the CTRL+F keys on your keyboard.
- Press the CTRL+V keys to paste the employee ID into the dialogue box and press the Enter key.
- Press the Enter key several times until you find all the matching entries.
- If there are duplicates, compare all the data of the duplicate entries. Check the employee number, name, email, and client.
- If the entries are found to be duplicates, delete the latest entry (the one you have entered in step 1 of this section).
- Repeat the process on each new entry until all the updated entries are found.
NOTE:
The number of duplicate entries usually corresponds with the number of Updated entries in the displayed Results after the csv file import process. Updated entries are those that have already been entered in a previous onboarding and were just updated by the recent file.
Updating the Status of the Onboarding Request
Go back to the RealPlay™ BOT Onboarding Request sheet to update the status of the request.
- Under the Status column, select Complete from the drop-down menu.
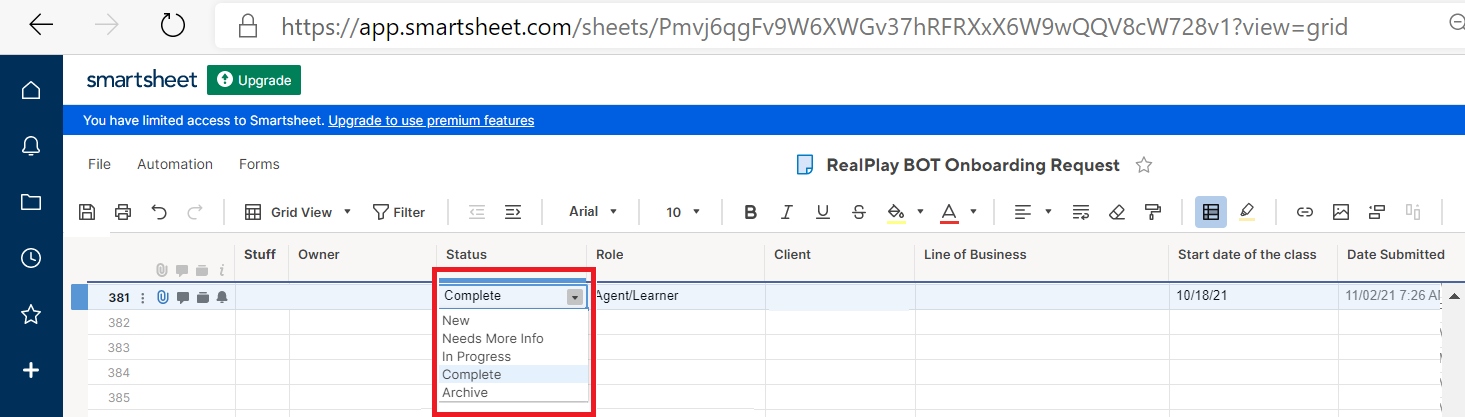
- Click the Save button. An automation/workflow will send the requester an email to inform them of their onboarding request’s completion and of the default password.