Topic Updated: April 01, 2025
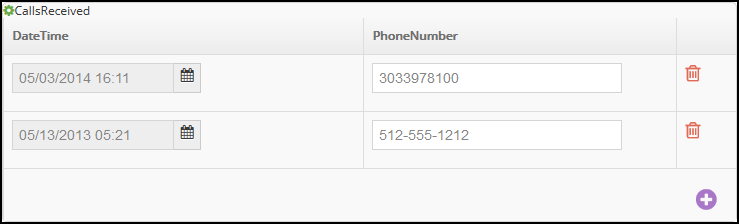
An Example of Date and Time Input
This pane contains the name of the setting (in the upper left corner of the pane), column labels above each column, and two columns arranged in a table format. This input type is similar to An Example of Table Input above. The one difference is the type of input box on the left side of the pane (date and time input boxes).
To set the date and time, perform the following steps:
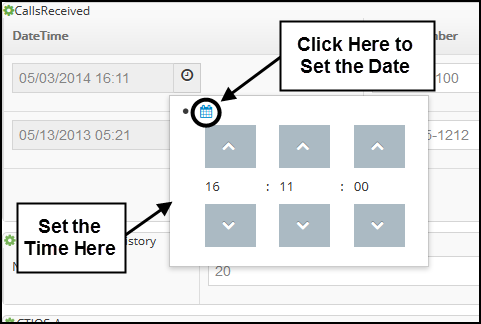
Click on the calendar icon in the right side of the DateTime input box. A Calendar pane opens to enable you to set a date (see the following screen capture).

In the Calendar pane, you can move to an earlier or later month by clicking on the arrows on either side of the name of the month. Make sure that you are viewing the month in which you need to set the date.
With the correct month displayed, click on the date to set the date in the DateTime box.
If you also want to set the time, click on the Clock icon (in the lower left corner of the Calendar pop-up) and then jump to the next step. Otherwise, if you are finished, click outside the Calendar pane to close the pop-up.
When you click on the clock icon, the time pane opens to enable you to set the time (see the following screen capture).
In the Time pane, you can set the time using either of the following methods:
In turn, click on the up or down arrows above and below the hours, minutes, and seconds to change those numbers until the desired time is displayed.
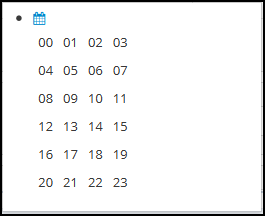
In turn, click once on either the hours, minutes, or seconds numbers to cause the time pane to change to a list of numbers:
If you click on the number representing the hour, the pane displays numbers from 00 to 23 (representing 24-hour time). Click on the number representing the hour to which you want to set the time.

If you click on the number representing the minutes, the pane displays numbers from 00 to 57 in three minute intervals. Click on the number representing the minute to which you want to set the time.

If you click on the number representing the seconds, the pane displays numbers from 00 to 57 in three second intervals. Click on the number representing the second to which you want to set the time.
If you are finished, click outside the Time pane to close the pop-up and set the time. Optionally, you can click the Calendar icon in the upper left corner of the Time pane to return to the Calendar pane to set or reset the date.


Note: For information about setting or updating individual settings, see Profile Settings By Type.
Please let us know how we can improve this topic by clicking the link below:
© TTEC Digital 2025
![]()
![]()
![]()