Topic Updated: April 01, 2025
Assign Users to a Site
To assign users to an existing site, you must be viewing the Locations page. If you are not viewing the Locations page, Working with Locations for information about displaying the Locations page.
To assign users to an existing site, you will be working in the Sites pane (see the following screen capture).
To assign users to an existing site, perform the following steps:
In the Locations page, locate and click on the Edit Users icon (
 ) on the right side of the row that displays the site.
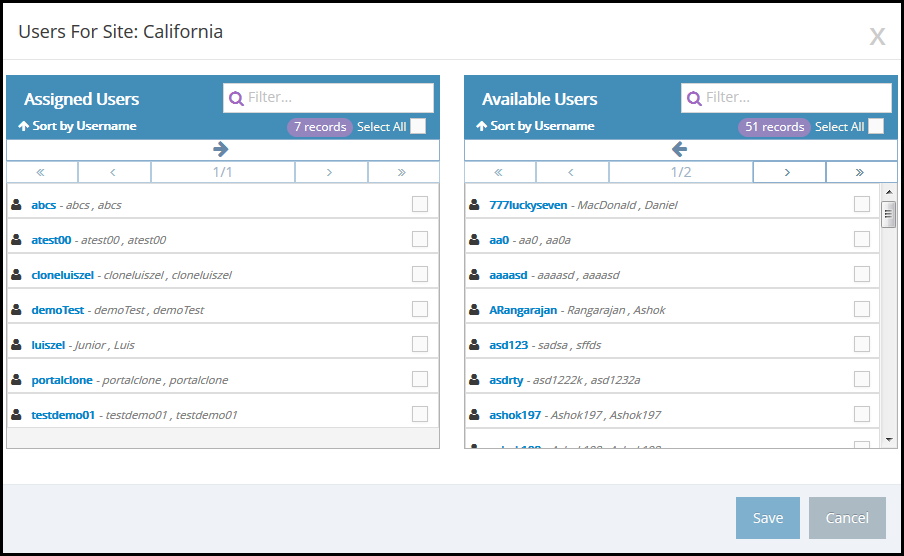
 The Users For Site assignment pop-up window opens to enable you to assign or un-assign users to or from the site. See the following screen capture.
Note: If you are working in a new site, initially the Assigned Users pane will not display any assigned users.
In the Users For Site assignment pop-up window, the Assigned Users pane and the Available Agents pane are displayed with the following information:
The Assigned Users pane on the left side of the assignment pop-up window lists all users that are currently assigned to the site.
The Available Users pane on the right side of the assignment pop-up window lists all users that are available for assignment to the site.
To assign users to the selected site, in the Available Users pane, locate the user or users to be assigned to the site and click in each associated check box to put a check mark into the check box. You can select as many users as is appropriate for the site.
Notes:
You can also perform a search for users using the Filter box in the top of the Available Users pane.
You can re-sort the contents of either pane by clicking on the Sort by Username command in the pane's header.
You can select all agents in the list by clicking on the Select All check box in the top of the pane to put a check mark into that check box.
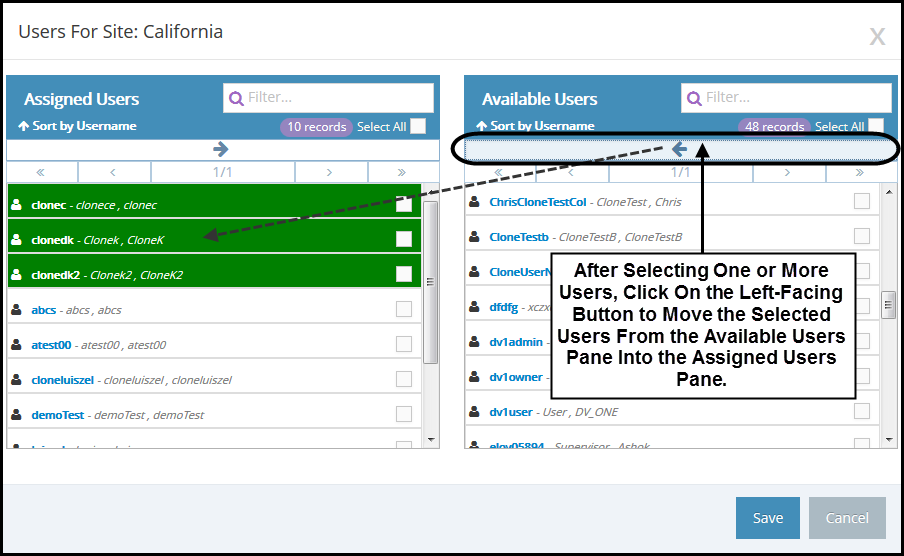
After selecting one or more users in the Available Users pane, click anywhere in the row that contains a left-facing arrow (the Move button) to move all selected agents from the Available Users pane into the Assigned Users pane. The selected users move to the top of the list of users in the Assigned Users pane and their color changes to green.
Notes:
Users that are moved into a different pane are always added to the top of the list of users. If the target pane includes more than one page of users and if you are on a page other than the first page, you must return to the first page to see the users that you moved.
You can both add (assign) and remove (un-assign) one or more users to and from the site in the same task. Continue with the next step for information about unassigning users from the site.
If you click on the Save button now, your changes are saved and a confirmation pop-up is displayed. The confirmation pop-up automatically closes after a few seconds.
To un-assign users from the selected site, in the Assigned Users pane, locate the user or users to be unassigned from the site and click in each associated check box to put a check mark into the check box. You can select as many users as is appropriate to unassign from the site.
Notes:
You can also perform a search for users using the Filter box in the top of the Assigned Users pane.
You can re-sort the contents of either pane by clicking on the Sort by Username command in the pane's header.
You can select all users in the list by clicking on the Select All check box in the top of the pane to put a check mark into that check box.
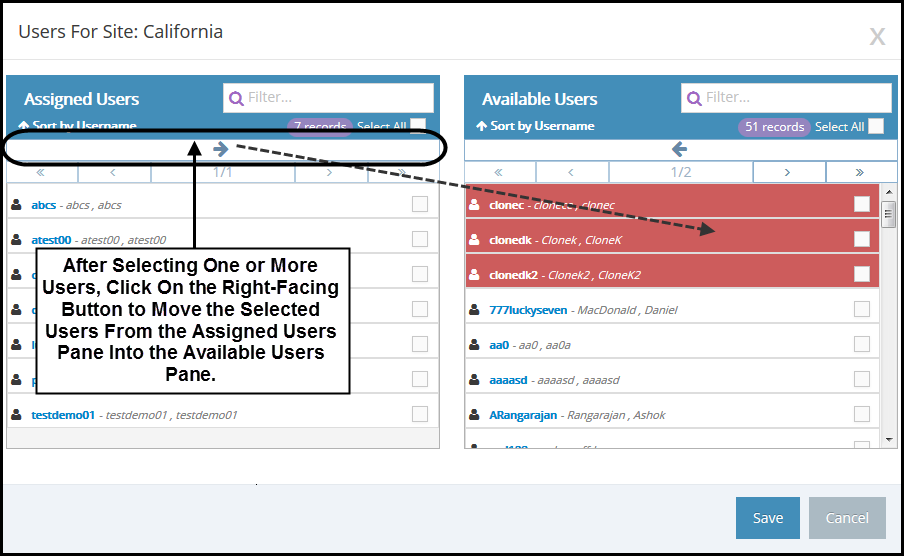
After selecting one or more users in the Assigned Users pane, click anywhere in the row that contains a right-facing arrow (the Move button) to move all selected users from the Assigned Users pane into the Available Users pane. The selected users move to the top of the list of users in the Available Users pane and their color changes to red.
Notes:
Users that are moved into a different pane are always added to the top of the list of users. If the target pane includes more than one page of users and if you are on a page other than the first page, you must return to the first page to see the users that you moved.
Remember that you can both add (assign) and remove (un-assign) one or more users to and from the site in the same task.
After you have finished moving users between the Assigned Users pane and the Available Users pane, click on the Save button to save your updates. The save operation may take a few seconds. When your changes have been successfully saved, a confirmation pop-up window opens and displays the "Users Saved Successfully" message (similar to the following screen capture).
The confirmation pop-up window closes automatically after a few seconds.
Note: If you change your mind about the updates you specified, you can click the Cancel button to discard your changes. When you click on the Cancel button, the Users For Site assignment pop-up window refreshes to display a message warning that you have not saved your changes and the Save button changes to the Continue button (see the following screen capture).
To discard your changes, click on the Continue button. Otherwise, you can click on the Cancel button to return to the previous window to save your changes.
Please let us know how we can improve this topic by clicking the link below:


